Wednesday, December 28, 2022

Cascading Floral Basket ... Inspiration Wednesday with Heartfelt Creations

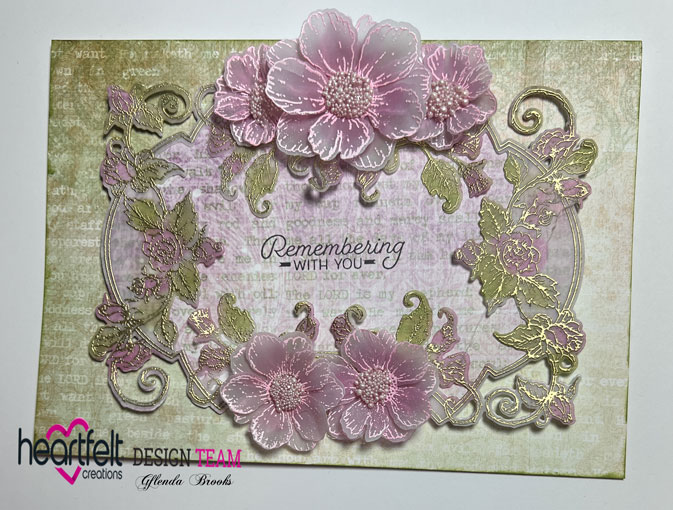
Good morning my friends and welcome!  I'm here this morning to share another card using the Floral Basket Collection from Heartfelt Creations.   It has been cold and snowy here in East Tennessee so this basket just says "Spring" to me.  Most of us have been experiencing terrible weather so I hope you enjoy my card!  You can find it in the Heartfelt Creations Gallery with all supplies used.


My finished card is 5" X 7".  Make card base and cover with a piece of Sheet 6A from the paper collection.

Using HCD2-7384 Fancy Classic Rectangle Frame Die, cut pieces using Deluxe Flower Shaping paper and Luxe Gold cardstock.  Glue white shadow die cut onto card front and glue the gold die cut onto that.  Cut a plain piece of white like the gold piece and use the center portion to layer ontop of the gold die cut.  I used Double Dots to pop it up to give dimension.  Using the smaller oval die from the Royal Elegance Frames,  cut two pieces;  one in gold and one in white.  Use the plain oval die that fits inside this more decorative die and cut a piece of sheet 6A and glue to the center of the oval.  Layer the gold piece behind the white piece shifting slightly so the gold shows through behind.  I used dimensional tape behind this piece to add dimension and give it the appearance of a medallion.  

Stamp the basket onto Deluxe Flower Shaping Paper using Memento Toffee Crunch ink.  Cut out with coordinating die and color using Stack and Store Daubers and Toffee Crunch ink.  Glue the handle onto the basket and glue the basket down onto the medallion piece on the card front. 

Stamp leaves using Leaf Green ink and color using same Leaf Green ink.  Cut out with coordinating die and edge the leaves with Olive ink to give them more dimension.  Lay leaves onto the mold, spritz with water and run through the die cut machine.  Lay aside to dry.

Stamp the flowers onto Deluxe Flower Shaping paper using Buttercup for the yellow flowers, Magenta Hue for the pink flowers, Cactus Flower and Majestic Violet for the purple flowers. Color with same colors and cut out with coordinating dies.  Place on coordinating mold, spritz with water and run through the die cut machine.  Turn out onto the desk to dry. Once dry add Prills to the centers of the petals and allow to dry. 

Once everything is dry, decide on placement and glue down onto card front.


Wednesday, December 21, 2022

Inspiration Wednesday with Heartfelt Creations....

Good morning my friends and welcome to my Inspiration Wednesday post for Heartfelt Creations.  We have entered the final count down for Christmas and everyone is in a mad dash to get everything finished.  Let's take a moment to breathe and you can enjoy my card I have made.  I think the best thing about this card for me is it isn't a Christmas card.  It was a marathon here in my craft room to get all my cards made and ready to go but it is all done and I think I'm ready for this wonderful holiday!

You can see my card in the Heartfelt Creations Gallery with all the supplies used to make this one.  


My card size is 5" X 7".  Make card base and cover with a piece of Sheet 1B of the paper collection.  Set aside while we work on all the elements.

Stamp the basket and floral using Rich Cocoa and color the basket with Rich Cocoa ink and a Stack and Store Dauber.  Color the florals with Prisma Color pencils, odorless mineral spirits and blending stumps. Stamp the bow with Goldenrod ink and color with a dauber and Goldenrod ink.  Cut everything out with coordinating dies and glue everything together to make the floral basket.

Stamp the sentiment with Goldenrod ink and cut out with Ornamental Tags Die and set aside. 

Using white cardstock and the Luxe Gold Cardstock cut out one each of the Regal Lattice Gateway Die.  Glue these two pieces together with the gold piece under the white and offset a bit so it shows through.  
Use the archway die from the set to cut out a piece of white cardstock and place it in the Embossing Folder and run through the die cut machine.  Glue this piece on top of the two die cuts creating a sort of medallion. 

Now glue the basket to the top of this medallion piece and using dimensional tape glue down the sentiment.  Now add dimensional tape to the medallion piece and adhere to card front.  The card is finished.  


Wednesday, December 14, 2022

Introducing the Floral Basket Collection from Heartfelt Creations...

Good morning everyone and welcome as we happily introduce the brand new Floral Basket Collection from Heartfelt Creations!  Let me just say you are going to love this collection.  It brings memories of garden parties with tables filled with baskets of flowers!  You can find my card in the Heartfelt Creations gallery with a listing of all the products used.  


My finished card size is 5" X 7".  Make card base using the Deluxe Flower Shaping Paper.  Cover with a piece of Sheet #8B and set aside.

Cut out the Fancy Classic Oval Frame twice, once with white cardstock and once with Luxe Gold cardstock.  Glue the two pieces together off setting just a bit so the gold shows through behind the white piece.  Glue to card front.

Stamp the florals for the basket onto watercolor paper using black ink.  Color with a brush and the Zig colored markers.  Add glitter to the Baby's Breath and allow to dry. Cut out with coordinating die.

Stamp the basket onto white cardstock using Rich Cocoa ink and color with the Stack and Store Daubers and Toffee Crunch ink. Cut out with coordinating dies.  Glue the florals onto the basket and cut a slit in the flowers then slip the basket handle into this and glue down.  Slide the base of the basket into the bottom of the Fancy Classic Oval Frame and glue down.  I added Double Dots to the top part of the flowers to add some dimension.  Glue down.  The card is finished.


Wednesday, December 7, 2022

wild Rose Curved Border....

Good morning my friends!  It's Wednesday and once again time to share another card with you that I have made using Heartfelt Creations products.  You can find a photo of my card and all the details in the Heartfelt Creations Gallery.


My card size is a slimline 4" X 9".  I used The Deluxe Flower Shaping Paper and made the card base.  Cover the front with a piece of Sheet 3A of the paper collection.  Cover the inside of the card with a piece of Sheet 1B of the paper collection. Using the curved border die and one of the decorative dies that does not cut an edge, cut the front piece of the card giving a beautiful cut out border to the card front.  I think the die I chose is quite simple but elegant and I just love the way it looks.  

Stamp the flower petals using Magenta Hue ink and color the centers with Golden Rod ink and then the edges with Magenta Hue.  Cut out with coordinating dies. Spritz with water and lay onto the mold then run through the die cut machine.  Turn out onto the desk to dry.  Stamp the leaves with Leaf Green and then color with same Leaf Green ink.  Cut out with coordinating dies and then edge them with Olive ink to give them more dimension.  Lay onto coordinating mold and spritz with water then run through the die cut machine.  Turn out onto the desk to dry.  

When everything is dry hot glue two petals of the flowers together then add Prills to the centers of these.  Decide on placement and glue down using hot glue.  The card is finished.  

Wednesday, November 30, 2022

Sunflower Love....

Good morning friends and welcome!  I have a card to share with you this morning using the new Cyber Monday Die from Heartfelt Creations.  This is another gorgeous die and I can see myself using this quite often in the future.  You can see my card in the Heartfelt Creations Gallery as well as all the products used to make it!


I love this die and think it makes a lovely slimline card and it's very quick and easy!  

My finished card size is 4" X 9" which is a slimline card size. Make the card base using white cardstock and cover with a piece of Sheet 8B from the paper collection. Set aside while we work on the rest of the elements.

Die cut the Star Lattice Rectangle Die out of white cardstock. Then cut the outline die for the smaller center piece of the die. I did one in white cardstock and then I cut another piece using a piece of Sheet 7B of the paper collection. Glue the three pieces together making a sort of center medallion for the card. Using a Hydra Sponge and Designer Dries Clear Glue add Crystal Clear Glitter to the larger die cut of the Star Lattice Rectangle Die. Set this aside to dry. Once dry glue down on the card front. Now take the smaller medallion and adhere it to the center of the card front using Double Dots to add dimension.

Now we are going to work on the sunflowers. Stamp the petals onto Deluxe Flower Shaping Paper using Memento Cantaloupe ink. I colored these petals in layers of color beginning with Dandelion, then Sunflower and lastly I used Goldenrod. Die cut these petals using coordinating dies and add Morocco ink onto the edges of the petals as well as the center of the petals. Next using Leaf Green ink, stamp and color the leaves and cut out using coordinating dies. Use Olive ink to add dimension to the leaves by going over the centers as well as the outside edges of the leaves. Now lay the petals and leaves onto the shaping mold spritz with water and run through the die cut machine. Turn out onto the desk to dry. Once dry using 3D Crystal Lacquer and a brush paint the flowers and leaves. This deepens the colors and adds a beautiful sheen to everything. Allow to dry. Once dry use hot glue to glue two flower petals together and then add a clump of hot glue to the centers and spoon Power Outage Prills over this. Once the glue hardens your flowers are ready to go onto the card front. Decide on placement of flowers and leaves and hot glue down and your card is ready to go.


Friday, November 25, 2022

Heartfelt Creations - Black Friday Release....

Good morning friends and welcome to the Heartfelt Creations Black Friday Release!  So many dies...so little time!  I have absolutely fallen in love with these dies and I just know you are going to as well.  You can find my card in the Heartfelt Creations Gallery with all the products used.


My finished card size is 4" X 8 1/2".  Make card base and cover with a piece of Sheet 10B of the paper collection.  Cut a piece of white cardstock 3 1/4" X 7 3/4" and use one of the Slim Basics Rectangles dies to cut a piece of sheet 3A and glue together.  Adhere to card front using dimensional tape to add dimension.  Cut the Slim Lattice Oval Die out of white cardstock and then cut it apart about half way down.  Using a Hydra Sponge and Designer Dries Clear Adhesive add Crystal Clear Glitter and set aside to dry.  When dry glue down on the card front.

Using a piece of Sheet 6B cut out the small oval in with the Slim Lattice Oval die and then cut another out of Sheet 9B.  Stamp the sentiment onto the light pink piece and glue it into the center of the dark pink die on the card front.  

Stamp the flower petals onto Deluxe Flower Shaping Paper with Magenta Hue ink and then color the edges with Magenta Hue as well.  Color the centers with Leaf green and then cut out with coordinating dies.  Lay on the mold, spritz with water and run through the die cut machine then turn out onto the desk to dry.  Glue two petals together to form the larger flower and add Prills to the center.  Also add Prills to the centers of the smaller petals as well.  

Stamp the leaves onto Deluxe Flower Shaping Paper with Leaf Green ink and color with Leaf Green ink as well as some splashes of Magenta Hue ink.  Cut out with coordinating dies and place onto the shaping mold, spritz with water and run through the die cut machine.  

Stamp the Dragonfly onto the Vellum and again on Deluxe Flower Shaping paper using Paradise Teal ink and emboss with gold embossing powder.  Color using Leaf Green and Paradise Teal inks and cut out with coordinating dies.  Glue the two pieces together making the dragonfly look like it is in flight.  

Decide on placement of flowers, leaves and the dragonfly.  Glue down and the card is finished!

Saturday, November 19, 2022

Christmas Card ... 2022

Like most of you I have been working on my Christmas cards lately and I will be sharing one or two with you in the coming days.  I have really been striving to make cards that can mail with a first class stamp because of the very high postal rates.  A card with 3D flowers and packed in one of the plastic boxes Heartfelt Creations has in their shop can cost almost $5.00 to mail.  I have a few that I spend that kind of money on but not many.


The hero of this card is the Filigree Accents die which is one of the latest released by Heartfelt Creations. I layered a bit of gold behind the die to jazz it up a bit.  Then Heartfelt Creations pretty poinsettia and some gold fillers and it will be all set.

I hope you enjoy my card!  Have a lovely weekend!

Wednesday, November 16, 2022

More Inspiration with the Friendship Rose Collection from Heartfelt Creations...

Good morning friends and welcome.  I'm here this chilly Tennessee morning to share with you another card I made using the Friendship Rose Collection from Heartfelt Creations.     My card is titled Locked Hearts and I just love how it turned out!  You can find it in the Heartfelt Creations Gallery with all the products used.


My card size is 5 1/2" X 7 1/2".  Make card base using the Deluxe Flower Shaping Paper. It is quite sturdy and makes a great card base.  Cover with a piece of Sheet 4B of the paper collection cutting it at 5 3/8" X 7 3/8".  

Using the Filigree Companion Frame die cut a piece of Sheet 4A and set aside.  Using the decorative frame cut a piece of Luxe Gold cardstock and glue this to the die cut.  

Cut three of the decorative hearts, then cut two of the hearts so  you can entertwine the three hearts together.  Glue down and then trim so the center heart does not have any of the other two dies showing inside the heart opening.  Use a hydra sponge to add glue and then glitter to the hearts and set aside to dry.  Once dry glue the hearts to the card front.  

Stamp the Budding Rose Heart onto white cardstock and use the Prismacolor pencils to color. Cut out using coordinating die and adhere this to the center heart.  The card is finished.  

Wednesday, November 9, 2022

Debuting the Friendship Rose Collection...

Good morning my friends!  It's time for another Heartfelt Creations Release and the Friendship Rose Collection is quite Beautiful.  Heartfelt Creations has done it again with this lovely collection and I just know you are going to love it.  You can find my card in the Heartfelt Creations Gallery  with a listing of all products used to make my card.  

My card size is 5 1/4" X 7 1/4".  Make card base and add a layer of Luxe Gold Cardstock.  Add another layer of Sheet 3A of the paper collection.  Set aside while we go to work on the die cuts and Rose Heart.

Cut two of the largest dies of the set; one is gold and one in white. Cut the next smallest die out of the white die cut and it leaves a heart opening showing the gold piece behind it.  Offset these and glue together so the gold just peeps through behind the white.  Cut the decorative heart shaped die out of white cardstock and set aside while we work on the coloring of the rose stamp.

Stamp the Friendship Rose Cling Stamp onto white cardstock and color with the colored pencils.  Cut out using coordinating die.  I used the Designer Dries Clear adhesive and added dots of glue onto the image where I wanted to add glitter.  Add the glitter and allow to dry.

Glue this colored heart onto the decorative heart shaped die cut then add to card front using Double Dots to add dimension.  The card is finished.  


Wednesday, November 2, 2022

Another Inspiration Wednesday with Heartfelt Creations....

Good morning everyone and welcome!  Come on in and sit a spell!  I'm here this morning to share another project for Heartfelt Creations.  


You can see this card in the Heartfelt Creations Gallery with all the products used listed there!  

The finished card size is 6" X 6".  Using the Rounded Sunlight Window die cut a circle out of Page 5A and glue to the circle of the card front.  Next I die cut the window dies from the same die set out of Gold cardstock and glued them to the card front. Now we need three 6" X 6" card fronts to cover the card front and the inside.  I used sheet 9A and 11A and just chose some card fronts that were appealing to me.  The beauty of this paper collection is it is coordinated to work together so you can't go wrong in your choices! 

I stamped the sentiment using Jet Black ink onto a piece of Sheet 5A and cut out using the Arrows and Banners die.  Edge this die cut with Leaf Green ink.  Cut a banner using white cardstock and glue the piece that has the sentiment go it.  This gives the sentiment a bit more stability.  Glue this banner to the inside of the card.

Now let's work on our flowers.  Stamp the flower petals onto Deluxe Flower Shaping paper using Magenta Hue ink and color using the Stack and Store Daubers and Magenta Hue Ink.  Cut out with coordinating dies.  Lay the petals onto the mold, spritz with water and run through the die cut machine.  Turn out onto the desk to dry. At this point I used the Deluxe Flower Shaping kit to apply pressure to the center of the petals and make a place to hold the Prills.  Once dry glue two petals together and add prills to the center.  Stamp the leaves onto Deluxe Flower Shaping Paper with Leaf Green ink.  Color with same ink and cut out with coordinating dies.  Lay onto the mold, spritz with water and run through the die cut machine.  Turn out onto the desk to dry.

Decide on placement of flowers and leaves and hot glue down.  The card is finished!


Wednesday, October 26, 2022

Inspiration Wednesday with Heartfelt Creations...

Good morning friends and welcome!  This morning I am continuing along with the Elegant Rose Frames Collection from Heartfelt Creations.  I find I am in love with this collection as it is so easy to use to have a quick and simple card that really packs a punch.  You can find my card in the Heartfelt Creations Gallery with all the instructions and a product list. 


My finished card size is 5" X 7".  Make card base and cover with a piece of Sheet 4A.  Set aside while we work on the rest of the card.

Using the largest die in the Elegant Rose sentiment die, cut two.  One out of white cardstock and one out of Sheet 5A of the paper collection.  Using the large oval die in the same set cut an opening in the white cardstock die cut.  Glue this piece to the green die cut which allows the green sheet to show through.  Using a Hydra Sponge and Designer Dries Clear Adhesive add glue to the edges of the die and apply Crystal Clear Glitter.  Allow to dry.  

Using the next size down oval, die cut two.  One in white cardstock and one in Luxe Gold Cardstock.  Glue the two together and allow a bit of the gold cardstock to show.  Using Eyelet Oval and Basics Large die set pick a die that will fit the fancy die cut and cut out using a piece of Sheet 4A of the paper collection.  Glue to the die cut and allow to dry.  

Using dimensional tape adhere the larger die cut to the card front and then again using dimensional tape, adhere the gold and white die cut to the larger oval.  

Now we are going to work on the sentiment.  Stamp the Sentiment onto Deluxe Flower Shaping Paper using Magenta Hue ink.  Using the Stack and Store Daubers, add Magenta Hue ink to the flowers and the word Birthday.  Add Leaf Green ink to the leaves and then cut out using coordinating die.  Glue to the card front and your card is ready to go.  

This card should be able to mail with a First Class Stamp. 

Wednesday, October 19, 2022

Remembrance Wild Roses - Elegant Rose Frames Collection

Good morning friends and welcome.  I'm here this morning to share another card using the Elegant Rose Frames Collection from Heartfelt Creations.  You can find my card in the Heartfelt Creations Gallery with all the products used and instructions. I love how this card turned out; the vellum makes it so elegant.


My finished card size is 5" X 7".  Make card base and cover with a piece of Sheet 3A of the paper collection.  

Stamp the Elegant Rose Frame onto vellum using Paradise Teal ink.  It doesn't matter what color ink you use, the embossing powder is going to cover the color.  Emboss using gold embossing powder.  Color the roses and leaves using Leaf Green and Magenta Hue ink I used the stack and store daubers because the pointed tips are perfect for coloring in tight places.  Use the coordinating dies and cut out the frame.  I also cut a frame from Sheet 4A of the paper collection but I did not use the die that cuts out the center.  Glue this piece behind the frame.  Stamp the sentiment using Jet Black ink into the center of the framew. I used dimensional tape to pop this frame up from the card front giving it a bit more dimension.  

Now lets work on the flowers.  Stamp the petals onto vellum using Magenta Hue ink and emboss using white embossing powder.  Cut out using coordinating dies.  Color the petals with Magenta Hue using the Stack and Store Daubers.  I used the Deluxe Flower Shaping Kit and the Golf tools to hand shape the petals.  Glue two petals together to form the flowers.  Put a puddle of hot glue in the center of the flowers and add the Prills.  Allow this to dry.  Decide on placement for the flowers and hot glue down.  The card is finished.  

This was a quick and easy card when all was said and done and it makes a beautiful presentation!

Wednesday, October 12, 2022

Debuting the Elegant Rose Frames Collection with Heartfelt Creations...

Good morning everyone and welcome!  I'm here this morning introducing the Elegant Rose Frames Collection from Heartfelt Creations!  This collection makes it easy for us to make beautiful framed cards for all occasions!  You can find my card in the Heartfelt Creations Gallery here:  


My card is 4 1/4" X 5 1/2".  Make card base and cover with a piece of 10A of the paper collection.  This sheet has different card fronts and I chose a couple of these to use on the front of my card.

Stamp the pretty Stylish Rose Frame onto watercolor paper using Jet Black ink and cut out with coordinating die.  Use Zig Clean Color markers and the water brush to color the roses and greenery and set aside to dry.  I added glitter to the filler around the roses to soften it a bit.  

Stamp the rose petals onto Deluxe Flower Shaping Paper and color with Leaf Green in the centers and Magenta Hue on the edges.  I also colored the backs of these petals.  Cut out using coordinating dies and lay onto the shaping mold and spritz with water.  Run through the die cut machine and turn out onto the desk to dry.  Once dry use hot glue to add several layers of petals to form the rose.  I added the Prills to the center of the flower and set aside to dry.  I used a Hydra Sponge to add adhesive to the petals and then dusted with the glitter.  Set aside to dry.  

I cut a shadow of the frame using another card front from Sheet 10A of the paper collection and glued the colored and glittered frame to that.  I stamped the sentiment using Magenta Hue ink and added dimensional tape to the back and adhered it to the card front. Decide on the placement of your roses and hot glue them down.  

Tie a droopy bow using white ribbon and glue it under the roses on the bottom of the frame. The card is finished.  


Wednesday, October 5, 2022

Inspiration Wednesday with Heartfelt Creations...

Good morning friends and welcome.   I'm here this morning to share another card with you that I have made using the Hollyhock flowers from Heartfelt Creations.  I made yellow flowers and have used a yellow layer under the flowers.  It makes a very happy and sunny card I think.  You can find my card in the Heartfelt Creations Gallery with a list of all products used to make it.


My finished card size is 5" X 6".  Make card base and set aside.  Cut a piece of yellow cardstock 4 7/8" X 5 7/8" and take one of the Filigree Border and Accents dies and cut it out along the bottom of the yellow cardstock piece.  Glue this down.

Pick one of the card fronts from sheet 10A of the Paper Collection and cut a piece to fit onto the yellow piece of cardstock and glue it down.  

Next cut one of the Rectangle die using white cardstock and then cut the next size down out of the card fronts of Sheet 10 A of the paper collection.  Edge with Vivid Chartruese glue to the die cut piece.  Use Double Dots to adhere to card front.  I cut the next to smallest of the rectangles using white card stock and then I stamped the sentiment onto a piece of white cardstock using Jet Black ink and cut out with the smallest rectangle of the die set.  I used the blending brush and Vivid Chartruese to color the white piece of cardstock and it turned out to be a perfect match to go with the rest of the pieces.  Glue these two rectangles together and I used dimensional tape to adhere to card front.  At this time I used the blending brush and Vivid Chartruese ink and sent along the bottom of the card front turning the white to a perfect pretty shade of green.

Next we will work on the flowers.  Stamp the petals with Memento Dandelion ink and color the edges with the same Dandelion ink.  Stamp the leaves with Leaf Green ink and color with same and then edge with Olive to add dimension.  Cut out using coordinating dies.  Lay flower petals and leaves onto the shaping mold, spritz with water and run through the die cut machine.  Turn out onto the desk to dry.  At this point I used the Flower shaping kit to add a bit more dimension to the flowers.  Once the flower petals are dry, glue two together to form the flower.  Add Prills to the centers and allow to dry.  Decide on placement and glue down with hot glue gun.  

Wednesday, September 28, 2022

Debuting the Filigree Frame and Borders Dies - Heartfelt Creations...

Good morning friends!   Today is the day Heartfelt Creations releases the new Filigree Frame and Border Dies and I'm so excited to share my card with you! You can find my card in the Heartfelt Creations Gallery with a listing of all the products used to make my card.


My finished card measures 6" X 7".  Make card base and cover with a piece of Sheet 12B of the paper collection.  

Using the largest die of the Oval Filigree Frame Set cut one out of white cardstock.  Use a Hydra Sponge and Dries Clear Adhesive and add Crystal Clear Glitter to the edges.  Set aside to dry.  Using the oval die cut a piece of Sheet 8B of the paper collection.  Use dimensional tape to adhere to the center of the large die cut. 

Using the next smaller die, cut two pieces; one white and one gold. On the white one cut out the next smallest die.  This allows the gold to show through the smaller die cut.  Offset the two and glue together just so the gold peeps through the edges.  Glue this to the card front.

Stamp the sentiment onto a piece of Sheet 6B of the paper collection then die cut using the smallest oval die in the set.  Glue this to the card front.

Now we are ready to work on the flowers.  Using Magenta Hue stamp the flower petals.  Ink the center with Light House ink and then color the rest with Magenta Hue.  I also colored the back sides of these petals.  Cut out with coordinating dies.  Stamp the leaves with Leaf Green and then also color them with Leaf Green ink.  Cut out with coordinating dies and then use Olive to go around the edges of the leaves.  Lay flower petals and leaves onto the Mold; spritz with water and run through the die cut machine.  Allow to dry.  Once dry use a Golf Tool to punch a hole in the center then run a stamen through the hole of two petals and use hot glue to hold into place.  Set aside.

Decide on placement of flowers and leaves and hot glue down.  The card is ready to go. 

Wednesday, September 21, 2022

Inspiration Wednesday with Heartfelt Creations...Continuing on with the Hollyhock Garden Collection...

Good morning my friends and welcome to my blog!  As we continue along with the Hollyhock Garden Collection from Heartfelt Creations,  I'm offering a slimline card this morning.  You can find my card in the Heartfelt Creations Gallery with a listing of all products used to make it. 


 My finished card size is 3 1/2" X 6 1/2".  Make card base and cover with a piece of Sheet 8B of the paper collection.  Cut a piece of white cardstock 3" X 6" and cover with a piece of Sheet 12B.  

Cut two of the French Gate Dies; one from White Cardstock and one from Gold.  Glue together offsetting a bit so the gold shows through behind the white. Glue to the 3" X 6" piece of white cardstock then glue to the card front.

Stamp the flowers onto the Deluxe Flower Shaping Paper using New Sprout and cut out using coordinating dies.  Color the center with New Sprout and the edges with Magenta Hue the the very edges with Vibrant Fuschia.  I colored front and back of the petals.  Lay onto the shaping mold, spritz with water and run through a die cut machine.  Turn out on the desk and allow to dry.  I also did a bit more shaping with the Deluxe Flower Shaping Kit at this point.  Once the petals dry add the Prills to the center and allow to dry.

Stamp the greenery from the Hollyhock Fence and the Hollyhock Stems and Blooms using Leaf Green then color using Leaf Green and brush the edges with Olive to add a bit of depth. I used hot glue to add the flowers to the greenery then I hot glued to the card front.  The card is finished. 

Wednesday, September 14, 2022

Debuting the Hollyhock Garden Collection with Heartfelt Creations...

Good morning friends and welcome!  This morning Heartfelt Creations is introducing the brand new Hollyhock Garden Collection!   This week I chose to make a tag using these lovely flowers and I hope you enjoy it.  You can find all the details of my tag in the Heartfelt Creations Gallery!


The finished size of my tage is 4" X 6".  Using the Album Tags and Accents Die cut a tag from a piece of the Deluxe Flower Shaping Paper.  Place the tag into the Embossing folder and run through a die cut machine.  

Using a piece of Sheet 12B cut one of the scalloped shaped dies and then cut a smaller shaped piece using one of the 6" X 6" panels on Sheet 10A.  Glue the two pieces together and then adhere to tag using dimensional tape.

Stamp the flowers onto Deluxe Flower Shaping Paper using Memento New Sprout ink.  Color the center of the petals with New Sprout and the outer edges using Archival Magenta Hue.  I colored front and back of the flowers.  Cut out with coordinating dies.  Lay onto the shaping mold and spritz with water then run through the die cut machine.  Add a bit more shaping with the Deluxe Flower Shaping Kit and allow to dry.  Add the Prills to the center of the flowers and allow to dry.

Stamp the Hollyhock Stems and Blooms onto Deluxe Flower Shaping Paper using Fern Green ink.  Color with Leaf Green ink and edge with a bit of Fern Green to add a bit of dimension.  Glue to the shaped medallion piece and decide on placement of flowers and glue them down using hot glue.

Stamp the sentiment with Magenta Hue and cut out using the Arrows and Banners die.  Edge with Magenta Hue ink and use dimensional tape to adhere to the front of the tag.

Add glitter to the flowers using a Hydra Sponge and Designer Dries Clear Adhesive.  Allow the glitter to dry.

Punch a hole in the top of the tag and tie the ribbon through and the tag is ready to go.

Wednesday, September 7, 2022

Inspiration Wednesday...Poppy Gateway Fold Card...

Good morning my friends and welcome to my blog.   I'm here this morning to share another Heartfelt Creations card I have made.  I hope you enjoy it as much as I enjoyed making it!  You can find my card in the Heartfelt Creations Gallery and there you can see all the items used to make it.  


The finished size of the card is 5" X 7".  Using the Gateway Fold Card, cover the front with a piece of Sheet 8B of the paper Collection.  I used the Large Outline die of the Teardrop Lattice Gateway Die for this.   I cut the decorative portion of the die using white cardstock.  Glue this piece onto the card front.  I cut another of the large outline die using a piece of Sheet 3A and glued this to the back of the card front.  Now lay the smaller archway die from the set onto the card front being careful to center on the decorative die cut.  Run this through the die cut machine and it should cut an opening through all these layers.  I had to run this through about 3 times to get the die to cut cleanly.  


Using the large Gateway die, cut two pieces out of Sheet 4A of the paper collection.  Glue these two pieces to the next two pages of the Gateway Fold card.  This covers all the inside portion of the card.  

Stamp the flower petals with Poppy Archival ink onto the Deluxe Flower Shaping Paper. Color the centers of the flowers with Leaf Green ink using the Stack and Store Daubers.  Color the rest of the petals with the Poppy ink and remember to do the back as well.  Cut out using the coordinating die. Lay onto the mold, spritz with water and run through the die cut machine.  Allow to dry then glue two petals together to form the flower.  Add the Prills to the center of the flowers and allow to dry.  

Stamp the Poppy Accents and the Leafy Accents onto the Deluxe Flower Shaping Paper using Fern Green.  Color using Leaf green and  the Stack and Store Daubers then go around the edges with Fern Green ink to add some shading to the leaves.  Cut out using coordinating dies. Lay the Leafy Accents onto the mold, spritz with water and run through the die cut machine.  Allow to dry.  


Wednesday, August 31, 2022

Divine Messenger....Inspiration Wednesday with Heartfelt Creations

Good morning my friends and welcome!  Another Heartfelt Creations Wednesday has rolled around and it is time to share another card I have made.  You can find my card in the Heartfelt Creations Gallery.  All the products used on my project are listed there.  


My card base is 4 1/4" X 5 1/2".  Make card base and cover with a piece of sheet 8B of the paper collection.

Stamp the background stamp onto white cardstock using Night Sky ink and emboss with silver embossing powder.  Use dimensional tape to attach to card front. Cut an oval from Sheet 8B of the paper collection and attach to card front with dimensional tape.  

Stamp the angel onto vellum using Night Sky ink and emboss with silver embossing powder.  Cut out with coordinating die.  Stamp the angel using Night Sky onto white cardstock and cut out with coordinating die.  Glue the two die cut angels together.  Glue the angel to the oval on the card front.  

This quick and easy card is finished and can be mailed using one first class stamp.


Wednesday, August 24, 2022

Inspiration Wednesday with Heartfelt Creations....

Good morning friends and welcome.  Wednesday has rolled around once again and I get to share another Heartfelt Creations project.  You can see my project in the Gallery with a listing of all the products used.


My finished card size is 3 1/2" X 6 1/2".  Make card base and cover with a piece of Sheet 9B of the paper collection.  Using The French Gate Die cut a piece of Sheet 12B with the larger rectangle.  Use dimensional tape and adhere to card front.  Using white cardstock cut out the French Gate Die and also cut one using the Luxe Gold card stock.  Glue these two pieces together so the gold shows under the white.  Glue to card front.  

Stamp the flowers using Leaf Green and color with various colors of Archival inks.  You can use your imagination here and color these the way you love them.  I used Magenta Hue and Vibrant Fushia, Sunflower and then Ultra Marine Blue and Manganese Blue.  The greens are Leaf Green and Olive.  Use coordinating dies to cut out the florals.

Apply Crystal Lacquer to the blooms of the florals and sprinkle with glitter then set aside to dry.   

Stamp the dragonfly onto Flower Shaping Paper and also onto the Vellum using Archival Jet Black ink.  Emboss both pieces with gold embossing powder then use coordinating dies to cut out.  I colored with Forget Me Not and Cactus flower.  Glue the Vellum dragonfly and the paper dragonfly together and lift up on the vellum dragonflies wings.  Glue to the top part of the card. 

Decide on the placement for the flowers then glue down with hot glue.  The card is finished.

Wednesday, August 17, 2022

Happy Heartfelt Creations Birthday Celebration.....

Good morning my friends and welcome to the Heartfelt Creations Birthday Celebration.  I am featuring the Birthday Celebration Die on my card this morning and I hope youy like it!  You can find my card in the Heartfelt Creations Gallery with instructions and a list of all products used.  
 

My finished card size is 5" X 7".  Make card base and cut a piece of black cardstock to be 1/8" smaller and glue to card base.  Cut a piece of Sheet 8B of the paper collection 4 3/4" X 6 3/4" and glue on top of the black cardstock.  

Stamp flowers using Archival Poppy ink and color with same and a bit of Archival Leaf Green in the center.  Cut out using coordinating dies and then add a bit more Poppy ink to the edges of the petals to give it a darker look. Lay onto the mold and spritz with water. Run through the die cut machine to shape and turn out onto desk to dry. Using a Hydra Sponge add 3D Crystal Lacquer to the petals and set aside to dry.  When dry, hot glue two petals together to form the flower.  On the larger flowers add a ring of glue to the center and Power Outage Prills.  Allow to dry then add some glue and Ribbit Prills to the very center of the flowers.  Allow to dry.  I stamped the leaves with Leaf Green ink and cut out with coordinating dies.  Color with Leaf Green ink and add a bit of Olive ink to the outer edges to make the leaves a bit darker.  

Using white cardstock cut out the Diamond Fluer Die.  I only used the smaller piece of the die cut and glued it to the bottom of the card front.  Decide on placement of flowers and leaves and glue down using hot glue.  

Stamp the sentiment onto white cardstock using Poppy ink and die cut with the Arrows & Banners die. Edge the Banner die cut with the Poppy ink.  Slide the end under the flowers and curl it so it lays easily onto the card front.  The card is finished.

Wednesday, August 10, 2022

Introducing the Joyous Noel Collection from Heartfelt Creations....

Good morning my friends and thank you for stopping by as we introduce the Joyous Noel Collection from Heartfelt Creations!  This is another wonderful collection to help you create more gorgeous Christmas cards that are elegant yet so quick and easy!  I have created a Christmas pocket card graced by one of the beautiful angels and a harp.  The elegant pocket holds Christmas tags and anyone would love to receive this in their mail box during the holiday season!  You can find my card in the Heartfelt Creations Gallery here.  You can find all the products used there.


The finished card size is 5" X 7".  Make card base and cover with a piece of Sheet 2B of the paper collection and put aside while we do the die cutting.  

Using white cardstock and Luxe Gold Cardstock cut one each of the Noel Decorative Die then glue the gold die cut to the back of the white die cut just letting the gold show through a little bit.  Glue this to the bottom of the card front making a pocket.

Using the tag die, cut tags from Sheet 2A of the paper collection then cut the larger tag out of the Luxe Gold Cardstock.  Glue them together and stick down into the pocket.

Stamp the angel and harp onto vellum using VersaMark ink and emboss using gold embossing powder.  I also embossed the angel's halo on the Noel Decorative die to just add a bit of interest.  Cut out the harp and Angel with coordinating dies and use Archival Night Sky ink and a sponge dauber to color the gown of the angel.  I used Pink Peony to color the face and hands of the Angel and Sunflower for her hair.  I didn't color the wings.  I backed the angel and the harp with white cardstock and used dimensional tape to glue to the card front.

I went to Sheet 4A and picked out a sentiment and cut it out.  I used my scissors and just eye balled it to cut out the notch.  I used dimensional tape to adhere to card front and the card is finished.

Wednesday, August 3, 2022

Inspiration Wednesday ... A Slimline Merry Christmas Card ...

Good morning friends and welcome to Inspiration Wednesday with Heartfelt Creations.  I'm here to share another Christmas card with you and it is a slimline card.  I love this style of card and seem to make them often.  You can find my card in the Heartfelt Creations Gallery along with all the details of the card.  


My finished card size is 4" X 7 1/2".  Make card base and cover with a piece of Sheet 5A of the paper Collection. I edged the paper with the Chipped Sapphire ink and set aside to dry. Let's work on the elements of the card.

Die cut the Regal Lattice Gateway Die out of white cardstock and using a Hydra Sponge and the Crystal Clear Glitter add glitter and set aside to dry.  Once dry glue down on the card front.  

Stamp the various stars and the words Merry Christmas in Chipped Sapphire ink and die cut.  Decide on placement on the card front and glue down. 

Now let's work on the colored ribbon.  I used white seam binding and spritzed it with water so it would better absorb the color.  Lay down some color on your craft mat and spritz with water then drag the seam binding through it.  Scrunch into a ball and allow to dry.  Once dry tie a bow and use Scor-Tape to adhere to the card front.

The card is ready to go and should mail with one First Class stamp.


Wednesday, July 27, 2022

Ornate Seasons Greetings....

Welcome everyone to Inspiration Wednesday with Heartfelt Creations!  I'm here to share another card featuring the new Holiday Star Collection.  I know it seems early to begin Christmas Cards but I always find myself facing the holiday and my cards aren't finished....so lets begin!  You can find my card in the Heartfelt Creations Gallery Here.


My card size is 6" X 6".  I used Deluxe Flower Shaping Paper for making the card base because it is a perfect weight for cards.  Cover base with a piece of Sheet 9A and set aside.  Using Dries Clear adhesive add Rajnis Crystal Clear Glitter to the card front and allow to dry.  

Using white cardstock cut out one of the Ornate Oval Dies and edge the die cut with Deep Purple ink.  Cut a Oval from Luxe Silver Cardstock and glue to the Ornate oval die cut.  Adhere to card front using dimensional tape to give it some lift and interest.  Stamp the sentiment onto a piece of Sheet 6A of the paper collection and use the die to cut out.  Add glitter to the sentiment and allow to dry.  Glue sentiment to the Silver Cardstock Oval and the card is finished.

This makes a flat card that can easily be mailed using one First Class Stamp.  


Wednesday, July 20, 2022

Inspiration Wednesday with Heartfelt Creations - Continuing on with the Holiday Star Collection..

Good morning friends and welcome!  Wednesday has once again rolled around and it's time to share another Heartfelt Creations card with you.  I'm continuing along with the Holiday Star Collection and you can see my card in the Heartfelt Creations Gallery


I love how this card turned out and think it will make a great addition to my Christmas card stash!


My card is a shaped card made using the Simple Centerpiece Die to create a Octagon Shaped card.  I used the Deluxe Flower Shaping paper to create the card base because it is a perfect weight for card making.  I covered the base with a piece of Sheet 1B of the paper collection.

Using white cardstock cut the Elegant Hearts Centerpiece Die and glue to card front.  Using the small center Octagon piece of the Elegant Hearts Centerpiece Die and cut a piece of Sheet 12B of the paper collection.  Also cut one from a piece of white cardstock and glue these two pieces together.  The white cardstock gives the piece a bit more stabalization.  I used Double Dots to adhere to the card front and give it a raised look.  

Using the Luxe Silver Cardstock stamp the star using Stazon Vibrant Violet and then sprinkle silver embossing powder over the image. Use a heat gun to emboss and then allow to cool. Use the coordinating dies to cut out. Stamp the center star onto white cardstock with Deep Purple ink and cut out with coordinating die. Using a Hydra sponge and Designer Dries Clear adhesive I put Crystal Clear glitter around the edges of the star outline. Next take the center of the die cut and use a Double Dot to adhere to the center of the smaller star.  

I cut out one of the sentiment dies using Luxe Silver Cardstock and the cut out star was just perfect for the center of this piece.  I saved the rest of the die for use later.


Thursday, July 14, 2022

Dragonfly Birthday Card.....

Good morning my friends and welcome to my blog.  I have become very lazy of late and only post on Wednesday and the first of the month but I decided today would be a good day to say hello.  July has given me many opportunities to make birthday cards...I needed 5 and so I decided I would share one with you that hasn't already been mailed.    I also want to share this withThe Sisterhood of Crafters  as their challenge is butterflies, dragonflies and bees. So my dragonfly card just fits perfectly into this challenge.  

My cardf uses all Heartfelt Creations products from the Decorative Dragonfly Collection.  I hope  you enjoy it as I have loved making it!  

If you are curious about this group of wonderful crafters and the challenges they provide just head over to this link:  The Sisterhood of Crafters  You can see what the talented design team has done for this challenge!

Wednesday, July 13, 2022

Introducing the Holiday Star Collection from Heartfelt Creations...

Good morning my friends and welcome!   It's Christmas in July and Heartfelt Creations is introducing the Holiday Star Collection!  You can find my card here in the Heartfelt Creations Gallery!  


My finished card size is 6" X 6".  I made my card base using the Deluxe Flower Shaping Paper because it is such a nice weight and can hold anything you mount on top. Make card base and cover with a piece of paper from sheet 10A of the paper collection.  

Cut the Courtyard Elegance Die using white cardstock and using a Hydra Sponge and Dries Clear Adhesive add glitter to the die cut.  Allow to dry and then glue to the card base.  

Using Distress Ink Chipped Sapphire and stamp the star onto white cardstock.  Cut out using the center of the coordinating die and set aside.  Using Vibrant Violet Stazon Ink stamp the star onto a piece of Luxe Silver Cardstock and emboss with Silver embossing powder.  Let it cool and then cut out the star with coordinating die.  Glue the smaller star that was stamped in Chipped Sapphire onto the embossed star using a dimensional dot in the center.  This makes a star medallion for the center of the card.  I used Double Dots to adhere to the card front. 

Cut out the sign die twice, once with white cardstock and once with Luxe Silver Cardstock and glue together offsetting a bit so the silver shows through behind the white piece.  I used a stamping platform to situate the sentiment and then stamp using Chipped Sapphire Distress Ink. I added dimensional tape behind the sign to adhere to card front 

Now lets work on the poinsettia flowers.  I stamped the petals using embossing ink and embossed with Silver embossing powder.  I did the same for the Holly petals.  I colored the flower petals with Magenta Hue and the Holy is colored with Viridian ink.  Use coordinating dies to cut out and then lay onto the mold.  Spritz with water and run through the die cut machine.  Turn out onto the desk to dry.  Glue two flower petals together and then glue a Holy piece behind the flowers.  Allow to dry.  Add Prills to the centers of the flowers and allow to dry.  Decide on placement of the flowers and use hot glue to glue to card front.

Wednesday, July 6, 2022

Inspiration Wednesday with Heartfelt Creations...

Good morning everyone and welcome.  I just love it when Wednesday rolls around and I get to share a project I made for Heartfelt Creations.  You can find my card in the Heartfelt Creations Gallery


My card size is 5" X 7".  Make card base using Deluxe Flower Shaping Paper and cover with a piece of Sheet 10B of the paper Collection that has been edged with Memento Blue Danube Ink.  

Using Cream Cardstock and Luxe Gold Cardstock cut out the different pieces of The Simply Classic Oval Frame. Glue the two pieces together with the gold shifted beneath the cream colored piece to allow the gold to peep through.  I used the adhesive foam strips behind this piece and attached to the card front.  Cut a smaller oval to fit in the opening of the cream and gold piece out of sheet 3A of the paper collection and glue it into place.  Now we are ready to work on the flowers.

Stamp the flower petals using Magenta Hue and Danube Blue ink onto Deluxe Flower Shaping Paper and stamp some calyx using Olive and some using Buttercup.  Stamp the leaves using Olive ink.  Color the centers of the flower petals using the same color they were stamped in and use Leaf Green and Vivid Chartreuse to color the leaves.  Use coordinating dies to cut everything out.  Place onto the shaping mold and run through the die cut machine and then turn out onto the desk to dry.  Shape the flower pieces and glue together using hot glue.  Glue two of the yellow calyx to form a flower and glue together.  Add Ribbit Prills to the center and set aside to dry. Using a Hydra Sponge with Dries Clear Adhesive, add glitter to the flower petals. 

Using the stamping platform stamp the Vining Sweet Pie using Olive green and Magenta Hue and cut out with coordinating die.  Color the leaves with leaf green and the flowers with Magenta Hue ink. Use the tools from the Deluxe Flower Shaping Kit to add some shape to the back of this piece.  I snipped this apart to use the curly pieces on the card front and then glued the rest to the card front.  Most of it is covered with the finished flowers but if you look closely it is peeping out here and there. Decide on placement of everything and hot glue down.

Stamp the sentiment onto cream cardstock using Jet Black ink and cut out using the Banner Die.  Cut off the part you dont need and then tuck the rest behind some of the florals and hot glue down.  The card is finished.


Friday, July 1, 2022

Four Seasons Summer Challenge - July - Anything goes...

Good morning friends and welcome to The Four Seasons Challenge for July, 2022.  As always anything goes and this is the second challenge for Summer!  So gather your supplies think Red, White, and Blue, Fourth of July, Watering Cans and pretty flowers!   You can post your project here:  The Four Seasons Challenge Blog.  The challenge runs from 12:00 AM (EST) on July 1 until 12:00 AM (est) on July 25.  The winner will be announced on July 28.

We have an Mood board for July but this is just to help give you some ideas for the season.  Remember anything goes!   


I picked up on the watering can and decided to use one on my card!  


I used lots of glitter on the flowers and on the drops of water coming out of the can but my camera just didn't pick it up!  I used shades of blue, lilac and purples and I just love how it turned out!  The paper is from the Heartfelt Creations Lush Lilac Collection.

Wednesday, June 29, 2022

Inspiration Wednesday with Heartfelt Creations....

Good morning everyone and welcome!  I'm here to share a slimline card I made using Heartfelt Creations Wild Aster flowers.  You can see my card and all supplies used to make it in the Heartfelt Creations Gallery.


My finished card size is 4" X 7 1/2". I used Deluxe Flower Shaping paper to make the base.  It is the perfect weight to use for cards. Cover with a piece of Sheet 3A of the paper collection.  Using Luxe Gold Cardstock cut the Rounded Window Frame Die and cut it half.  Glue one half on the left side of the card and the other half on the bottom of the card.  

Stamp the flower petals using New Sprout ink and color the centers using Pink Peony and cut out using the coordinating dies.  Shape the petals using the Deluxe Flower Shaping kit and glue three petals together to make the flower base.  Glue a pearl in each petal and set aside to dry.  Stamp the leaves with Leaf Green ink and color with same the add some Olive ink to add more dimension.  Cut out using coordinating dies and I just used my fingers to shape the leaves a bit.  Decide on placement on the card and glue down flowers and leaves.

Stamp the sentiment onto a piece of white cardstock using Jet Black ink and use Banner die to cut out.  I cut a piece of gold cardstock just a little bit larger than the sentiment piece and then just eye balled where to cut out the peak and hand cut that with just a pair of scissors.  Glue the gold piece and the white sentiment piece together.  Tuck the end under the gold Rounded Window die cut and glue down allowing a bit to hang over the edge of the card.  

The card is finished.  


Wednesday, June 22, 2022

Inspiration Wednesday with Heartfelt Creations....

Good morning my friends!  I'm here this morning to share another card using the Heartfelt Creations Mushroom Cottage collection.  

You can find my card in the Heartfelt Creations Gallery and all the products used and instructions are listed there as well.


My finished card size is 5 1/2" X 5 1/2".  Make card base and cover with one of the card fronts from sheet 1A of the paper Collection.  

Stamp the Fairy with Jet Back ink and color using the Zig watercolor markers and the water brush.  Die cut with coordinating dies and at this point I cut off the wings.  Stamp the Fairy onto vellum cardstock twice using Cactus Flower ink and emboss using the Bridal Tinsel embossing powder.  Die cut the Fairy using coordinating dies and then cut the wings to use on the watercolored Fairy.  Glue the vellum wings onto the Fairy and allow to dry.  Stamp the fence using Toffee Crunch and then color with same and a Stack and Store Dauber.  Cut out with coordinating die and set aside.  Stamp the vine using Jet Black ink and color with Leaf Green and Magenta Hue.  Cut out with coordinating die and set aside.  Stamp the little frog with Leaf Green and color using same and use the Dove Blender pen and Lady Bug ink for the tongue.  Cut out using coordinating die and set aside.  Stamp the little butterfly with Cactus Flower ink onto vellum and then heat emboss with Bridal Tinsel embossing powder.  Use coordinating die to cut out and I used some Leaf Green ink to color.

Decide on placement of the elements and glue them down.  Add some glitter here and there to make it all sparkle and the card is finished.


Wednesday, June 15, 2022

Inspiration Wednesday with Heartfelt Creations...

Good morning my friends and welcome!  Today I'm here to share another card with you using the Mushroom Cottage Collection.  These little guys are perfect for a mini slimline card and you can see my card in the Heartfelt Creations Gallery.


My finished card size is 3 1/4" X 6 1/4" which is the min slimline card size.  Make card base using the Deluxe Flower Shaping paper.  It is the perfect weight for card bases.  Cover with a piece of 10B of the paper collection and set aside while we work on the elements.

Stamp the Mushroom Cottages using Toffee Crunch ink onto watercolor paper and then use the zig markers and the waterbrush to color them.  I lay down color onto a acrylic stamping block and use the waterbrush to pick up and color on the watercolor paper. These watercolor pens come in so many colors and you can pick which colors you like the best. Stamp the leaves and little snails using Toffee Crunch and color the leaves with Leaf Green and the little snails are colored with the Zig markers.then Cut out everything with coordinating dies and decide on placement along the bottom edge of the card.  Glue everything down.  

Stamp the sentiment onto white cardstock using Vibrant Fushia and use one of the arrow dies to cut out.  I edge the arrow with Vibrant Fushia and cut off the pointed end.  Push behind one of the leaves and glue down.  The card is complete. This makes a quick and easy card and it is perfect for mailing with one stamp.  


Wednesday, June 8, 2022

Introducing the Mushroom Cottage Collection from Heartfelt Creations...

Good morning my friends and welcome!  We are introducing this wonderful collection with lots of great stamps and dies for all your card making needs.  My card this morning is a shaped card and I hope you enjoy it!  You can see it in the Heartfelt Creations Gallery for more details and all the supplies used.


My card us a shaped card.  Make card base using Deluxe Flower Shaping Paper.  Stamp the large mushroom onto white cardstock using Toffee Crunch and color using Lady Bug and Poppy ink for the top and Desert Sand and Toffee Crunch to color the bottom. Cut out with coordinating die. 
 
Stamp the windows, doors and the the snails using Toffee Crunch ink and cut out with coordinating dies.  The shutters are colored with Danube Blue and the light shining through the windows and doors is colored with Dandelion ink.  The frog and leaves are stamped with Leaf Green and colored with same then cut out using coordinating dies.  I used the Dove blender pen to color the frog's tongue. The snails are colored with a bit of Desert Sand and Poppy ink.  Layer the windows, door, snails and frog onto the front of the mushroom and glue down.  Add glitter to the ivy petals and glue down.  The shaped card is finished.

Wednesday, June 1, 2022

Inspiration Wednesday with Heartfelt Creations...

Good morning friends and welcome to June!  I'm here to share a card I made using the Wild Poppy Collection from Heartfelt Creations.  I love these flowers and you are going to be seeing these featured on my cards a lot! You can find my card shown here in the Heartfelt Creations Gallery 


My finished card is 5" X 7".  Using white cardstock make card base and cover with a piece of sheet 8B of the paper collection.  Set aside while we work on the die cutting.  

Using the large shadow die cut a piece of white cardstock and then using Luxe Gold cardstock cut the large border die.  Glue these two together and glue to card front.  Cut the next die size down using white cardstock and edge with the Poppy  ink.  Use Double D Dots to adhere to card front.  Use the remaining dies in the set and cut 2 of each out of white cardstock and 1 out of gold.  Glue together and layer the gold cardstock off setting just a bit behind the white pieces.  Glue these to the card front.  Stamp the sentiment on the center cut out of white cardstock using Jet Black Ink and use dimensional tape to adhere to the card.

Stamp the Poppy flowers and leaves onto the Deluxe Flower Shaping Paper using Poppy ink and color using Poppy, Tiger Lily and Carnation Red.  The leaves are stamped with Jet Black and cut off the main image to use with these blossoms.  I colored the leaves with Leaf Green Ink.  Use coordinating dies to cut out the flowers and leaves and lay the flowers onto the shaping Mold.  Spritz with water and run through the die cut machine and turn out onto the desk to dry.  Glue two flower petals together and on the larger flower I used one of the small florals to shape and glue down for the center.  On the smaller flowers I did Prills and then all flowers got a ring of Power Outage Prills.  Allow everything to dry and then I used a brush and Glossy Accents and coated the petals and sprinkled with glitter then allowed them to dry.  I did a bit of hand shaping on the leaves and then decided on placement of flowers and leaves and glued everything down.  The card is finished.