Wednesday, August 31, 2022

Divine Messenger....Inspiration Wednesday with Heartfelt Creations

Good morning my friends and welcome!  Another Heartfelt Creations Wednesday has rolled around and it is time to share another card I have made.  You can find my card in the Heartfelt Creations Gallery.  All the products used on my project are listed there.  


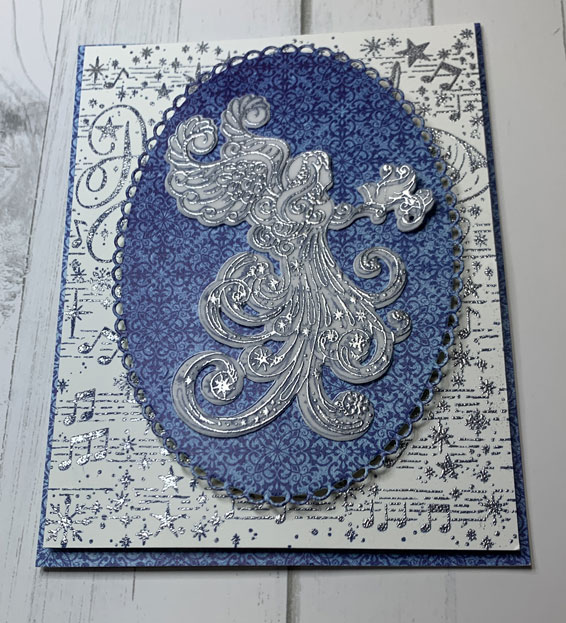
My card base is 4 1/4" X 5 1/2".  Make card base and cover with a piece of sheet 8B of the paper collection.

Stamp the background stamp onto white cardstock using Night Sky ink and emboss with silver embossing powder.  Use dimensional tape to attach to card front. Cut an oval from Sheet 8B of the paper collection and attach to card front with dimensional tape.  

Stamp the angel onto vellum using Night Sky ink and emboss with silver embossing powder.  Cut out with coordinating die.  Stamp the angel using Night Sky onto white cardstock and cut out with coordinating die.  Glue the two die cut angels together.  Glue the angel to the oval on the card front.  

This quick and easy card is finished and can be mailed using one first class stamp.


Wednesday, August 24, 2022

Inspiration Wednesday with Heartfelt Creations....

Good morning friends and welcome.  Wednesday has rolled around once again and I get to share another Heartfelt Creations project.  You can see my project in the Gallery with a listing of all the products used.


My finished card size is 3 1/2" X 6 1/2".  Make card base and cover with a piece of Sheet 9B of the paper collection.  Using The French Gate Die cut a piece of Sheet 12B with the larger rectangle.  Use dimensional tape and adhere to card front.  Using white cardstock cut out the French Gate Die and also cut one using the Luxe Gold card stock.  Glue these two pieces together so the gold shows under the white.  Glue to card front.  

Stamp the flowers using Leaf Green and color with various colors of Archival inks.  You can use your imagination here and color these the way you love them.  I used Magenta Hue and Vibrant Fushia, Sunflower and then Ultra Marine Blue and Manganese Blue.  The greens are Leaf Green and Olive.  Use coordinating dies to cut out the florals.

Apply Crystal Lacquer to the blooms of the florals and sprinkle with glitter then set aside to dry.   

Stamp the dragonfly onto Flower Shaping Paper and also onto the Vellum using Archival Jet Black ink.  Emboss both pieces with gold embossing powder then use coordinating dies to cut out.  I colored with Forget Me Not and Cactus flower.  Glue the Vellum dragonfly and the paper dragonfly together and lift up on the vellum dragonflies wings.  Glue to the top part of the card. 

Decide on the placement for the flowers then glue down with hot glue.  The card is finished.

Wednesday, August 17, 2022

Happy Heartfelt Creations Birthday Celebration.....

Good morning my friends and welcome to the Heartfelt Creations Birthday Celebration.  I am featuring the Birthday Celebration Die on my card this morning and I hope youy like it!  You can find my card in the Heartfelt Creations Gallery with instructions and a list of all products used.  
 

My finished card size is 5" X 7".  Make card base and cut a piece of black cardstock to be 1/8" smaller and glue to card base.  Cut a piece of Sheet 8B of the paper collection 4 3/4" X 6 3/4" and glue on top of the black cardstock.  

Stamp flowers using Archival Poppy ink and color with same and a bit of Archival Leaf Green in the center.  Cut out using coordinating dies and then add a bit more Poppy ink to the edges of the petals to give it a darker look. Lay onto the mold and spritz with water. Run through the die cut machine to shape and turn out onto desk to dry. Using a Hydra Sponge add 3D Crystal Lacquer to the petals and set aside to dry.  When dry, hot glue two petals together to form the flower.  On the larger flowers add a ring of glue to the center and Power Outage Prills.  Allow to dry then add some glue and Ribbit Prills to the very center of the flowers.  Allow to dry.  I stamped the leaves with Leaf Green ink and cut out with coordinating dies.  Color with Leaf Green ink and add a bit of Olive ink to the outer edges to make the leaves a bit darker.  

Using white cardstock cut out the Diamond Fluer Die.  I only used the smaller piece of the die cut and glued it to the bottom of the card front.  Decide on placement of flowers and leaves and glue down using hot glue.  

Stamp the sentiment onto white cardstock using Poppy ink and die cut with the Arrows & Banners die. Edge the Banner die cut with the Poppy ink.  Slide the end under the flowers and curl it so it lays easily onto the card front.  The card is finished.

Wednesday, August 10, 2022

Introducing the Joyous Noel Collection from Heartfelt Creations....

Good morning my friends and thank you for stopping by as we introduce the Joyous Noel Collection from Heartfelt Creations!  This is another wonderful collection to help you create more gorgeous Christmas cards that are elegant yet so quick and easy!  I have created a Christmas pocket card graced by one of the beautiful angels and a harp.  The elegant pocket holds Christmas tags and anyone would love to receive this in their mail box during the holiday season!  You can find my card in the Heartfelt Creations Gallery here.  You can find all the products used there.


The finished card size is 5" X 7".  Make card base and cover with a piece of Sheet 2B of the paper collection and put aside while we do the die cutting.  

Using white cardstock and Luxe Gold Cardstock cut one each of the Noel Decorative Die then glue the gold die cut to the back of the white die cut just letting the gold show through a little bit.  Glue this to the bottom of the card front making a pocket.

Using the tag die, cut tags from Sheet 2A of the paper collection then cut the larger tag out of the Luxe Gold Cardstock.  Glue them together and stick down into the pocket.

Stamp the angel and harp onto vellum using VersaMark ink and emboss using gold embossing powder.  I also embossed the angel's halo on the Noel Decorative die to just add a bit of interest.  Cut out the harp and Angel with coordinating dies and use Archival Night Sky ink and a sponge dauber to color the gown of the angel.  I used Pink Peony to color the face and hands of the Angel and Sunflower for her hair.  I didn't color the wings.  I backed the angel and the harp with white cardstock and used dimensional tape to glue to the card front.

I went to Sheet 4A and picked out a sentiment and cut it out.  I used my scissors and just eye balled it to cut out the notch.  I used dimensional tape to adhere to card front and the card is finished.

Wednesday, August 3, 2022

Inspiration Wednesday ... A Slimline Merry Christmas Card ...

Good morning friends and welcome to Inspiration Wednesday with Heartfelt Creations.  I'm here to share another Christmas card with you and it is a slimline card.  I love this style of card and seem to make them often.  You can find my card in the Heartfelt Creations Gallery along with all the details of the card.  


My finished card size is 4" X 7 1/2".  Make card base and cover with a piece of Sheet 5A of the paper Collection. I edged the paper with the Chipped Sapphire ink and set aside to dry. Let's work on the elements of the card.

Die cut the Regal Lattice Gateway Die out of white cardstock and using a Hydra Sponge and the Crystal Clear Glitter add glitter and set aside to dry.  Once dry glue down on the card front.  

Stamp the various stars and the words Merry Christmas in Chipped Sapphire ink and die cut.  Decide on placement on the card front and glue down. 

Now let's work on the colored ribbon.  I used white seam binding and spritzed it with water so it would better absorb the color.  Lay down some color on your craft mat and spritz with water then drag the seam binding through it.  Scrunch into a ball and allow to dry.  Once dry tie a bow and use Scor-Tape to adhere to the card front.

The card is ready to go and should mail with one First Class stamp.