Showing posts with label Shaped Card. Show all posts

Wednesday, July 19, 2023

Inspiration Wednesday with Heartfelt Creations...

Good morning friends and welcome to my blog!  I'm here this morning to share another Christmas card with you using the Holiday Ornament Collection!  This is another beautiful collection and the last collection Heartfelt Creations will be releasing.  You can find my card in the Heartfelt Creations Gallery  with all the details listed there.


My card is a shaped card made by folding a piece of Deluxe Flower Shaping Paper and laying the die over the fold and running through the die cut machine.  Cut another Elaborate Oval Frame out of Deluxe Flower Shaping Paper and glue to the front of the card.  Cover with a piece of Sheet 3A of the paper collection.

Cut one white and one gold of the die and layer them together so the gold shows behind the white just a bit then glue.  Glue to the card front.  Stamp the sentiment onto the card front using Rhubarb Stalk ink and set aside.

Stamp the ornaments using Bamboo Leaves ink onto Deluxe Flower Shaping Paper and add ink using Stack and Store Daubers.  I used Bamboo Leaves and Rhubarb Stalk ink. Cut out using the coordinating die.  I used a paint brush and 3D Crystal Lacquer to paint the ornaments so they shine and allow to dry.  As they are drying sprinkle with Rajni Chawla's Crystal Clear Glitter and allow everything to dry. Use hot glue and glue down the ornaments to the top of the card front. Tie a piece of red seam binding into a bow and hot glue to the top of the ornaments and the card is finished.  

Wednesday, July 12, 2023

Debuting the Holiday Ornament Collection... Heartfelt Creations...

Good morning my friends and welcome!  This morning I'm here to introduce the brand new Holiday Ornament Collection with Heartfelt Creations!  I just love this collection and will use these products to make my own Christmas Cards this year and for many years to come!  I have a card for you this morning and you can find it in the Heartfelt Creations Gallery.   


My card is a shaped card.  Make card base by cutting the die just over the fold of Deluxe Flower Shaping Paper. Cut a piece of Sheet 3A of the Paper Collection using the die twice.  Cover the front and the inside of the card with this.  Using the Stack and Store Daubers edge the paper with Memento Bamboo Leaves and sponge some ink over the whole shape to make the green just a shade darker on the inside piece.  

Stamp the ornament onto Deluxe Flower Shaping Paper using Leaf Green Archival Ink and emboss with gold embossing powder.  Die cut the piece using coordinating dies and glue to the card front.  I stamped and embossed the ornament twice so I could cut out the center star to give me an additional piece of the image to use.  I used a cut up piece of the double dots and used that to adhere the star to the card front.  This gives it a bit of dimension.  Set aside to dry.

Stamp the sentiment onto a piece of the Deluxe Flower Shaping Paper using Memento Bamboo Leaves ink and die cut using coordinating die.  Clue to the inside of the card being careful to place it over the part of the paper that had more ink sponged to make it darker.  This allows the sentiment to show up better when it has been glued down.  

This makes a very beautiful shaped card and could also be hung on the tree when received.  


Wednesday, June 8, 2022

Introducing the Mushroom Cottage Collection from Heartfelt Creations...

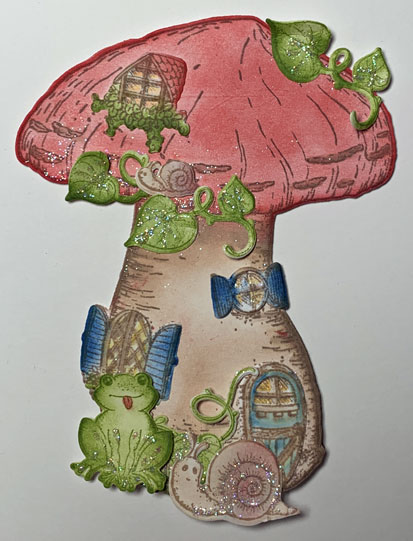
Good morning my friends and welcome!  We are introducing this wonderful collection with lots of great stamps and dies for all your card making needs.  My card this morning is a shaped card and I hope you enjoy it!  You can see it in the Heartfelt Creations Gallery for more details and all the supplies used.


My card us a shaped card.  Make card base using Deluxe Flower Shaping Paper.  Stamp the large mushroom onto white cardstock using Toffee Crunch and color using Lady Bug and Poppy ink for the top and Desert Sand and Toffee Crunch to color the bottom. Cut out with coordinating die. 
 
Stamp the windows, doors and the the snails using Toffee Crunch ink and cut out with coordinating dies.  The shutters are colored with Danube Blue and the light shining through the windows and doors is colored with Dandelion ink.  The frog and leaves are stamped with Leaf Green and colored with same then cut out using coordinating dies.  I used the Dove blender pen to color the frog's tongue. The snails are colored with a bit of Desert Sand and Poppy ink.  Layer the windows, door, snails and frog onto the front of the mushroom and glue down.  Add glitter to the ivy petals and glue down.  The shaped card is finished.

Wednesday, June 30, 2021

Inspiration Wednesday with Heartfelt Creations...Swirling Clematis

Good morning my friends and welcome to another Inspiration Wednesday with Heartfelt Creations!   As we continue along with the Climbing Clematis Collection, I'm sharing another shaped card I have made.


Products Used:
Climbing Clematis Paper CollectionHCDP1-2128
Clematis Cling Stamp SetHCPC-3954
Clematis DieHCD1-7355
3D Clematis Shaping MoldHCFB1-5006
Leafy Accents Cling Stamp SetHCPC-3835
Leafy Accents DieHCD1-7193
3D Leafy Accents Shaping MoldHCFB1-467
Elegant Swirl Gateway DieHCD2-7327
Arrows and Banner DieHCD1-7204
Special Birthday Sentiments Cling Stamp SetHCPC-3843
Stack and Store Daubers-Pack of 30HCDA2-450
Deluxe Flower Shaping Paper Pack of 50 - WhiteHCPP1-475
Heart of Gold PrillsANC804
Rajni Chawla's Crystal ClearPGM15015
Designer Dries Clear Adhesive159723
Metal Tip for Adhesive Bottles352854
Ranger Archival Ink Pad - Fern GreenRACP962
Ranger Archival Ink Pad - Leaf GreenRACP436

Other Products: Die Cut Machine, Hot Glue Gun, Dimensional Tape, Flat Back Pearls

Instructions: This shaped card measures 5" x 7". Make card base using the Eyelet Swirl Gateway die. Cover the front with a piece of sheet 9B of the paper collection. Use the Eyelet Swirl Gateway die to cut a decorative piece using white card stock and cut a piece of purple Sheet 10B and glue to the center back of the decorative die. Cut a piece of sheet 9B to layer on top of the white decorative piece. This will be where we put the flat back pearls. Glue this decorative piece to the card front.

Cut a Piece of sheet 5A and glue to the inside of the card, then cut a piece of sheet 5B for the back of the card and glue it down.

Stamp the flowers onto the Flower Shaping Paper using Majestic Violet and color with a Stack and Store Dauber. Use coordinating die to cut out the flowers. Stamp the Leafy Accent leaves using Fern Green Ink and color with Leaf Green Ink, then cut out with coordinating dies. Place the flowers and leaves into their coordinating 3D shaping molds and spritz with water then run through die cut machine. Turn out onto desk to dry. Once dry, add prills to the flower centers, decide on placement and use hot glue to glue down.

Stamp the sentiment onto white card stock using Majestic Violet Ink and cut out with the arrow die. Edge the white cardstock with Majestic Violet and adhere to card front using dimensional tape.

Using Dries Clear Adhesive glue down the flat back pearls onto the green accent piece on the card front allow to dry.

To finish the card, add Crystal Clear glitter to the flowers and allow to dry.

If you would like more inspiration you can head over to the Heartfelt Creations blog and see what the other designers have made!


Wednesday, February 17, 2021

Inspiration Wednesday with Heartfelt Creations...

Good morning friends from a frosty East Tennessee!  I think most of us are in the same boat...so far no ice or snow but it may be on the way.  I do have a lot to be thankful for as my electricity is still going!  

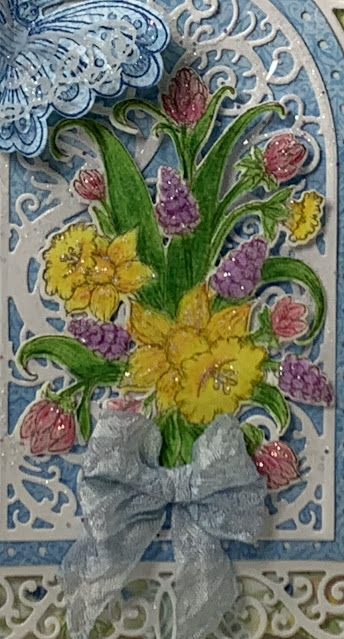
I'm here this morning to share another card I have made using the Delightful Daffodil collection.  With the weather we are having it is good to think of Spring.  I actually have little Daffodil shoots coming up in my landscaping.  That makes me feel like Spring is coming!


Products Used:
Delightful Daffodil Paper CollectionHCDP1-2124
Delightful Daffodil & Butterfly Cling Stamp SetHCPC-3943
Delightful Daffodil & Butterfly DieHCD1-7341
Vellum Paper - 10 Sheets3-GN2911-F
Designer Dries Clear Adhesive159723
Metal Tip for Adhesive Bottles352854
Rajni Chawla's Crystal ClearPGM15015
Crystal Ultrafine Transparent Glitter 1/2 oz.85-glitter
Memento Dye Ink Pad - Danube BlueTSMP600
Memento Dye Ink Pad - Rich CocoaTSMP800
Zig Clean Color Real Brush Markers - 48 Pack478594
Hydra SpongesRLHS100

Other Products: White Cardstock, Die Cut Machine, Dimensional Tape, Prismacolor Pencils: PC918, PC930, PC929, PC933, PC932, PC912, 742 1/2, PC917, PC931, PC911, PC908, PC916, 734 White Seam Binding, Gamsol, Blending Stumps

Instructions: Using the largest die cut a shaped card for the card base. Cover with a piece of Sheet 4B of the paper Collection. Using Sheet #12B cut out pieces to layer on the card front as well as some using white cardstock. Glitter the white die cuts and on the largest diecut, use dimensional tape to adhere to card front. Glue the other layers down onto the card front.

Stamp the flowers with Rich Cocoa ink and color using the pencils and gamsol. Use coordinating dies to die cut the flowers. Add glitter and set aside to dry. Lay down some color from the Dull Blue Marker, spritz with water and drag the seam binding through the puddle to color. Scrunch and allow to dry. Tie a bow and once the flowers are glued to the card front, glue down the bow.

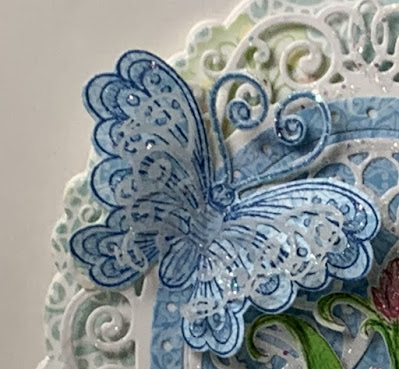
Stamp the butterfly onto a piece of Sheet 12B paper using Danube Blue ink cut out with coordinating die and glitter. Set aside to dry. Using the vellum, cut out the overlay for the butterfly and glitter and allow it to dry. Glue the butterfly and the overlay together and glue to the card front. The card is finished.