Wednesday, September 30, 2020

Inspiration Wednesday with Heartfelt Creations

Good morning friends!  I hope this post finds you well.  I'm here on this Wednesday morning to share another Heartfelt Creations card I have made.  It's a fun fold "slide and lock" card and I hope you love it!


It is a gatefold card with a locking medallion piece that slides down over the two gates.  I loved the design when I first saw it and just knew I had to try it.  


This next image is the inside of the card with the gates open.  I just chose a pretty piece of the paper collection to cover this part.  You could add a sentiment here or write a private personal message to the recipient of this card.


Products Used:
Ornate Just for You DieHCD1-7321
Ornate Just for You Cling Stamp SetHCPC-3936
Summer's Garden Paper CollectionHCDP1-2119
Wisteria Petals DieHCD1-7295
Wisteria Petals Cling Stamp SetHCPC-3911
Eyelet Circle & Basics Small DieHCD1-7154
Circle Basics Large DieHCD1-7155
Merry Moments Cling Stamp SetHCPC-3885
Leafy Accents DieHCD1-7193
3D Leafy Accents Shaping MoldHCFB1-467
Deluxe Flower Shaping Paper Pack of 50 - WhiteHCPP1-475
Luxe Silver CardstockHCGP1-493
Deluxe Flower Shaping KitHCST1-401
Stack and Store Daubers-Pack of 30HCDA2-450
Designer Dries Clear Adhesive159723
Metal Tip for Adhesive Bottles352854
Double Dots 100pc. -3D Foam CirclesDDOTS
Heart of Gold PrillsANC804

Other Products: White Cardstock, Die Cut Machine

For more ideas on creating with the Special Sentiments Stamps & Dies, watch the tutorial at https://youtu.be/-dYnAWXIH3E.

For more tips on creating with the Cascading Petals Collection watch the tutorial at https://youtu.be/DqhvfrsTI00.

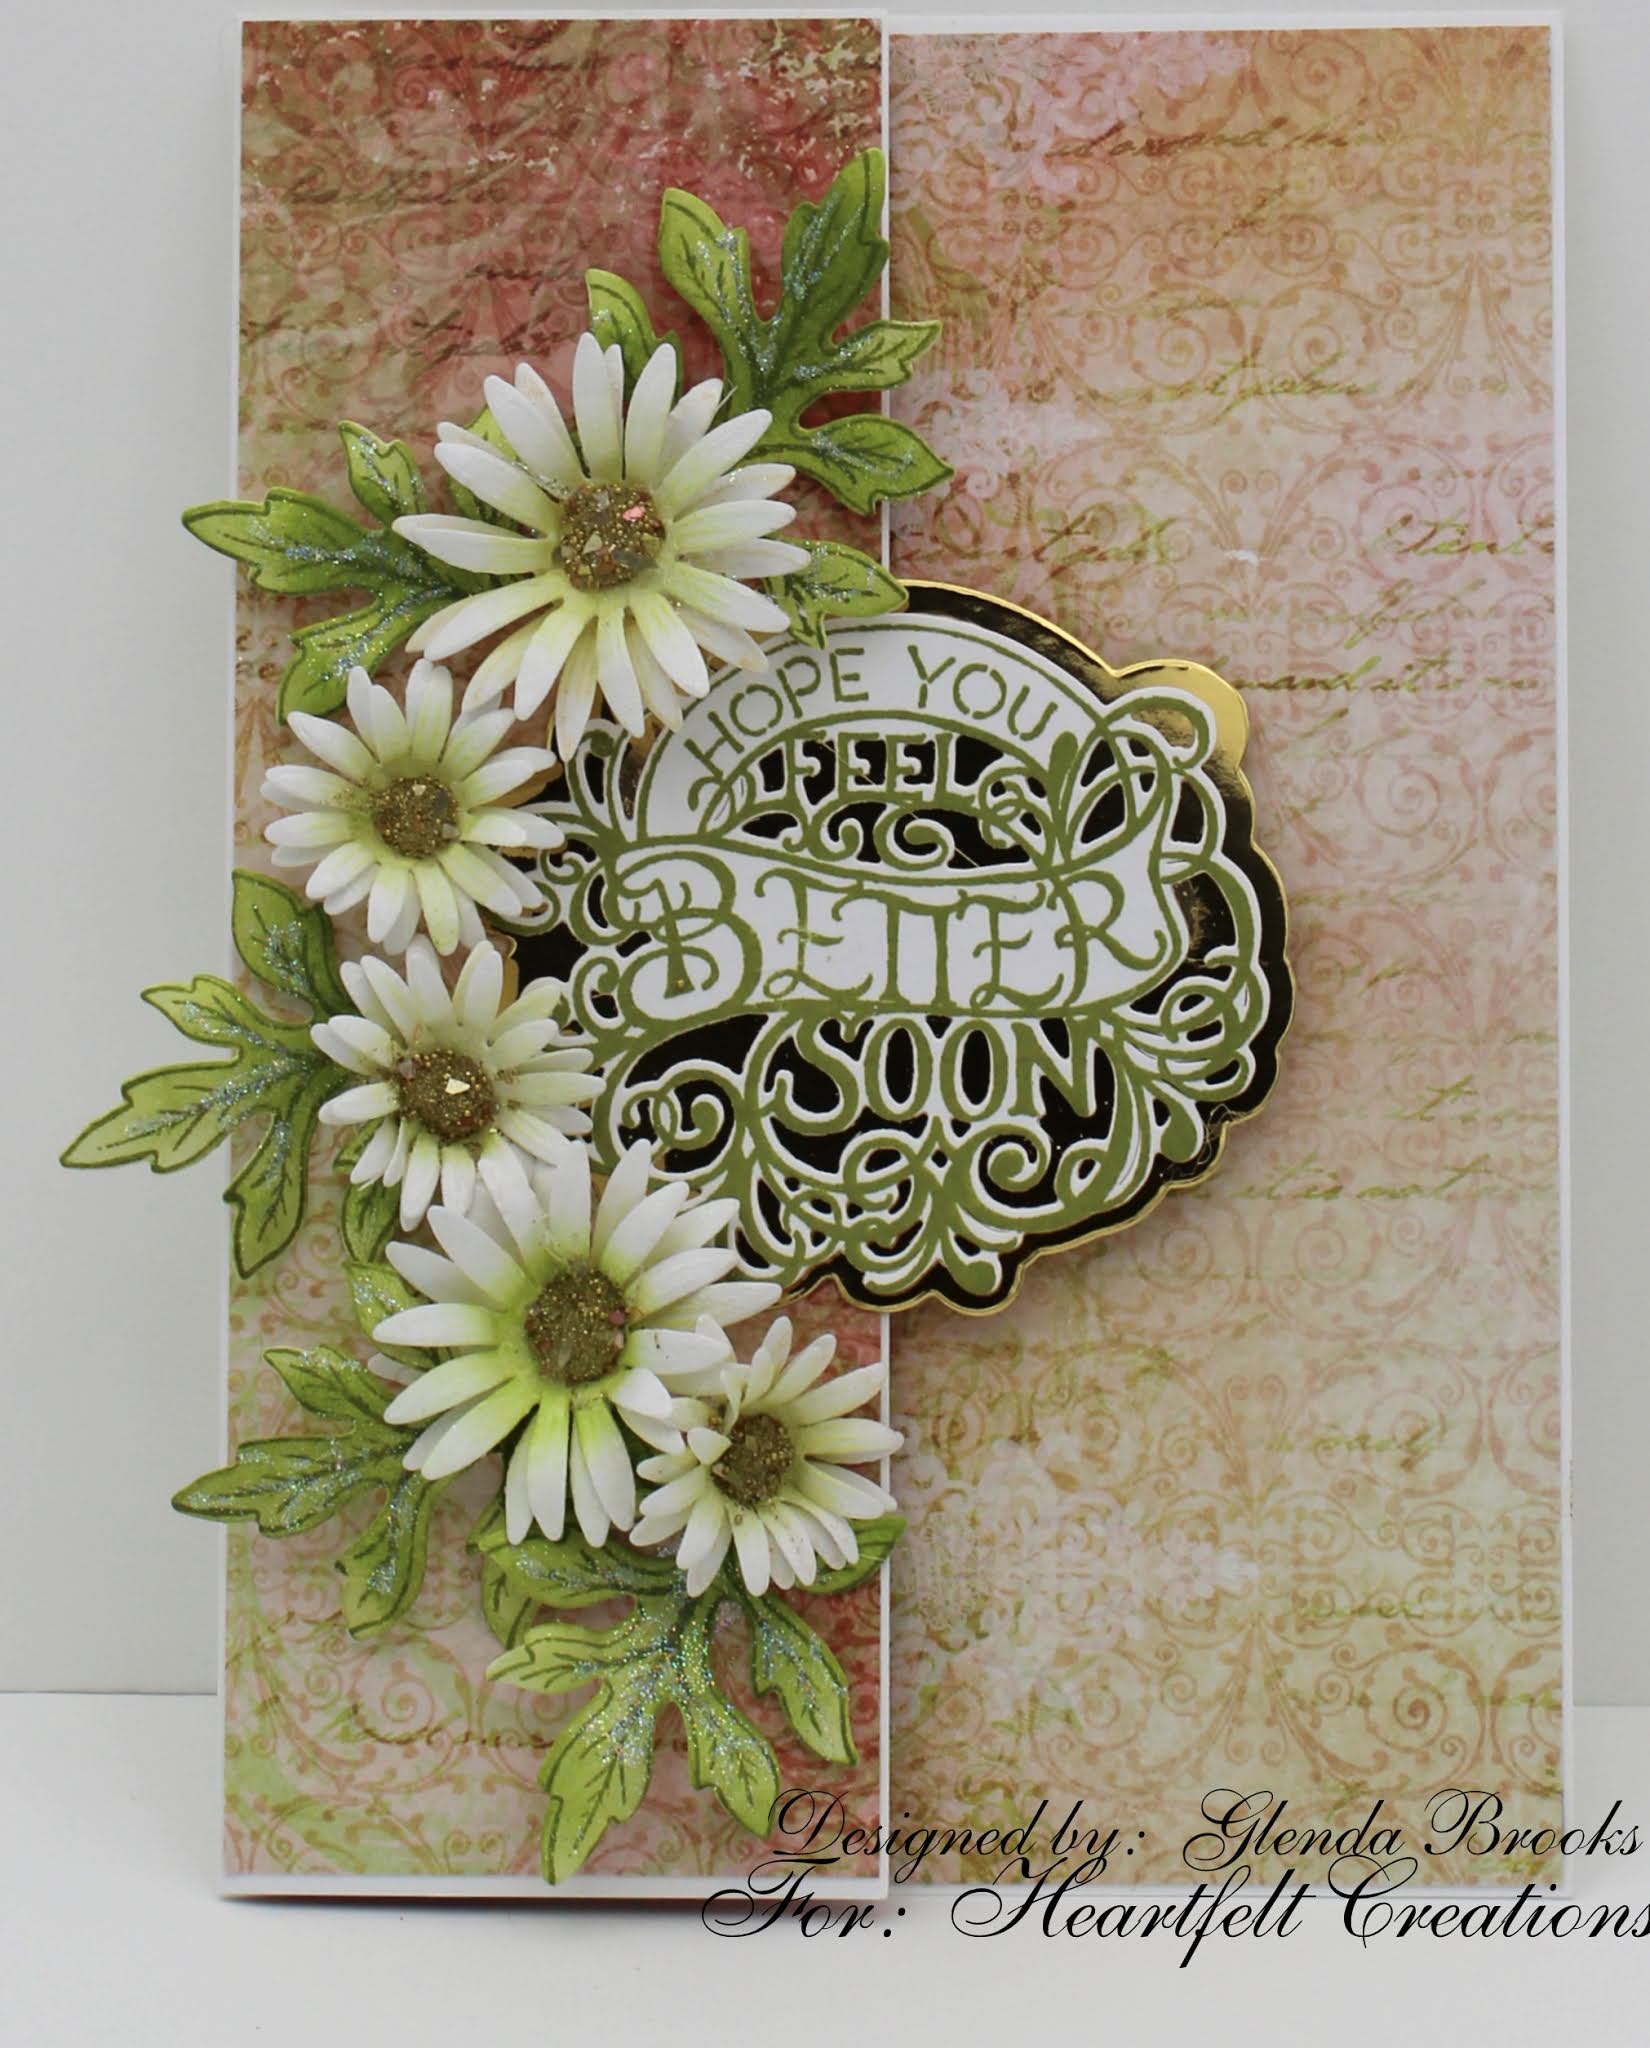
Instructions: My finished card measures 5 1/2” x 5 7/8”. I used the Flower Shaping Paper to make the card base as well as any other pieces for the card. I found a YouTube video for the card base and the locking medallion and just followed along. You can find one that you like and do the same as there are several videos showing different sizes. You just make a tri fold card and then cut 4 pieces of 4" x 4" cardstock for the locking piece. Score two of the squares at 2" and fold in half. Next you glue these two folded pieces to another one of the squares and then you lay the last square over this and glue it down. This allows the center part of the piece to open sort of like butterfly wings. This is what you slide down over the two front sides of the card to hold it in place (sort of like a modified belly band). I am a visual learner, so the videos are a great help for me to help me understand how something works.

Once you have all the pieces cut and together as well as the base card, it is time to decorate. I covered the two front panels with the paper collection and then I cut a piece for the inside of the card that has a picture on it and glued that into place. You can stamp or write on this panel or if you want you can just leave it as is because it is beautiful.

Cover the locking piece with another piece of the paper collection and set aside to dry. I stamped the sentiment with Cactus Flower ink and used the coordinating die to cut it out. I also used the shadow die to cut the silver cardstock. Glue the two pieces together. I cut an Eyelet Circle out of white Deluxe Flower Shaping Paper and then used a smaller circle die to cut another piece of the pretty paper collection. Glue the two circles together and the sentiment piece glues down onto that. Using Double Dots to pop up the circles, attach the circle to the locking piece.

Stamp the flowers using Cactus Flower ink and cut out using the coordinating die. I hand shaped the petals and glued two together to form the flowers. I added Prills to the centers and then using the sponge daubers I went around the edges of the flowers with Cactus Flower ink to add a bit more interest to them.

Stamp the leaves using Fern Green ink and then color them with Leaf Green ink. Using coordinating die, cut out the leaves. Lay onto the mold and spritz with water then run through the die cut machine. Turn out onto the desk to dry. Once dry, decide on the placement of the flowers and leaves and glue down. The card is finished.


Wednesday, September 23, 2020

Debuting the Heartfelt Creations Special Sentiments.....

 Good morning friends!  I hope this post finds you well.  I'm here this morning to share another Heartfelt Creations card I made and I'm using the Special Sentiments!  I just love these Special Sentiments stamps and dies and I know you will too!  


Products Used:
Summer's Garden Paper CollectionHCDP1-2119
Elegant Especially for You Cling Stamp SetHCPC-3934
Elegant Especially for You DieHCD1-7319
Wild Aster Cling Stamp SetHCPC-3887
Wild Aster DieHCD1-7257
Deluxe Flower Shaping Paper Pack of 50 - WhiteHCPP1-475
Luxe Gold CardstockHCGP1-488
Deluxe Flower Shaping KitHCST1-401
Stack and Store Daubers-Pack of 30HCDA2-450
Designer Dries Clear Adhesive159723
Metal Tip for Adhesive Bottles352854
Crystal Ultrafine Transparent Glitter 1/2 oz.85-glitter
Ranger Archival Ink Pad - Fern GreenRACP962
Ranger Archival Ink Pad - Leaf GreenRACP436

Other Products: Other Products: White Cardstock, Die Cut Machine, Hot Glue Gun, Ranger Embossing Ink,White Embossing Powder, Gold Gala Glitz, Magnets

For more ideas on creating with the Special Sentiments Stamps & Dies, watch the tutorial at https://youtu.be/-dYnAWXIH3E.

For more tips on creating with the Summer's Garden Collection watch the tutorial at https://youtu.be/kYiP8qJZ4rE.

For more tips on creating with the Wild Aster Collection watch the tutorial at https://youtu.be/1mriCKqh-Ac.

Instructions: My finished card size is 5" x 7". Make card base and cut off half of the front of the card. Decide on placement of magnets and glue them down. Cover card base with Sheet 2B of the paper collection.

Stamp the sentiment using Fern Green ink onto white cardstock and using the coordinating die, cut it out. Cut out the shadow die using the gold cardstock and glue together. Glue half of this medallion to the cut off card front.

Stamp the flower petals with embossing ink and emboss using white embossing powder. Color the centers of the flowers with Leaf Green ink, shape and glue two together to form flowers. Make a puddle of hot glue in the center of the flowers and add Gala Glitz to form the center of the flowers. Stamp the leaves using Fern Green ink and color with Leaf Green in. Shape and add glitter and allow to dry. Decide on the placement of the flowers and petals and hot glue in place. The card is finished.

Monday, September 21, 2020

Inspiration...

You know how sometimes you see something and you are totally inspired?  Well Emma Lou did a Heartfelt Creations Facebook live on September 15 using some discontinued products and I have to admit I am totally inspired!  


 I watched her video and immediately whipped out two cards to add to my Christmas stash!  Thank you Emma Lou and Heartfelt Creations!  These came together so quickly and I think they are beautiful!  
I used HCD1-7144 Decorative Medallion Die, HCD1-7199 Noel Ornament Die,  and HCPC 3834 Noel Sentiments Cling Stamps.  These are on the Limited Edition List so if they are still available hurry and get yours now!

I have totally enjoyed seeing all the inspirational videos from Heartfelt Creations during this Covid isolation.  I have learned so much and hope these keep coming even after we are able to resume our lives!

Wednesday, September 16, 2020

Inspiration Wednesday with Heartfelt Creations...On Your Special Day....

 Good morning friends and welcome to my blog.  I'm here this morning to share another card using the Summer's Garden Collection.  I love making these flowers because they are a large "statement" piece and when used on a card you need very little else to go with them!


Products Used:
Summer's Garden Paper CollectionHCDP1-2119
Large Garden Zinnia Cling Stamp SetHCPC-3923
Large Garden Zinnia DieHCD1-7314
Large 3D Zinnia Shaping MoldHCFB1-491
Small Garden Zinnia Cling Stamp SetHCPC-3924
Small Garden Zinnia DieHCD1-7315
Small 3D Zinnia Shaping MoldHCFB1-492
Stairway Gardens DieHCD1-7281
Special Birthday Sentiments Cling Stamp SetHCPC-3843
Deluxe Flower Shaping Paper Pack of 50 - WhiteHCPP1-475
Deluxe Flower Shaping KitHCST1-401
Stack and Store Daubers-Pack of 30HCDA2-450
Designer Dries Clear Adhesive159723
Metal Tip for Adhesive Bottles352854
Double Dots 100pc. -3D Foam CirclesDDOTS
Rajni Chawla's Crystal ClearPGM15015
Ribbit PrillsANC825
Hydra SpongesRLHS100

Other Products: White Cardstock, Hot Glue Gun, Die Cut Machine, Dandelion Memento Ink, Flat Back Pearls

For more tips on creating with the Summer's Garden Collection watch the tutorial at https://youtu.be/kYiP8qJZ4rE.

For more ideas on creating with the Decorative Royale Square & Circle Dies, watch the tutorial at https://youtu.be/tqmtn_TiVVw.

Instructions: My finished card size is 6" x 6". I cut a piece of the flower shaping paper 6" x 12" and scored at 6". Fold to make card base. Using Sheet 8B of the paper collection use the scalloped edge die to cut a piece to add color to the card front. Glue down.

Next, using white cardstock, I cut out the decorative pieces of the dies leaving the center square in place to hold the sentiment. Glue this piece to the green layer and set aside. I glued the pearls next and left to dry. Stamp the sentiment using Vibrant Fuchsia ink and cut out using the square center.

Stamp the leaves with Fern Green Archival Ink and color using Leaf Green. Cut out using the coordinating die. Lay on the mold, spritz with water and run through the die cut machine. Turn out to dry. While the leaves are drying, stamp the flower petals using Rich Cocoa ink then color using various inks. Here is where you can select what color you like. Cut out the petals using coordinating dies. Lay onto the mold, spritz with water and run through the die cut machine. As you turn the petals out use the Deluxe Flower Shaping Kit to add a bit more dimension to them. Allow to dry. Layer up several petals and glue together. The more dimension the better. Next add prills to the center and allow to dry. This is the time to apply glitter with glue and the sponge. Once everything is dry, decide on placement and hot glue in place. The card is finished.


Wednesday, September 9, 2020

Debuting the Summer's Garden Collection with Heartfelt Creations...

Good morning my friends; I hope you are well.  This morning we are here to share a brand new collection from Heartfelt Creations...The Summer's Garden Collection is here!  This collection brings back many childhood memories of my Mom.  She grew these along our back porch and I loved to see them blooming with their beautiful colors!  


Other Products: White Cardstock, Die Cut Machine, Hot Glue Gun, Memento Dandelion Ink Pad


For more tips on creating with the Summer's Garden Collection watch the tutorial at https://youtu.be/kYiP8qJZ4rE.

For more ideas on creating with the 5 x 7 Decorative Frame Dies, watch the tutorial at https://youtu.be/qdBFA5VpmSo.

Instructions: My finished card size is 5" x 7". I used the Flower Shaping Paper and made a 5" x 7" card base. Using the Royal Elegance Frame die, tape it down so that it hangs over the fold in the paper. Run through the die cut machine. Using the same die, cut a a shaped die using Sheet 10B in the paper collection; glue to the card base. Next, cut the next smaller size of the Royal Elegance die using white cardstock and glue it down. I used Sheet 5A of the paper collection and cut the next size of the die. I distressed it with Morocco ink and glued it down.

I stamped the sentiment onto white cardstock and then used the oval piece of the die to cut it out. I used Morocco ink to color the edges of the white oval then I used foam dots to add some dimension.

Using Memento Rich Cocoa Ink, stamp the flower petals and color using different colors of Memento Ink. Cut out the petals using coordinating dies, spritz with water and then shape using the molds. When the petals come out of the mold use the Deluxe Flower Shaping Kit to add a bit more dimension to the petals and set aside to dry. Once dry glue several layers of the petals together to make the flower. The more layers, the more dimension. Add the Prills to the centers and allow to dry. Once dry, add glitter and set aside to dry.

Stamp the leaves using Archival Fern Green and then using the stack and store daubers, color with Leaf Green Archival Ink. Using the coordinating die, cut out the leaves, spritz with water and run through the die cut in the mold. Allow to dry and then add glitter and lay out to dry again.

Decide where you want the elements to be and glue down onto the card front. Don't forget the little ladybug; I used Memento Lady Bug Ink and colored then run through the mold to shape. When dry, just glue to one of the leaves and your card is finished.


Wednesday, September 2, 2020

Inspiration Wednesday with Heartfelt Creations....Elegant Envelope Box Card...

Good morning my friends.  I'm here this morning to share another Heartfelt Creations project with you! 


The following photo is the card opened up,  There is a place for you to write a short message to the recipient. I love using the paper collection for this as it will do all the heavy lifting for you.


The next photo is just a close-up of the roses from Heartfelt Creations.  I really loved how they turned out don't you.  


Other Products: Die Cut Machine, White Cardstock, Hot Glue Gun, Crinkled and Glittered Tissue Paper

For more tips on creating with the Classic Rose collection, watch the tutorial at https://youtu.be/Z8P070kC3oo.

For more tips on creating with the flower shaping molds, watch the tutorial at https://youtu.be/FSdPL7nXvQE.

Instructions: My finished project size is 5 3/4" x 8 1/2". There are numerous YouTube videos for making one of these envelope box cards so I chose one and followed along with the measurements for making this project. The video I chose was this one. She gave more details about measurements and instruction. Once you have finished making the box it is time to decorate. I used some of the beautiful Sweet Peony Paper Collection to decorate.

Stamp the rose petals using Ranger Archival Ink in Magenta Hue, then I colored the centers using Ranger Archival Ink in Sap Green and Memento New Sprout ink. Then I lightly did the edges of the petals and then I used the coordinating die to cut out. Next stamp the leaves in Fern Green and use Magenta Hue and Leaf green to finish coloring the leaves. Die cut the leaves. Add the leaves and Rose petals to the mold, spritz with a little water and run through the die cut machine to shape. I used the Deluxe Flower Shaping Kit to add a bit more shaping to the rose petals and then set them aside to dry. Once the leaves and roses are dry, layer the rose petals and glue with hot glue to form the flowers. Add glitter to the leaves and the roses and allow to dry.

While everything is drying, cut pieces of the tissue paper so that there are several points then color with Ranger Archival Ink in Magenta Hue. I placed these points into the envelope box part of the card and used some hot glue to help hold them in place.

Find a sentiment on the paper and cut out and glue to the inside of the card. I also cut one of the small tag pieces so there is some room for a personal message. I really love how this turned out and hope you love it too!