Wednesday, October 26, 2022

Inspiration Wednesday with Heartfelt Creations...

Good morning friends and welcome!  This morning I am continuing along with the Elegant Rose Frames Collection from Heartfelt Creations.  I find I am in love with this collection as it is so easy to use to have a quick and simple card that really packs a punch.  You can find my card in the Heartfelt Creations Gallery with all the instructions and a product list. 


My finished card size is 5" X 7".  Make card base and cover with a piece of Sheet 4A.  Set aside while we work on the rest of the card.

Using the largest die in the Elegant Rose sentiment die, cut two.  One out of white cardstock and one out of Sheet 5A of the paper collection.  Using the large oval die in the same set cut an opening in the white cardstock die cut.  Glue this piece to the green die cut which allows the green sheet to show through.  Using a Hydra Sponge and Designer Dries Clear Adhesive add glue to the edges of the die and apply Crystal Clear Glitter.  Allow to dry.  

Using the next size down oval, die cut two.  One in white cardstock and one in Luxe Gold Cardstock.  Glue the two together and allow a bit of the gold cardstock to show.  Using Eyelet Oval and Basics Large die set pick a die that will fit the fancy die cut and cut out using a piece of Sheet 4A of the paper collection.  Glue to the die cut and allow to dry.  

Using dimensional tape adhere the larger die cut to the card front and then again using dimensional tape, adhere the gold and white die cut to the larger oval.  

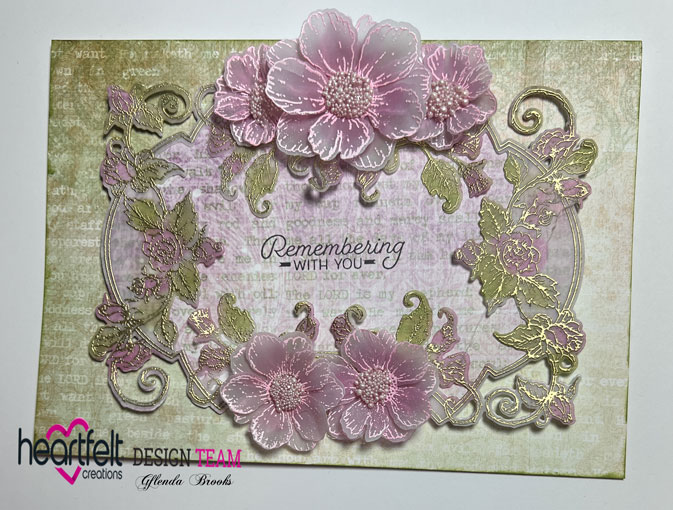
Now we are going to work on the sentiment.  Stamp the Sentiment onto Deluxe Flower Shaping Paper using Magenta Hue ink.  Using the Stack and Store Daubers, add Magenta Hue ink to the flowers and the word Birthday.  Add Leaf Green ink to the leaves and then cut out using coordinating die.  Glue to the card front and your card is ready to go.  

This card should be able to mail with a First Class Stamp. 

Wednesday, October 19, 2022

Remembrance Wild Roses - Elegant Rose Frames Collection

Good morning friends and welcome.  I'm here this morning to share another card using the Elegant Rose Frames Collection from Heartfelt Creations.  You can find my card in the Heartfelt Creations Gallery with all the products used and instructions. I love how this card turned out; the vellum makes it so elegant.


My finished card size is 5" X 7".  Make card base and cover with a piece of Sheet 3A of the paper collection.  

Stamp the Elegant Rose Frame onto vellum using Paradise Teal ink.  It doesn't matter what color ink you use, the embossing powder is going to cover the color.  Emboss using gold embossing powder.  Color the roses and leaves using Leaf Green and Magenta Hue ink I used the stack and store daubers because the pointed tips are perfect for coloring in tight places.  Use the coordinating dies and cut out the frame.  I also cut a frame from Sheet 4A of the paper collection but I did not use the die that cuts out the center.  Glue this piece behind the frame.  Stamp the sentiment using Jet Black ink into the center of the framew. I used dimensional tape to pop this frame up from the card front giving it a bit more dimension.  

Now lets work on the flowers.  Stamp the petals onto vellum using Magenta Hue ink and emboss using white embossing powder.  Cut out using coordinating dies.  Color the petals with Magenta Hue using the Stack and Store Daubers.  I used the Deluxe Flower Shaping Kit and the Golf tools to hand shape the petals.  Glue two petals together to form the flowers.  Put a puddle of hot glue in the center of the flowers and add the Prills.  Allow this to dry.  Decide on placement for the flowers and hot glue down.  The card is finished.  

This was a quick and easy card when all was said and done and it makes a beautiful presentation!

Wednesday, October 12, 2022

Debuting the Elegant Rose Frames Collection with Heartfelt Creations...

Good morning everyone and welcome!  I'm here this morning introducing the Elegant Rose Frames Collection from Heartfelt Creations!  This collection makes it easy for us to make beautiful framed cards for all occasions!  You can find my card in the Heartfelt Creations Gallery here:  


My card is 4 1/4" X 5 1/2".  Make card base and cover with a piece of 10A of the paper collection.  This sheet has different card fronts and I chose a couple of these to use on the front of my card.

Stamp the pretty Stylish Rose Frame onto watercolor paper using Jet Black ink and cut out with coordinating die.  Use Zig Clean Color markers and the water brush to color the roses and greenery and set aside to dry.  I added glitter to the filler around the roses to soften it a bit.  

Stamp the rose petals onto Deluxe Flower Shaping Paper and color with Leaf Green in the centers and Magenta Hue on the edges.  I also colored the backs of these petals.  Cut out using coordinating dies and lay onto the shaping mold and spritz with water.  Run through the die cut machine and turn out onto the desk to dry.  Once dry use hot glue to add several layers of petals to form the rose.  I added the Prills to the center of the flower and set aside to dry.  I used a Hydra Sponge to add adhesive to the petals and then dusted with the glitter.  Set aside to dry.  

I cut a shadow of the frame using another card front from Sheet 10A of the paper collection and glued the colored and glittered frame to that.  I stamped the sentiment using Magenta Hue ink and added dimensional tape to the back and adhered it to the card front. Decide on the placement of your roses and hot glue them down.  

Tie a droopy bow using white ribbon and glue it under the roses on the bottom of the frame. The card is finished.  


Wednesday, October 5, 2022

Inspiration Wednesday with Heartfelt Creations...

Good morning friends and welcome.   I'm here this morning to share another card with you that I have made using the Hollyhock flowers from Heartfelt Creations.  I made yellow flowers and have used a yellow layer under the flowers.  It makes a very happy and sunny card I think.  You can find my card in the Heartfelt Creations Gallery with a list of all products used to make it.


My finished card size is 5" X 6".  Make card base and set aside.  Cut a piece of yellow cardstock 4 7/8" X 5 7/8" and take one of the Filigree Border and Accents dies and cut it out along the bottom of the yellow cardstock piece.  Glue this down.

Pick one of the card fronts from sheet 10A of the Paper Collection and cut a piece to fit onto the yellow piece of cardstock and glue it down.  

Next cut one of the Rectangle die using white cardstock and then cut the next size down out of the card fronts of Sheet 10 A of the paper collection.  Edge with Vivid Chartruese glue to the die cut piece.  Use Double Dots to adhere to card front.  I cut the next to smallest of the rectangles using white card stock and then I stamped the sentiment onto a piece of white cardstock using Jet Black ink and cut out with the smallest rectangle of the die set.  I used the blending brush and Vivid Chartruese to color the white piece of cardstock and it turned out to be a perfect match to go with the rest of the pieces.  Glue these two rectangles together and I used dimensional tape to adhere to card front.  At this time I used the blending brush and Vivid Chartruese ink and sent along the bottom of the card front turning the white to a perfect pretty shade of green.

Next we will work on the flowers.  Stamp the petals with Memento Dandelion ink and color the edges with the same Dandelion ink.  Stamp the leaves with Leaf Green ink and color with same and then edge with Olive to add dimension.  Cut out using coordinating dies.  Lay flower petals and leaves onto the shaping mold, spritz with water and run through the die cut machine.  Turn out onto the desk to dry.  At this point I used the Flower shaping kit to add a bit more dimension to the flowers.  Once the flower petals are dry, glue two together to form the flower.  Add Prills to the centers and allow to dry.  Decide on placement and glue down with hot glue gun.