Wednesday, April 27, 2022

Introducing the French Gate and Courtyard Dies from Heartfelt Creations...

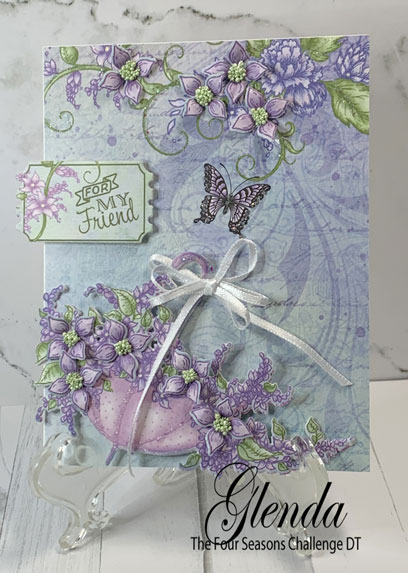
Good morning my friends.  I am here to help welcome the new French Gate and Courtyard dies from Heartfelt Creations.  I decided to use the Courtyard die on my card this morning.  It makes a 6" X 6" card if you use it and don't cut it apart.  You can see my card in the Heartfelt Creations Gallery here.

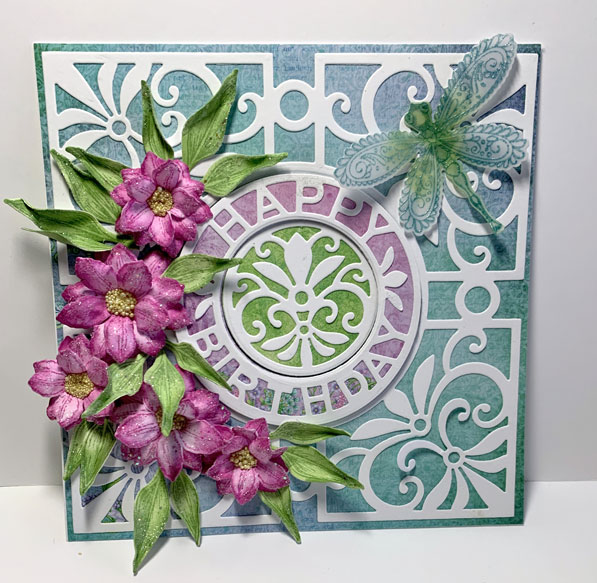
My finished card size is 6 X 6.  I made the card base out of the Deluxe Flower Shaping Paper because it is just the perfect weight for card making.  Cover the card front with one of the 6 X 6 card fronts from Sheet 10A.  

Using white card stock cut out the French Courtyard Die.  Glue the largest portion of the die cut to the card front.  Use the circle dies to cut the backgrounds for the center portion of the card.  I used more of the card fronts from Sheet 10A of the paper collection.  Glue the white die cuts to the colored circles and on the one that says Happy Birthday I adhered it to the card front using dimensional tape.  The center die cut was glued to a green piece of Sheet 10A and I just glued it to the center opening and it is recessed a bit.  This is giving just a slight bit of interest in the card front.

Stamp the dragonfly onto Vellum with Teal Zeal ink and emboss with clear embossing powder.  Allow to cool. Color the center of the dragonfly with Bamboo Leaves.  Use coordinating die to cut out and glue to the card front pulling up the wings to make her look like she is in flight.

Stamp the flower petals onto Deluxe Flower Shaping paper using Lilac poses and then color the petals with same.  Cut out using coordinating dies.  Stamp the leaves using Bamboo Leaves and color with same.  Use coordinating dies to cut out.  Lay the flower petals onto the shaping mold, spritz with water and run through die cut machine.  Spritz the leaves with water and finger shape the ends until you are happy with the look.  Allow to dry.  Glue flower petals together and add Lemon Chiffon Prills to the centers.  Allow to dry.  Using a Hydra Sponge add glue to the edges of the flowers and leaves and sprinkle Crystal Clear glitter over them.  Allow to dry.  

Once everythinbg is dry, decide on placement of flowers and leaves; I cut the leaves apart and glue everythingf down.  The card is finished.

You can check out what the other design team members created by visiting Heartfelt Creations.  Have a great rest of the week!

Wednesday, April 20, 2022

Inspiration Wednesday with Heartfelt Creations...

Good morning friends and welcome.  I'm here to share another card with you featuring the Decorative Dragonfly Collection from Heartfelt Creations.  You can find my card in the Heartfelt Creations Gallery here.  


My finished card is 5" X 7".  Make card base out of Deluxe Flower Shaping Paper.  The weight of this is perfect for making cards.  Cover the card base with a piece of Sheet 5A of the paper collection.  

Cut two of the Regal Lattice Gateway Die; one out of white cardstock and one out of the Luxe Gold cardstock.  Offset the two with the gold beneath the white and glue together.  Glue to the card front.

Stamp the flowers using Jet Black Archival ink and emboss using clear embossing powder onto Canson watercolor paper. Use the water pen and the Zig markers to color the flowers then cut out using coordinating dies.  Allow to dry and then add glitter.  Glue to the bottom of the card front and allow to dry.

Stamp the dragonfly twice using black ink and emboss with Midnight Teal embossing powder.  Color with Magenta Hue and Danube Blue ink.  Cut out using coordinating die and glue the two dragonflies together pulling up on the wings of the top dragonfly to make it look like it is in flight.  Decide on placement and glue to the top of the card.

For more inspiration be sure and visit the Heartfelt Creations Blog to see what all the other designers have made!


Wednesday, April 13, 2022

Introducing the Heartfelt Creations Decorative Dragonfly Collection...

Good morning everyone!  I'm here this morning to help introduce the brand new Decorative Dragonfly Collection from Heartfelt Creations!  This is such a wonderful collection and I just know you are going to love it!  You can see my card in the Heartfelt Creations Gallery Just follow the  link!  


My finished card is 4 1/4" X 5 1/2" using a fun fold and a belly band.  Make card base and score the card front in half and burnish.  Cut two pieces of the paper 2" X 5 3/8" and cover the front of the card.  I used Sheet 11B which has card fronts on it.  Cover the inside with a piece of Sheet 10A cut to 4 1/8" X 5 3/8".  The belly band is made using a 1" strip of Sheet 12B.

Cut a piece of white cardstock and layer onto the inside of the card.  I stamped the sentiment on this piece using Jet Black ink. 

I stamped the flower onto Canson watercolor paper using Jet Black ink and embossed it with clear embossing powder.  I used the Zig markers and a water brush to color the flower and then used coordinating die to cut it out.  I added glitter and set this aside to dry.  

I stamped the larger dragonfly twice using Olive ink and embossed with clear embossing powder.  Color with various ink colors, I used Leaf Green, Cornflower Blue, Magenta Hue and glued the two together curling the wings a bit to make it look like it is in flight. Edge the 1" piece of the paper collection with Cornflower Blue and shape into the belly band and use Scor-Tape to adhere together in the back.  Glue the dragonfly to the bellyband and set aside to dry.


Stamp the small dragonfly with Memento Danube Blue ink and emboss with clear embossing powder.  Color using Danube Blue and Leaf Green inks then cut out using coordinating die.  

Decide on placement for the flower and the small dragonfly and glue down.  Slide the belly band down over the card and it is ready to go.


Wednesday, April 6, 2022

Inspiration Wednesday with Heartfelt Creations...

Good morning everyone and welcome!  I'm here to share another card I have made using Heartfelt Creations.  You can see my card in the Heartfelt Creations Gallery here.  I love how these vellum flowers and leaves turned out.  


My finished card is 4 1/4" X 5 1/2".  Make card base and cover with a piece of The Moments in Time Paper Collection.  I used Sheet 8B for this.  Next cut a piece of Sheet 2B of the paper collection and layer with dimensional tape onto the card front. I also added some Magenta Hue ink to the edges of this layer.  The top layer is Sheet 12B and I also used dimensional tape to adhere to the card front.

Using white cardstock, cut the Simply Elegant Centerpiece die and then cut it apart to fit onto the card front.  Glue it down.  

Stamp the flowers onto vellum using Versa Mark ink and emboss with white embossing powder.  Cut out with coordinating dies.  Using the Stack & Store Daubers and Magenta Hue ink, color the flowers. I used one of the Golf tools to shape the petals and then hot glued two petals to form the flower. Put a mound of hot glue in the center of the flowers and add the Prills to form the center.  Stamp the leaves with Versa Mark ink and emboss with white embossing powder.  Use coordinating dies to cut out and color with Olive ink.

Decide on placement of the flowers and leaves and using hot glue adhere to card front.  The card is finished.  


Friday, April 1, 2022

The Four Seasons Challenge - Spring Anything Goes!

Good morning friends and welcome to The Four Seasons Challenge for April, 2022.  As always anything goes and this is the second challenge for Spring!  So gather your supplies think Tulips, Bunny Rabbits, Easter and Spring Showers.  You can post your project here:  The Four Seasons Challenge Blog.  The challenge runs from 12:00 AM (EST) on April 1 until 12:00 AM (est) on April 25.  The winner will be announced on April 28.

We have an Mood board for April but this is just to help give you some ideas for the season.  Remember anything goes! 


The umbrellas were what inspired me from this board and I remembered I had this die and I used it to cut out an umbrella from the Lush Lilac Paper Collection.  My card is 4 1/4" X 5 1/2" and features The Lush Lilac Collection from Heartfelt Creations.  I made Lilac blooms and used the green Prills for the centers and then glued them here and there on the card front.  Tie a bow using white ribbon and to finish everything off use some glitter.  I love glitter and even my little Yorkie girls wear glitter on their little faces.


My grandmother had a huge Lilac Bush and it was the only flower in her garden we were allowed to pick.  When it bloomed in the Spring the blooms were abundant and the scent could be smelled all over her garden.  Our home had a bouquet in every room and it was heavenly! So you can imagine the memories this flower brings forth for me!

Come join us for this wonderful Spring Anything Goes Challenge.  You can see what the design team has created by visiting the Four Seasons Challenge Blog. Come join us and play along.  I would love to see what you create!

Supplies:  Heartfelt Creations Lush Lilac Collection, HCD1-7201 Tickets and Tags Die, Rajni Chawla's Crystal Clear Glitter, Lettuce Entertain You Prills for the flower centers, White Ribbon, Designer Dries Clear Adhesive