Wednesday, June 27, 2018

Debuting the Heartfelt Creations Leafy Accents Stamps, Die and Shaping Mold...

Can I just say what a wonderful release this is for me!  When you make flowers you need lots of leaves and this collection makes that so darn easy!  The leaves come out of that mold with so much dimension and all you have to do is allow them to dry and use them on your project!  This is going to be one of my favorites for now on!  This morning I'm sharing a tag I have made and there are leaves all over it!  The best part is my wrist and shoulder didn't hurt at all.


Products Used
Designer Dries Clear Adhesive159723
Metal Tip for Adhesive Bottles352854
Luggage and Tags DieHCD1-745
Butterfly Medley Paper CollectionHCDP1-251
Memento Dye Ink Pad - Rhubarb StalkTSMP301
Memento Dye Ink Pad - Rose BudTSMP400
Memento Dye Ink Pad - New SproutTSMP704
Memento Dye Ink Pad - Bamboo LeavesTSMP707
Memento Dye Ink Pad - Rich CocoaTSMP800
Memento Dye Ink Pad - Tuxedo BlackTSMP900
Deluxe Flower Shaping KitHCST1-401
Minnie Pearls PrillsANC803
Sizzix Vagabond 2 With Solo Wafer-Thin Die Adapter532423-KIT
Wildwood Florals Cling Stamp SetHCPC-3769
Wildwood Florals DieHCD1-7125
Stack and Store Daubers-Pack of 30HCDA2-450
Rajni Chawla's Crystal ClearPGM15015
Bridal Bouquet Stamens-SmallHCS1-460
Small Sweet Peony Cling Stamp SetHCPC-3819
Small Sweet Peony DieHCD1-7173
Leafy Accents DieHCD1-7193
3D Leafy Accents Shaping MoldHCFB1-467
Groove Golf Tool SetDMCT4185
Leafy Accents Cling Stamp SetHCPC-3835

Other Products: White Cardstock, Grape Jelly and Dandelion Memento Inks, Dimensional Tape, Hot Glue, 2 white Tags, Watercolor Paper, White Seam Binding
For more tips on creating with the flower shaping molds, watch the tutorial at https://youtu.be/FSdPL7nXvQE.
Instructions:  Glue the two tags together and then cover with a piece of the cardstock. Go around the edges of the die with Grape Jelly Ink Memento Ink to accent the colors of the paper collection. Using Tuxedo Black ink, stamp the various leaves onto white cardstock. Using a dauber, color the leaves with New Sprout and Bamboo Leaves Memento ink and then cut out using the coordinating die. Place the leaves into the mold, spritz with water and run through the Vagabond to give them the beautiful 3D look! Allow the leaves to dry.
Working with the yellow flowers, stamp onto Watercolor paper using Dandelion Memento Ink. Color the centers of the flowers with Dandelion Memento Ink and a dauber. Spritz the petals and use the Groove Golf Tool Set to shape the petals. Set aside to dry. Add the Prills to the centers of the flowers and set aside to dry.
Now working with the pink flowers, stamp onto white cardstock using Rich Cocoa Memento Ink. Color with Rosebud Memento Ink and a dauber. Spritz with water and use the Deluxe Flower Shaping tools to shape and then set aside to dry. Once dry punch a hole in the center and thread through the stamen and use hot glue to hold in place. Add glitter to the edges of the flower petals using dries clear adhesive and allow to dry.
Decide on placement of the leaves and flowers and hot glue into place. Cut out the tag and using the dimensional tape, adhere to another piece of the paper collection making a little sign. Glue it down.
Color the seam binding with Grape Jelly ink and water and once dry tie a piece through the top of the tag.

Wednesday, June 20, 2018

Inspiration Wednesday with Heartfelt Creations.....

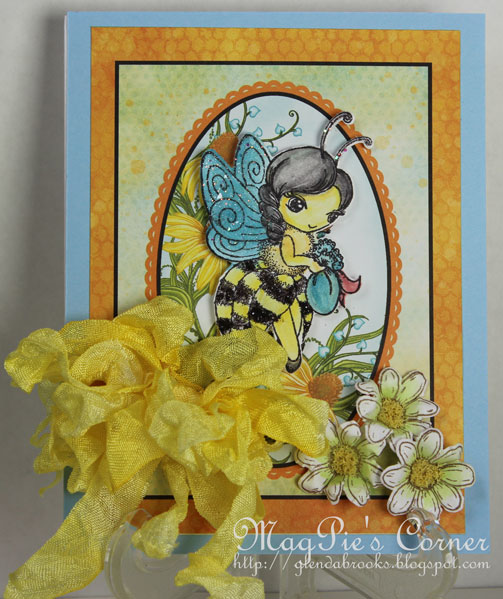
Good morning everyone.  I hope you are enjoying the fine June weather and lots of fun activities.  We are continuing along with the Sweet as Honey Collection at Heartfelt Creations and I'm here to share a quick and easy card with you.


Products Used
Designer Dries Clear Adhesive159723
Metal Tip for Adhesive Bottles352854
Delightful Daisies Cling Stamp SetHCPC-3656
Delightful Daisy DieHCD1-760
Memento Dye Ink Pad - CantaloupeTSMP103
Memento Dye Ink Pad - Teal ZealTSMP602
Memento Dye Ink Pad - New SproutTSMP704
Memento Dye Ink Pad - Rich CocoaTSMP800
Memento Dye Ink Pad - Tuxedo BlackTSMP900
Deluxe Flower Shaping KitHCST1-401
Sizzix Vagabond 2 With Solo Wafer-Thin Die Adapter532423-KIT
Stack and Store Daubers-Pack of 30HCDA2-450
Rajni Chawla's Crystal ClearPGM15015
Honey Bee Maidens Cling Stamp SetHCPC-3829
Sweet as Honey Paper CollectionHCDP1-291
Honey Bee Maidens DieHCD1-7183

Other Products: White Cardstock, Black Glitter, Ivory Flower Soft, Seam Binding, Dandelion Memento Ink Dimensional Tape
For more tips on creating with the Sweet as Honey collection, watch the tutorial at https://youtu.be/89nlTDw3kOE.
Instructions: My card is 4 1/4 x 5 1/2". Make card base and cover with a piece of blue cardstock. Then pick one of the card fronts from the paper collection and add it to the card front. Stamp the flowers with Rich Cocoa Memento Ink onto white cardstock. Color using New Sprout Memento ink and a sponge dauber then cut out using the coordinating die. Stamp the Bee Maiden in Tuxedo Black Memento Ink and color using daubers and Memento Ink then cut out using coordinating die. Add glitter to the Bee Maiden and set her aside to dry. Add flower soft to the center of the daisies and allow them to dry. Use dimensional tape and adhere the Bee Maiden to the card front. Make a cluster of flowers and glue them down.
Cut a length of the seam binding, spritz it with water and color it with Dandelion ink. Scrunch and allow to dry. When dry tie a bow and glue to the card front. The card is finished.
For more inspiration please visit the Heartfelt Creations Blog to see what the other designers have created!

Wednesday, June 13, 2018

Debuting the Sweet as Honey Collection with Heartfelt Creations....


Life is busy and can “bee” overwhelming at times…and it’s in the middle of that chaos that you need to get “busy as a bee” with your creative side and refresh your soul with some fun and lighthearted art from the heart! The “bee-autiful” thing about creating art from the heart is that
whether you’re needing to send “bee-lated” birthday greetings, remind someone to “bee-lieve” in themselves, or simply let someone know you’ll “bee” thinking about them, you’ve not only accomplished your act of kindness through remembering and touching the hearts of friends and loved ones with your creative projects, but you’ve refreshed your soul and refocused your heart as well! Join us in spreading joy and “bee-autiful” creations with the new Sweet as Honey Collection by Heartfelt Creations! “Swarming” with stunning illustrations of whimsical honey bees, charming hives and “bee-autious” garden scenes, this fun and lighthearted collection is ideal for creating projects for a multitude of occasions and is sure to capture the hearts of the young and the young at heart! A bright and happy hued paper collection will fill your soul with rays of warm sunshine yellows, bright sky blues and rich golden honey colors, while boasting captivating honeycomb patterns, happy hexagons, delightful polka dots, perfect plaids and dreamy florals! An assembling of three “bee-coming” cling stamp sets, along with coordinating dies provide endless inspirations with a “bee-autiful” colony of honey bee maidens, whimsical hives and sweet sentiments ideal for pairing with honeycomb die cuts! So, now that you know what all the “buzz” is about, join us in “bee-ing” Sweet as Honey and sharing “bee-autiful” art from the heart wherever you go!


Products Used
Designer Dries Clear Adhesive159723
Luggage and Tags DieHCD1-745
Dove Blender Kit241159
Delightful Daisies Cling Stamp SetHCPC-3656
Delightful Daisy DieHCD1-760
Memento Dye Ink Pad - CantaloupeTSMP103
Memento Dye Ink Pad - Rose BudTSMP400
Memento Dye Ink Pad - Teal ZealTSMP602
Memento Dye Ink Pad - New SproutTSMP704
Memento Dye Ink Pad - Bamboo LeavesTSMP707
Memento Dye Ink Pad - Rich CocoaTSMP800
Memento Dye Ink Pad - Desert SandTSMP804
Deluxe Flower Shaping KitHCST1-401
Ornate Borders and Pockets DieHCD1-780
Pocket and Flipfold Inserts E-KraftHCFP3-439-3
Stack and Store Daubers-Pack of 30HCDA2-450
Rajni Chawla's Crystal ClearPGM15015
Banners Of Love DieHCD1-7160
Frame a Card Leafy Borders DieHCD2-7190
Sweet as Honey Cling Stamp SetHCPC-3831
Honey Bee Bungalows Cling Stamp SetHCPC-3830
Sweet as Honey Paper CollectionHCDP1-291
Sweet as Honey DieHCD1-7185
Honey Bee Bungalows DieHCD1-7184

Other Products: Dandelion Memento Ink, White Cardstock, Cream Colored Cardstock, Large Magnetic Discs, Decorative Flower Center, Black Glitter, Gingham Black Ribbon, Ivory Flower Soft, Vintage Photo Distress Ink
For more tips on creating with the Sweet as Honey collection, watch the tutorial at https://youtu.be/89nlTDw3kOE.
For tips on using the Albums and Inserts watch this video: https://youtu.be/uThSFbPtnYE.
Instructions:  Pick out the papers you want to use and cut out to fit on the album then glue down. On the cover piece I used one of the medallion dies to cut out the design before I glued it down. Be sure to determine where you need the magnets to be ahead of time so you can use the paper to cover them. Cut the dies and glue down where you like. The lace die cut was used as a border and the partial circle die was used as a pocket to hold two tags. The tags were cut out of the paper pack using the Luggage and Tags Dies.
Using Rich Cocoa Memento Ink stamp the flowers and leaves onto white cardstock then use the coordinating dies to cut out. Color the centers of the flowers with New Sprout Memento Ink then add Flower Soft to the center of the flowers and set aside to dry. Color the leaves with a dauber and New Sprout and Bamboo Leaves Memento Ink. Using Rich Cocoa Memento Ink stamp the honey jar and bees then use the coordinating dies to cut out. Color using a combination of the Dove Blender Pen and the daubers and Dandelion and Cantaloupe Memento Inks as well as Rosebud Memento Ink. The little bees are colored with Dandelion and Teal Zeal Memento Ink and the Dove Blender pen. Add glitter to the bee's wings and allow to dry. Once everything is dry you can determine where you want the decorative elements to be and glue them down.
I stamped the sentiment onto cream cardstock using Rich Cocoa Memento Ink and used one of the honey comb shaped dies to cut out then I edged it with Vintage Photo Distress Ink. Glue it down and then add one of the little bees to the corner of the sentiment.
I didn't do a lot of decorating to the inside as I wanted to leave room for adding photos.


Products Used
Designer Dries Clear Adhesive159723
Dove Blender Kit241159
Memento Dye Ink Pad - CantaloupeTSMP103
Memento Dye Ink Pad - Teal ZealTSMP602
Memento Dye Ink Pad - New SproutTSMP704
Memento Dye Ink Pad - Bamboo LeavesTSMP707
Memento Dye Ink Pad - Rich CocoaTSMP800
Deluxe Flower Shaping KitHCST1-401
Sizzix Vagabond 2 With Solo Wafer-Thin Die Adapter532423-KIT
Go Man Go PrillsANC818
Wildwood Florals Cling Stamp SetHCPC-3769
Wildwood Florals DieHCD1-7125
Stack and Store Daubers-Pack of 30HCDA2-450
Rajni Chawla's Crystal ClearPGM15015
Eyelet Oval & Basics Small DieHCD1-7156
Sweet as Honey Cling Stamp SetHCPC-3831
Sweet as Honey Paper CollectionHCDP1-291
Sweet as Honey DieHCD1-7185

Other Products: White Cardstock, Dandelion Memento Ink, Black Glitter, Distress Crackle Paint, Dimensional Tape, Scor-Tape, Seam Binding
For more tips on creating with the Sweet as Honey collection, watch the tutorial at https://youtu.be/89nlTDw3kOE.
Instructions: My card is 4 1/4 X 5 1/2". Make card base and using one of the card fronts from the paper collection, cut out the oval center using the coordinating oval die. Cut a rectangle of contrasting paper and glue it to the center of the front of the card. Also pick another piece of the paper and cut out an oval and set that aside. Adhere the paper to the card front using dimensional tape. Make sure the rectangle piece of paper is showing through the oval cut out.
Stamp and, using coordinating dies, cut out the beehive, sentiment, flowers and bees. Use Rich Cocoa Memento ink to stamp everything except the sentiment and use Tuxedo Black for that. Color leaves using Dove Blender Pen and New Sprout and Bamboo Leaves Memento Ink. The beehive is colored using Dandelion, Cantaloupe, and Rich Cocoa Memento Ink and a combination of the Dove Blender Pen and daubers. Color the flowers with Teal Zeal Memento Ink and a dauber.
Shape the flowers using the Deluxe Flower Shaping Kit and then add Prills to the centers and set aside to dry. Next do the little bees. Add black glitter to their bodies and then add Crackle Paint to their wings and dip them into the Crystal Clear. Set aside to dry. Once dry curl their little wings up so it gives them a bit of dimension and looks like they are flying.
Glue the beehive house to the oval you cut out of the paper and then add the tiny flowers on either side of the steps. Add dimensional tape to the oval and adhere it into the oval cut out on the card front. Make sure to use enough dimensional tape so that the oval stands up above the card front. Decide where you want the little bees to be and glue them down. Glue down the sentiment piece and then tie a bow using the seam binding and adhere to the bottom corner of the card. Your card is ready to go.

Wednesday, June 6, 2018

Heartfelt Creations Inspirational Wednesday...

Good morning from East Tennessee!  I'm happy to report that we are having several days of sunshine and I'm so glad to have a few days to catch up with all my chores!  I want to take a bit of time and share my card for this week using the Backyard Blossoms collection from Heartfelt Creations.


Products Used
Designer Dries Clear Adhesive159723
Redland Elements26redland
Memento Dye Ink Pad - New SproutTSMP704
Memento Dye Ink Pad - Bamboo LeavesTSMP707
Memento Dye Ink Pad - Rich CocoaTSMP800
Sizzix Vagabond 2 With Solo Wafer-Thin Die Adapter532423-KIT
Stack and Store Daubers-Pack of 30HCDA2-450
Intricate Swirl Frames DieHCD2-7191
Backyard Blossoms Cling Stamp SetHCPC-3827
Backyard Blossoms Paper CollectionHCDP1-290
Backyard Blossoms DieHCD1-7181

Other Products: Coneflower Blue Archival Ink, White and Purple Cardstock, Dimensional Tape
For tips on creating with the Backyard Blossoms Collection watch this video: https://youtu.be/swO34-n1HNc.
Instructions: My card is 5 x 7". Make card base out of white cardstock and cover with a piece of purple cardstock. Diecut the Swirl Frame Die out of white cardstock and use dimensional tape to adhere it to the card front. Measure and cut a piece of the paper collection to fit inside the inner area of the die cut. Glue it down.
Stamp the flowers and leaves using Rich Cocoa Memento Ink onto white cardstock. Color the leaves using New Sprout and Bamboo Leaves Memento Ink. The flower part is colored with Coneflower Blue Archival Ink. Cut out the flowers using the coordinating die. Use Designer Dries Clear Adhesive and add the Redlands Elements to the cone part of the flower and set aside to dry. Once dry decide on the placement of the flowers and glue down. The card is ready to go.