Wednesday, February 24, 2021

Inspiration Wednesday with Heartfelt Creations...

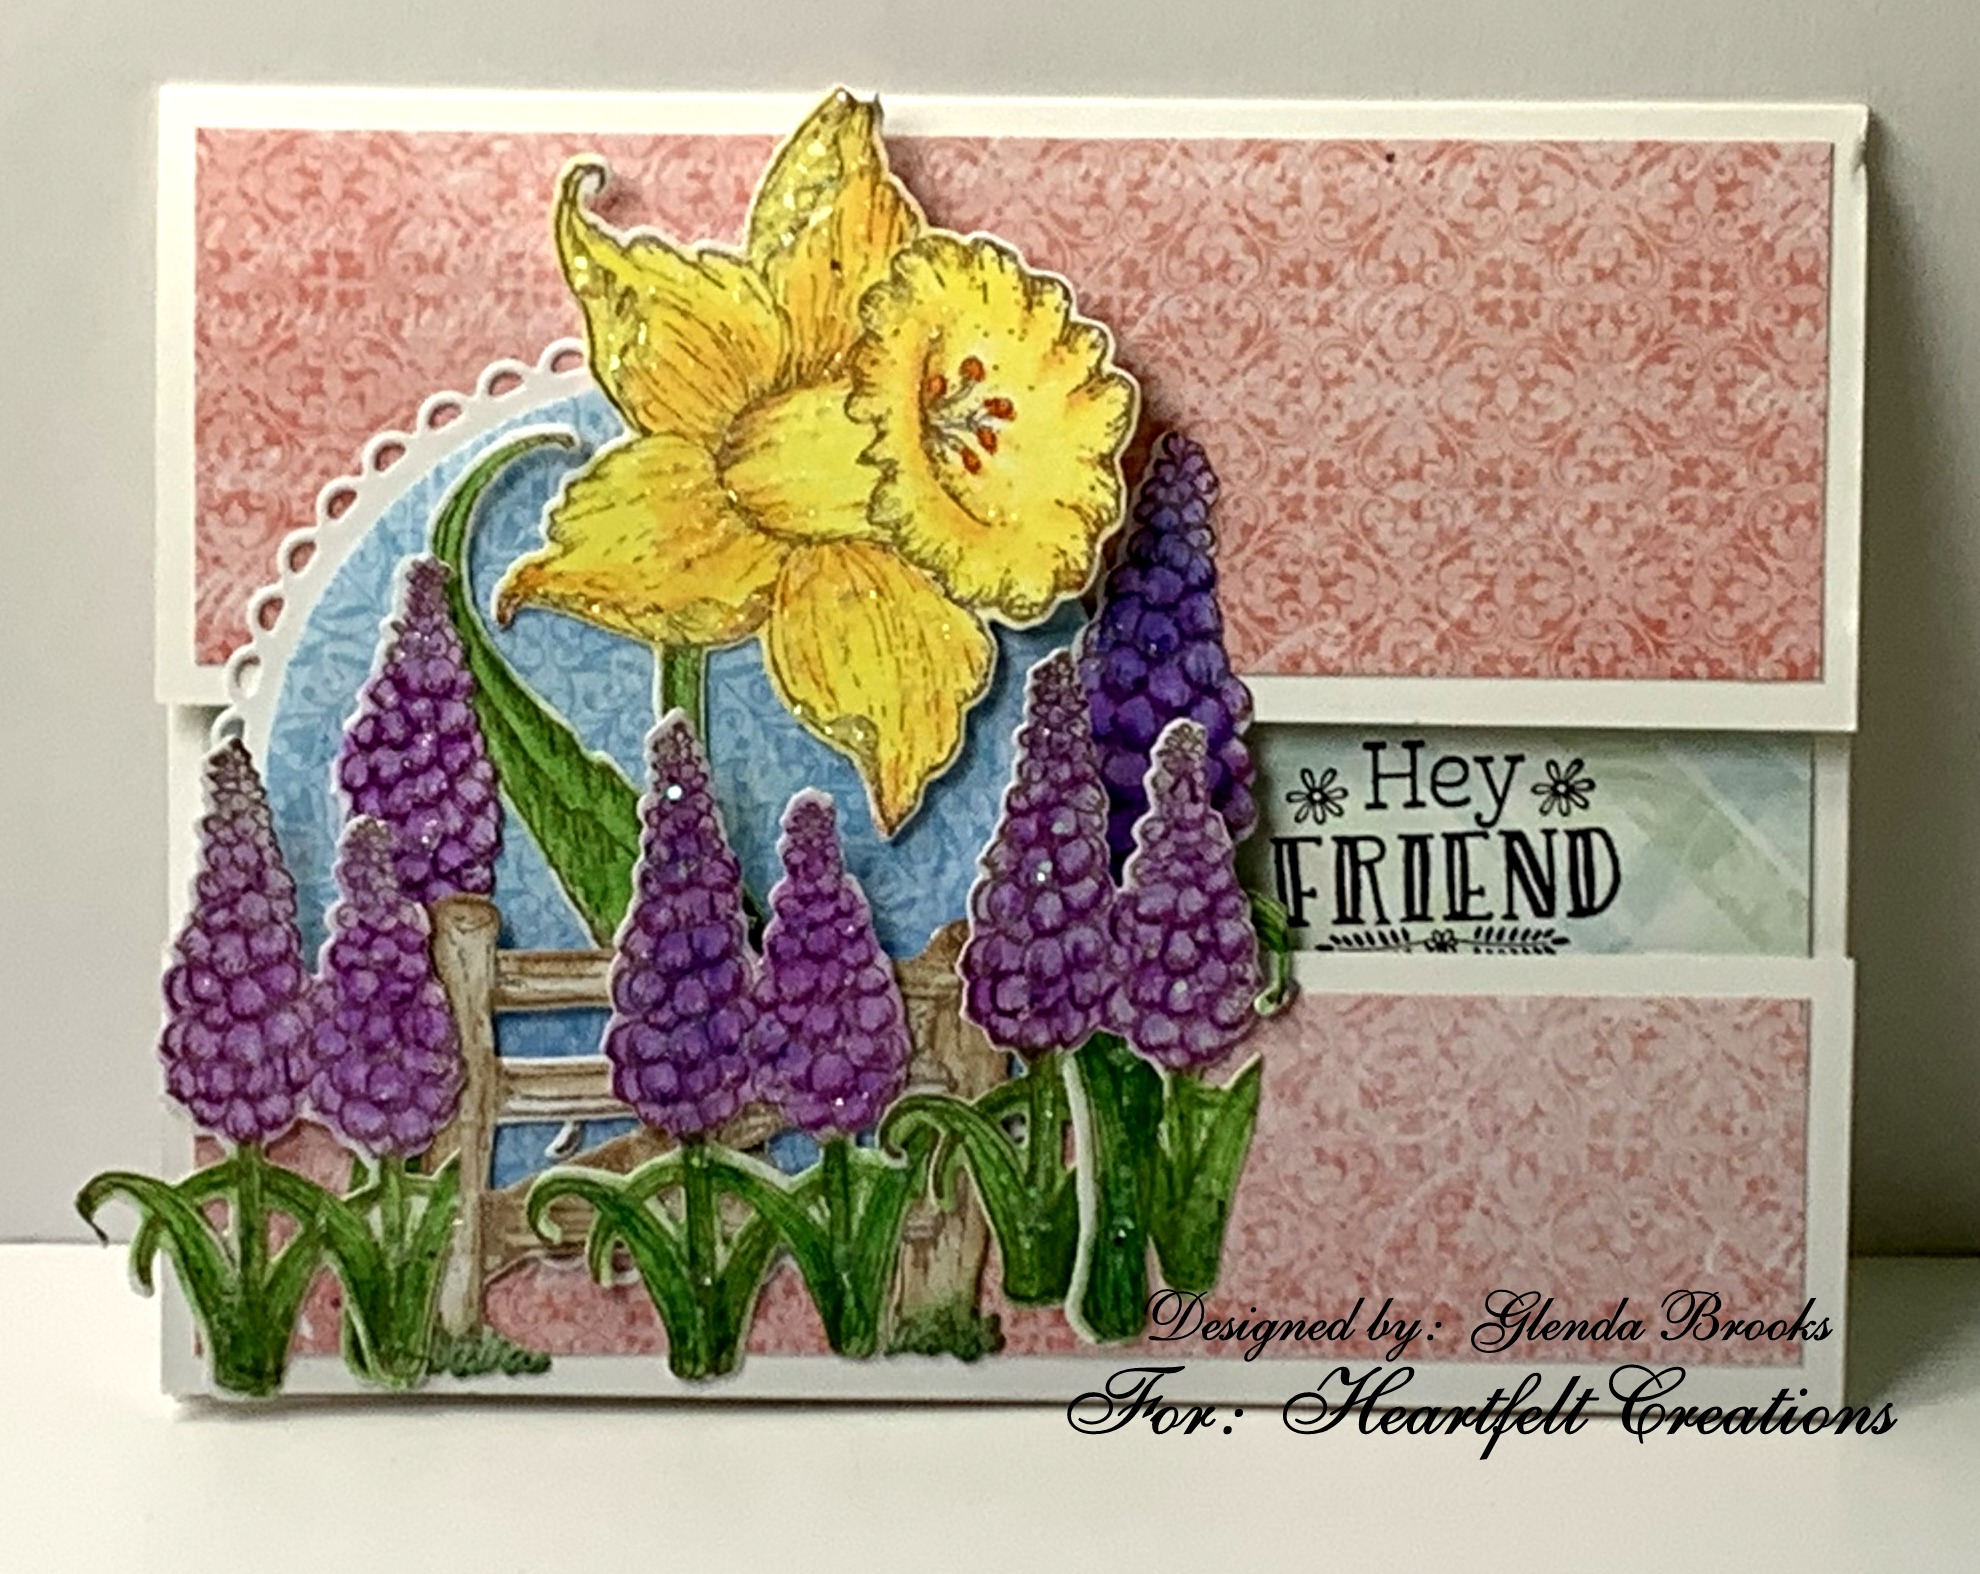
Good morning my friends!  I'm here this morning to share with you a card I have made for Heartfelt Creations using the Delightful Daffodil Collection!  As Spring nears we have been enjoying a few days of Spring temps.  We are approaching highs of 70 degrees and this old girl is definitely ready to welcome Spring!


Products Used:
Delightful Daffodil Paper CollectionHCDP1-2124
Delightful Daffodil & Hyacinth Cling Stamp SetHCPC-3944
Delightful Daffodil & Hyacinth DieHCD1-7342
Delightful Daffodil & Butterfly Cling Stamp SetHCPC-3943
Delightful Daffodil & Butterfly DieHCD1-7341
Barnyard Accents Cling Stamp SetHCPC-3927
Barnyard Accents DieHCD1-7318
For My Friend Sentiments Cling Stamp SetHCPC-3844
Decorative Circle Frames DieHCD2-7306
Circle Basics Large DieHCD1-7155
Stack and Store Daubers-Pack of 30HCDA2-450
Memento Dye Ink Pad - Rich CocoaTSMP800
Memento Dye Ink Pad - Toffee CrunchTSMP805
Ranger Archival Ink Pad - Jet BlackRACP468
Designer Dries Clear Adhesive159723
Metal Tip for Adhesive Bottles352854
Rajni Chawla's Frosting PowderPGM15016 

Other Products: White Cardstock, Die Cut Machine, Dimensional Tape, Prismacolor Pencils: PC918, PC930, PC929, PC933, PC932, PC912, 742 1/2, PC917, PC931, PC911, PC908, PC916, 734 Gamsol, Blending Stumps

Instructions: My finished card size is 4 1/4" x 5 1/2". It is a split front card. Make card base and measure down 2" and cut and then the piece that is left cut at 1 1/2". I cut a piece of Sheet 7B of the paper collection and covered the inside of the card. I used Sheet 11B to cover the front of the card. I used a piece of tape to hold the bottom portion of the card front in place then I cut out the circle medallion and I used dimensional tape to adhere a piece of Sheet 12B of the paper collection that was also cut using the circle die. Add glue to the top and bottom of the circle medallion and glue down. I stamped the sentiment through the opening in the card front.

Using Rich Cocoa ink stamp the flowers and the fence. Color the flowers with the colored pencils and cut out using coordinating dies. Add glitter and set aside to dry. I colored the fence with Stack and Store Daubers and Toffee Crunch ink and cut it out using the coordinating die.

Once everything is dry, decide on placement and glue down the elements and the card is finished.

Monday, February 22, 2021

Sending you a Hug...Inspired by Facebook Live with Emma Lou Beechy...

Good Monday morning my friends.  I hope you are safe and well as we begin a brand new week!  This morning I'm sharing a card to encourage someone and let them know you are thinking of them!  Emma Lou Beechy with Heartfelt Creations did a Facebook live on this card on February 17, 2020  and I just had to make one.  She totally inspired me to do this one.


I used products from the Delightful Daffodil collection and the Teardrop Lattice Gateway die to create this card.  Also used the Eyelet Rectangle and Basic Dies.  When I saw this video I was totally inspired and just had to try one for myself.  I did change the dimensions on this card a little bit so it wasn't a complete copy.  Thank you Emma Lou!

I hope you enjoy this as much as I loved making it!  Why don't you give it a try.  You will find it to be a quick and easy card and can be mailed using one first class stamp.  

Well this does it for me this morning.  I'm off for a second cup of coffee.  I hope your day is filled with Joy!

Friday, February 19, 2021

I'm Thinking of You.....

Good Friday morning my friends!  Well we had a little artic blast here and some rain, sleet and snow and the rain again all in a span of a few hours and it moved on up the east coast.  Thankfully it didn't amount to much in these parts for very long.  Of course I'm seeing daffodils peeping up through the ice and snow but in this area anything is possible. East Tennesee has the ability to change it's weather in the blink of an eye.  You may be wearing flip flops in one minute and in the next blizzard like conditions.  I used to be one of those ladies in her own  personal summer and longing for the day I became the little old lady carrying a sweater with her at all times.  Well this year I have become that little lady!  I am now cold most days and always find myself layering up to stay comfortable.  I guess you need to be careful what you ask for!  But I have to admit...it is kinda nice!  

This morning I'm here to share another slimline card with you!  It measures 3 3/4 X 8 3/4.  


I used Heartfelt Creations Large Garden Zinnia and Delightful Dasies for the flowers and Leafy accents for the leaves.  The embossing folder is called Wildflower by Cuttlebug. The sentiments used is also Heartfelt Creations For my Friend Sentiments.  I'm not going any further into the mechanics of this card...it is quick and easy and ready to go very quickly!

I have to admit, I have really become addicted to these little treasures and love how easy they fit in a business envelope or you can make one of your own.  Usually one first class stamp will carry it if you manage to keep it flat.  So this one is ready to be sent on it's way to bring a family member a bit of sunshine in their day! Get into your supplies and come up with a quick card of your own and let's get the written word out there!

I hope your day is filed with joy!


Wednesday, February 17, 2021

Inspiration Wednesday with Heartfelt Creations...

Good morning friends from a frosty East Tennessee!  I think most of us are in the same boat...so far no ice or snow but it may be on the way.  I do have a lot to be thankful for as my electricity is still going!  

I'm here this morning to share another card I have made using the Delightful Daffodil collection.  With the weather we are having it is good to think of Spring.  I actually have little Daffodil shoots coming up in my landscaping.  That makes me feel like Spring is coming!


Products Used:
Delightful Daffodil Paper CollectionHCDP1-2124
Delightful Daffodil & Butterfly Cling Stamp SetHCPC-3943
Delightful Daffodil & Butterfly DieHCD1-7341
Vellum Paper - 10 Sheets3-GN2911-F
Designer Dries Clear Adhesive159723
Metal Tip for Adhesive Bottles352854
Rajni Chawla's Crystal ClearPGM15015
Crystal Ultrafine Transparent Glitter 1/2 oz.85-glitter
Memento Dye Ink Pad - Danube BlueTSMP600
Memento Dye Ink Pad - Rich CocoaTSMP800
Zig Clean Color Real Brush Markers - 48 Pack478594
Hydra SpongesRLHS100

Other Products: White Cardstock, Die Cut Machine, Dimensional Tape, Prismacolor Pencils: PC918, PC930, PC929, PC933, PC932, PC912, 742 1/2, PC917, PC931, PC911, PC908, PC916, 734 White Seam Binding, Gamsol, Blending Stumps

Instructions: Using the largest die cut a shaped card for the card base. Cover with a piece of Sheet 4B of the paper Collection. Using Sheet #12B cut out pieces to layer on the card front as well as some using white cardstock. Glitter the white die cuts and on the largest diecut, use dimensional tape to adhere to card front. Glue the other layers down onto the card front.

Stamp the flowers with Rich Cocoa ink and color using the pencils and gamsol. Use coordinating dies to die cut the flowers. Add glitter and set aside to dry. Lay down some color from the Dull Blue Marker, spritz with water and drag the seam binding through the puddle to color. Scrunch and allow to dry. Tie a bow and once the flowers are glued to the card front, glue down the bow.

Stamp the butterfly onto a piece of Sheet 12B paper using Danube Blue ink cut out with coordinating die and glitter. Set aside to dry. Using the vellum, cut out the overlay for the butterfly and glitter and allow it to dry. Glue the butterfly and the overlay together and glue to the card front. The card is finished.

Monday, February 15, 2021

Happy Birthday ......

 Good morning friends!  I'm constantly trying to find new designs for the birthday cards I need to make each year.  I have been loving the slim line cards and do one every chance I get.  Recently I had a dear friend having a birthday and this is the card I made for her.


I used a Gina K Designs stamp set that is called Holiday Tapestry and was introduced as a Christmas set but this flourish can be used in so many ways.  I'm seeing a lot of this flourish in my life.  I hope you enjoy this as much as I do.  I just love the white embossing on that pretty blue background!  

Well that's it for me this Monday morning!  Hope all is well in your world!  Try and do something today that brings you Joy!


Wednesday, February 10, 2021

Introducing the Delightful Daffodil Collection....

Good morning friends.  Another month has rolled around and we are once again introducing another wonderful Heartfelt Creations collection!  I have actually seen s few shoots of green coming through the ground and I just know it will not be long before there is a burst of color there!  So this morning we at Heartfelt Creations are giving you a little promise of what is to come!   


Other Products: White Cardstock, Prisma Color Pencils: PC911, PC912, PC908, PC918, PC916, PC917, 742 1/2, PC931 Dimensional Tape, Gamsol, Blending Stumps

Instructions: My finished card size is 5" x 7". Using the Royal Elegance Frames Die, make a shaped card and cover with a piece of the paper collection. I used sheet #7B. I edged that with a stack and store dauber and Garden Patina ink. Using white card stock, cut the large decorative piece and then I added Crystal Clear glitter around the edges and allowed that to dry. When dry, I used DDOTS to adhere to the card front.

I cut the next size oval using sheet 9B of the paper collection. Glue this to the card front.

Stamp the flowers with Memento Rich Cocoa Ink and use the pencils and Gamsol to color and shade the flowers. Using the coordinating die, cut out the flowers. Add Crystal glitter and allow to dry. When dry, use DDOTS to adhere to the top of the last oval.

Using the Cut Mat Create dies, cut out the label piece from the paper collection. It was on Sheet 3A of the paper collection. Stamp the sentiment onto the label and edge with Garden Patina and a Stack and Store Dauber. I used dimensional tape to adhere to the card front. The card is finished.

To see more projects from the Design Team head over to the Heartfelt Creations Blog.


Wednesday, February 3, 2021

Heartfelt Creations Inspiration Wednesday...Grateful Garden...

Good morning my friends and I hope you are keeping well!  It has been cold and snowy here in East Tennessee over the past few days.  No accumulations but just dusting roof tops and shrubs.  I love to sit by the window and watch the snow falling and so I have been content.  This morning I'm here to share another card I have made for Heartfelt Creations.  It is sporting some summer blooms so I'm hoping it makes you feel like we took a walk in the garden!


Products Used:
Summer's Garden Paper CollectionHCDP1-2119
Large Garden Zinnia Cling Stamp SetHCPC-3923
Large Garden Zinnia DieHCD1-7314
Small Garden Zinnia Cling Stamp SetHCPC-3924
Small Garden Zinnia DieHCD1-7315
Small 3D Zinnia Shaping MoldHCFB1-492
Royal Elegance Frames DieHCD2-7307
For My Friend Sentiments Cling Stamp SetHCPC-3844
Luxe Gold CardstockHCGP1-488
Stack and Store Daubers-Pack of 30HCDA2-450
Groove Golf Tool SetDMCT4185
Hydra SpongesRLHS100
Metal Tip for Adhesive Bottles352854
Designer Dries Clear Adhesive159723
Double Dots 100pc. -3D Foam CirclesDDOTS
Lemon Chiffon PrillsANC809
Lettuce Entertain You PrillsANC814
Rajni Chawla's Crystal ClearPGM15015

Other Products: White Cardstock, Dimensional Tape, Hot Glue Gun, Die Cut Machine

Instructions: My finished card size is 5" x 7". Make card base and cover with a piece of the paper collection. I used Sheet 8B Green. Next, using gold cardstock cut out the largest Royal Elegance Frames Die and using dimensional tape, add it to the card front. Using white cardstock cut out the next size down of the dies and using DDots attach it to the gold piece. Cut an oval from the paper collection; I used 6A it is a pinkish color, then attach this to the white die cut. Stamp the sentiment onto white cardstock and using one of the decorative die pieces cut it out and using dimensional tape, add it to the card front. This gives you some dimension and draws attention to the different die cuts.

Stamp the leaves with Fern Green and using daubers color with leaf green ink and then edge in Library green for some more depth of color. Cut out with coordinating die. Lay them onto the 3D mold and spritz with water and run through the die cut machine. Lay them out onto the desk and allow to dry.

Stamp the Flowers with the colors you are going to color them with. Use what color makes you happy. Next cut out the petals with coordinating dies. This time instead of using the molds to shape the petals I used the Golf Tools and a pair of tweezers to shape and curl the flower petals. It was fun to do this for a change. Next, layer the petals and glue together then add Prills to the centers. Cut up one of the sponges and add glue then dust with glitter and allow to dry. Decide on placement of the flowers and leaves and glue them down. The card is finished!

For mor inspiration head over to the Heartfelt Creations Blog to see what the other designers have created.