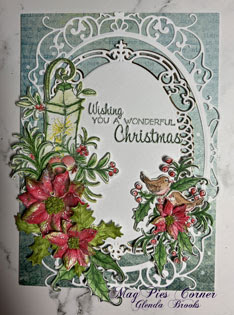
Wednesday, July 26, 2023

Heartfelt Creations....Filigree Noel...

Today is my final post as a Heartfelt Creations Designer. I find I'm struggling to have words to express my feelings about this like many other design team members.  I began my journey with Heartfelt Creations in 2011 and through the years I always felt like I had come home.  Their products were just perfect for my style of crafting and they were always so very generous with me!  They are definitely a class act and they will be missed!  Now what do I do with myself on Wednesdays?

My card this morning is using the Holiday Ornament collection and you can find my card in the Heartfelt Creations Gallery here.


My finished card size is 4 1/4" X 5 1/2".  Make card base and cover with a piece of Sheet 3B of the paper collection.  Set Aside.

Using various dies from the Rectangle Fillagree Die set cut out of the Flower Shaping paper and also out of the Luxe Gold Cardstock.  Glue the larger die cut to the card front and then cut another shape from the set using a piece of Sheet 9B of the paper collection and glue that to the inside of the larger piece.  Next cut two pieces of the next smallest die using white and gold cardstock then glue together with the gold piece showing through from the back. Glue this to the card front.  

Stamp the ornament onto watercolor paper using Memento Bamboo Leaves ink and then emboss with gold embossing powder.  Use the Zig markers and the waterbrush to color the ornament and allow to dry. Die cut with coordinating die.   Use 3D Crystal Lacquer to cover the ornament and give it a pretty shine.  Allow this to dry.

Cut a piece of white ribbon and tie a bow and make a hanger to hold the ornament.  Hot glue to hold into place.  The card is finished.

Monday, July 24, 2023

Little Fish ...

Good morning friends and welcome to my blog.  I'm here this morning to share with you a card I made for the Can You Handle the Pressure Challenge. The challenge is to use any embossing folder with a twist of Nautical.  This is just a suggestion and as long as you use an embossing folder your card will  apply.  


I chose an embossing folder that reminded me of sea weed and the image is looking through a port hole of a boat.  I fell in love with this sweet little fish so I wanted to use it!  The image, sentiment and paper are from the Under The Sea Collection from Heartfelt Creations.  I hope you enjoy!

Wednesday, July 19, 2023

Inspiration Wednesday with Heartfelt Creations...

Good morning friends and welcome to my blog!  I'm here this morning to share another Christmas card with you using the Holiday Ornament Collection!  This is another beautiful collection and the last collection Heartfelt Creations will be releasing.  You can find my card in the Heartfelt Creations Gallery  with all the details listed there.


My card is a shaped card made by folding a piece of Deluxe Flower Shaping Paper and laying the die over the fold and running through the die cut machine.  Cut another Elaborate Oval Frame out of Deluxe Flower Shaping Paper and glue to the front of the card.  Cover with a piece of Sheet 3A of the paper collection.

Cut one white and one gold of the die and layer them together so the gold shows behind the white just a bit then glue.  Glue to the card front.  Stamp the sentiment onto the card front using Rhubarb Stalk ink and set aside.

Stamp the ornaments using Bamboo Leaves ink onto Deluxe Flower Shaping Paper and add ink using Stack and Store Daubers.  I used Bamboo Leaves and Rhubarb Stalk ink. Cut out using the coordinating die.  I used a paint brush and 3D Crystal Lacquer to paint the ornaments so they shine and allow to dry.  As they are drying sprinkle with Rajni Chawla's Crystal Clear Glitter and allow everything to dry. Use hot glue and glue down the ornaments to the top of the card front. Tie a piece of red seam binding into a bow and hot glue to the top of the ornaments and the card is finished.  

Monday, July 17, 2023

Christmas Bird.....

Good morning my friends and welcome!  Bring your cup of beverage along and let's visit a spell!  This morning I'm here to share another Christmas card I made to add to my stash for the coming Christmas season!  It won't be long and we will all be singing the blues because we don't have our cards finished !  I have found this wonderful challenge Peace On Earth Christmas Challenge.  I have really been enjoying playing along and now I find I have made a dent in my list.  I'm hoping to play along in each challenge until I have my cards finished and ready to go!


My card is quick and simple and flat!  It can be mailed with a first-class stamp!  I just cut a circle out of some pretty Christmas paper then another circle to mat then layered onto a die cut and onto more pretty paper.  It is a 4 1/4" X 5 1/2" card and a perfect size!  

Well that is it for me this morning.  I hope you enjoy my card as much as I enjoyed creating it.  Happy Monday everyone!

Wednesday, July 12, 2023

Debuting the Holiday Ornament Collection... Heartfelt Creations...

Good morning my friends and welcome!  This morning I'm here to introduce the brand new Holiday Ornament Collection with Heartfelt Creations!  I just love this collection and will use these products to make my own Christmas Cards this year and for many years to come!  I have a card for you this morning and you can find it in the Heartfelt Creations Gallery.   


My card is a shaped card.  Make card base by cutting the die just over the fold of Deluxe Flower Shaping Paper. Cut a piece of Sheet 3A of the Paper Collection using the die twice.  Cover the front and the inside of the card with this.  Using the Stack and Store Daubers edge the paper with Memento Bamboo Leaves and sponge some ink over the whole shape to make the green just a shade darker on the inside piece.  

Stamp the ornament onto Deluxe Flower Shaping Paper using Leaf Green Archival Ink and emboss with gold embossing powder.  Die cut the piece using coordinating dies and glue to the card front.  I stamped and embossed the ornament twice so I could cut out the center star to give me an additional piece of the image to use.  I used a cut up piece of the double dots and used that to adhere the star to the card front.  This gives it a bit of dimension.  Set aside to dry.

Stamp the sentiment onto a piece of the Deluxe Flower Shaping Paper using Memento Bamboo Leaves ink and die cut using coordinating die.  Clue to the inside of the card being careful to place it over the part of the paper that had more ink sponged to make it darker.  This allows the sentiment to show up better when it has been glued down.  

This makes a very beautiful shaped card and could also be hung on the tree when received.  


Wednesday, July 5, 2023

Inspiration Wednesday with Heartfelt Creations....

Good morning everyone and welcome to my space!  I'm here this morning to share another Heartfelt Creations card and I hope  you enjoy it!  You can find my card in the Heartfelt Creations Gallery for all the products used and all details so you can create one of your own. 


My finished card is 5 1/2" X 7 1/2".  I made a tent fold card by cutting the Deluxe Flower Shaping Paper once to 5 1/2" X 7 1/2" and once to 5 1/2" X 8".  Score the 8" piece at 1/2" then glue to the 7 1/2" piece to make the tent fold card.  Cover the front of the card with a piece of Sheet 4A of the paper collection.  Die cut two pieces of the Delicate Daisy border die out of Deluxe Flower Shaping Paper and glue to the center of the card front.  Cut off what overhangs the bottom of the card.  

Stamp the Feathery Florals stamp twice onto Deluxe Flower Shaping Paper; once in Leaf Green and once in Magenta Hue. Color using inks and the Stack and Store Daubers.  Cut out with coordinating dies and shape using the Deluxe Flower Shaping Kit. Cut off some of the greenery on the piece that was stamped in Magenta Hue.  Glue the two pieces together.  

Stamp the Floral Feather stamps once using the Encore Gold and Cactus Flower and Forget Me Not using an ombre technique.  Color using different inks and Stack and Store Daubers.  Cut out using coordinating dies.  

Pour out some Designer Dries Clear adhesive and dilute with water then use a brush and paint onto the different pieces and sprinkle glitter. Add the Prills to the center of the flowers and allow to dry then glue everything to the side of the card front.

Cut a sentiment from sheet 6A of the paper collection and mat with a piece of Sheet 4A.  Add dimensional tape and adhere to the card front.  

This is a quick and easy design which packs a punch.

Tuesday, July 4, 2023

A Quick and Easy Christmas Card......

Good morning everyone and welcome.  I'm sharing another quick and easy Christmas card and I'm entering it in the Peace on Earth Christmas Challenge


Just a few die cuts and the pretty Festive Christmas Collection papers and you have a beautiful card!  Not a lot more to say about this one.  Very quick and easy to do!  Enjoy!

Monday, July 3, 2023

Peace on Earth Christmas Challenge.....#43

Good morning friends and welcome.  I have slowly begun to make a few Christmas cards and decided this would be a perfect time to join in this challenge. You can find the Challenge at:  Peace on Earth Christmas Challenge.  My card features all products from Heartfelt Creations and it just makes me happy!


If you have a few minutes you might want to begin working on your Christmas cards as well and of course you will be welcome to play along with this great challenge.  Nothing like getting a head start on your cards!