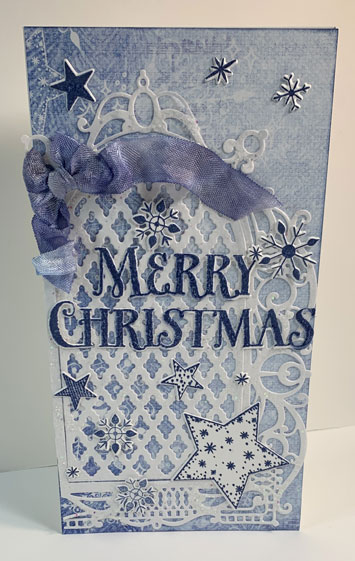
Here I am again with a new Christmas card for you. This time the pretty papers and dies do all the heavy lifting. Quick and easy and flat so it's easy to mail. It is 5" X 7" and I think it's a stunner! I'm entering this one in the Peace on Earth Christmas Challenge. This is such a fun challenge and so easy to participate in so if you have some time go on over and check it out. It will help you to get a jump on your holiday cards!
Tuesday, August 22, 2023
Wednesday, June 28, 2023
Another Inspiration Wednesday with Heartfelt Creations...
Hello my friends! It's once again Wednesday and I'm here to share another project from Heartfelt Creations. You can find my card in the Gallery with all the instructions and products used.
My finished card size is a tent fold 4 1/4" X 5 1/2". Make card base using Deluxe Flower Shaping Paper and cover the front with a piece of Sheet 6B of the paper collection. Cut a layering piece of gold cardstock and glue to card front. Next cut a piece of white cardstock and emboss with the embossing folder. Glue to the card front.
Stamp the sentiment using Carnation Red ink and die cut with coordinating die three times. Glue together. This gives a very sturdy feel to the sentiment. Glue to the bottom of the card front.
Stamp the poinsettia twice in Carnation Red onto Deluxe Flower Shaping Paper and die cut with coordinating dies. Color with Carnation Red and some spots of Leaf Green. Lay onto the Mold, spritz with water and run through the die cut machine. Turn out onto the desk to dry. When dry, glue the two petals together and add the Prills to the center. Set aside to dry. Stamp the Holly Berry Spray in Leaf green and color with same. Cut out using the coordinating die.
Glue the Holly Berry Spray onto the card front and glue the Poinsettia on top of that. When everything is dry, the card is ready to go!
Wednesday, August 3, 2022
Inspiration Wednesday ... A Slimline Merry Christmas Card ...
Good morning friends and welcome to Inspiration Wednesday with Heartfelt Creations. I'm here to share another Christmas card with you and it is a slimline card. I love this style of card and seem to make them often. You can find my card in the Heartfelt Creations Gallery along with all the details of the card.
Wednesday, July 20, 2022
Inspiration Wednesday with Heartfelt Creations - Continuing on with the Holiday Star Collection..
Good morning friends and welcome! Wednesday has once again rolled around and it's time to share another Heartfelt Creations card with you. I'm continuing along with the Holiday Star Collection and you can see my card in the Heartfelt Creations Gallery.
Wednesday, December 1, 2021
The Four Seasons - Winter Season - December - Anything Goes Winter....
Good morning friends and welcome to The Four Seasons Challenge for December. As always anything goes and this is the first challenge for Winter! So gather your supplies and lets get started. You can post your project here: The Four Seasons Challenge Blog. The challenge runs from 12:00 AM (EST) on December 1 until 12:00 AM (est) on December 25. The winner will be announced on December 28.
We have an inspiration board for December but this is just to help give you some ideas for the season. Remember anything goes!
My finished card measures 5" X 7" and is built onto a 4 1/4" X 5 1/2" base. Make card base and cover with a piece of designer paper cut just slightly smaller. Using white cardstock die cut two pieces to glue onto each end of a scalloped rectangle cut from gold cardstock. Glue to card base. The die cut pieces extend out over the edges of the base card making it 7" long.
Archival inks were used to stamp and color all the elements for the wreath. Die cut the elements with coordinating dies and hand shape with the Heartfelt Creations Deluxe Flower Shaping kit. Hot glue all the elements onto the wreath shadow die cut. I just love the big red bow that is cut out of gold cardstock and placed over a piece of red paper that is die cut to go behind the gold piece. Once you have everything in place use a sponge and some dries clear adhesive to apply some glitter here and there and then set it aside to allow the glue to dry. Once everything is dry you can glue the wreath to the card front. I think this makes a great Christmas card and it can be mailed without extra postage!
Supplies:
Heartfelt Creations Festive Poinsettia Paper Collection
Heartfelt Creations Home For The Holidays Paper Collection
Heartfelt Creations Seasonal Wreath Paper Collection
HCD1-7375 Heartfelt Creations Seasonal Wreath Die
HCD1-7306 Heartfelt Creations Eyelet Rectangle & Basics Die
HCD2-7306 Heartfelt Creations Decorative Circle Frames Die
HCD1-7370 Heartfelt Creations Simply Elegant Centerpiece Die
HCPC-3967 Heartfelt Creations Winter Wreath Accents Cling Stamp Set
Luxe Gold Cardstock
Designer Dries Clear Adhesive
#85 Crystal Glitter
White Cardstock
Hot Glue Gun
Dimensional Tape
Fern Green Archival Ink
Leaf Green Archival Ink
Jet Black Archival Ink
Gold Embossing Powder
Monday, January 25, 2021
Winter Snowman.....
I used the sweet snowman and gifts from the Countryside Cottage Collection from Heartfelt Creations and the sentiment is from my stash. When Heartfelt Creations created this collection they made so many of us so happy. It has something for every season. Everything was watercolored with Zig Colored Markers and a water brush. Super easy and lots of fun!


