Wednesday, March 30, 2022

Inspiration Wednesday with Heartfelt Creations...

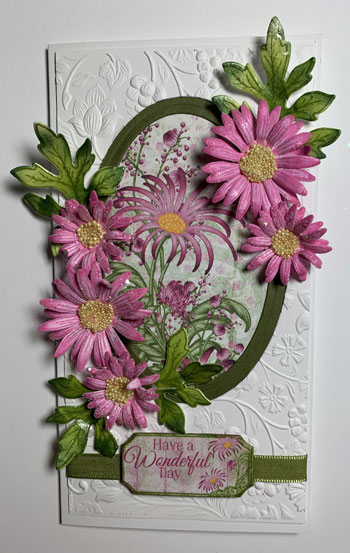
Good morning my friends and welcome to this Inspiration Wednesday from Heartfelt Creations.  I'm here this morning to share another card I have made using the Wild Aster flowers.  I love this flower and I use it quite a bit because it is so easy to shape and make!  You can find my card in the Heartfelt Creations Gallery


My finished card size is 3 3/4" X 7".  Make card base and set aside while we work on the elements.  

Cut a piece of white cardstock 3 1/2" X 6 3/4".  Use one of the oval dies and cut an opening in the cardstock.  I just eye balled this.  I used the embossing folder at this point and set it aside.  Using green cardstock cut a piece about 3 1/4" X 6"  and cut a smaller oval in it.  Position the green piece behind the white embossed piece making sure it is even in the opening and glue down.  I chose a piece of the paper collection and cut a piece to lay behind the opening.  Glue this down.  Wrap a piece of ribbon around the bottom of the card panel and use Scor-Tape to adhere to the back of the panel.  Cut out one of the tags from the paper collection and using dimensional tape, adhere to the panel over the ribbon.  Glue this panel to the card front.

Now we are going to work on the flowers.  Stamp the flowers onto Deluxe Flower Shaping Paper using Magenta Hue ink. Color these petals with Magenta Hue as well.  Use coordinating dies to cut out the flower petals.  Stamp the leaves using Fern Green and color with Leaf Green ink.  Cut out using coordinating dies.  Edge the leaves with Olive ink to give dimension to them. I used Stack and Store Daubers to add color to the flowers and leaves. Shape the leaves a bit using the Deluxe Flower Shaping Kit and then brush on Glossy Accents and set aside to dry.  Shape the flowers using the Deluxe Flower Shaping kit and then hot glue two petals together being careful to offset the petals.  Add the Lemon Chiffon Prills to the centers of the flowers and set aside to dry.  Once dry, use Hydra Sponges and Dries Clear Adhesive to add glitter to the flower petals and then set aside to dry.  Once everything is dry decide on placement and hot glue to the card front.   
Wednesday, March 23, 2022

Another Inspiration Wednesday with Heartfelt Creations...

Good morning my friends and welcome to a rainy Spring morning in East Tennessee!  It is once again Wednesday and time to share a card from Heartfelt Creations.  

My card is featuring the Sweet Pea Collection and can be found in the Heartfelt Creations Gallery here.


My finished card size is 3 1/2" X 6".  Make easel card base by cutting white cardstock to measure 6" X 7".  Score the 7" side in half and then score one of the sides in half again. Make a mountain fold here. Cut a white piece of cardstock 3 1/2" X 6" and glue to the mountain fold.  I covered this piece of cardstock with a piece of sheet 3B of the paper collection.  The inside of the card is covered with a piece of 10A of the paper collection. I also cut a small piece of Sheet 10A for the back side of the easel.  

Stamp the flowers with Memento New Sprout ink and cut out with coordinating dies.  Stamp the leaves with Memento Fern Green, color with Leaf Green and cut out with coordinating dies.  Edge the leaves with Memento Olive ink to highlight and add dimension to the leaves.  Lay the flower petals and leaves onto the mold, spritz with water and run through the die cut machine.  Turn out onto the desk to dry.  I used the Deluxe Flower Shaping kit to add a bit more dimension to the flower petals.  Shape the flowers and hot glue together to hold in place.  Allow everything to dry.

Die cut small decorative piece of the Elaborate Frames dies using a piece of sheet 9B of the paper collection.  Use dimensional tape to adhere to card front.  Decide on placement of flowers and leaves and use hot glue to adhere to the card front.  Add Crystal Clear glitter to the flowers and allow to dry.  

Stamp the sentiment onto a piece of sheet 10A of the paper collection that measures 1" X 3 1/4".  Mat with a slightly larger piece of sheet 9B and glue to the back of the sentiment.  Adhere to the inside of the card using dimensional tape.  This will serve as a stop for the easel section of the card. 

Wednesday, March 16, 2022

Inspiration Wednesday with Heartfelt Creations - Continuing along with the Sweet Pea Collection...

Good morning my friends and welcome as we continue along with the Sweet Pea Collection from Heartfelt Creations.


You can see my card in the Heartfelt Creations Gallery with a list of all the products I used to create it.

My finished card size is 5" X 7".  Make card base and cover with a piece of Sheet 3B of the paper collection.

Cut two of the Palace Gateway Die out of white cardstock.  Cut down and glue together to make the base for the oval pieces.  Using the Hydra Sponge add glue and sprinkle with glitter, set aside to dry.  Once dry, glue to the card front.  Cut a large oval shape using sheet 6B of the paper collection.  I also cut a piece of heavy white cardstock into a large oval as well.  Glue the two together.  Edge with Majestic Violet Ink and a Stack & Store Dauber.  Using dimensional tape, adhere to card front.  Cut a smaller oval using a piece of sheet 6A and white cardstock.  Glue the two together.  Stamp the sentiment onto the front of the smaller oval using Majestic Violet and then edge the oval with New Sprout ink.  Use dimensional tape to adhere to the larger oval.

Stamp the leaves with Fern Green ink, color with leaf green and cut out using coordinating dies.  Edge with olive to add dimension.  Stamp the flowers with Majestic Violet and add more Majestic Violet to the petals using a Stack and Store Dauber. Cut out using coordinating dies. Also color the back of the petals with Majestic Violet ink.  Lay the leaves and flowers onto the shaping mold, spritz with water and run through the die cut machine.  Use the Deluxe Flower Shaping Kit of shape a bit more and then glue the petals together using the hot glue gun.  Add glitter to the flowers and allow to dry.

Once everything is dry glue down using the hot glue gun.  The card is finished.


Wednesday, March 9, 2022

Debuting the Sweet Pea Collection from Heartfelt Creations...

Good morning everyone and welcome!  I'm here this morning to introduce you to the brand new Sweet Pea Collection from Heartfelt Creations!   These flowers remind me of my childhood and my mother having these in a vase on our table.  They seemed to grow wild in our yard and they were abundant.  Most flowers remind me of my Mom and my childhood but these seem to be very special to me.  You can see my card and all the items used to create it in the Heartfelt Creations Gallery.


The finished card size is 5 X 7 and it is a shaped card.  Using the Simply Classic Rectangle Frame Die, make the shaped card base.  Cover with a piece of sheet 9B of the paper collection.  Next cut two decorative pieces of the die; one using white cardstock and one using gold.  Glue the two together so the gold shows through from the bottom side of the dies.  Attach to the card front.

Stamp the vase in Magenta Hue and color around the edges with a Stack and Store Dauber.  Cut out two of the decorative piece from the die set; once with white cardstock and once with gold.  Glue together with the gold showing through from the back of the white die cut.  Glue down to the center of the vase.  Now glue the vase to the center of the card front.  

Stamp the sentiment with  Magenta Hue ink onto white cardstock and use the small rectangle die to cut it out.  Cut a piece of the Luxe Gold Cardstock to glue behind the white piece and become a mat.  Bow this piece a little and glue to the bottom of the vase.

Stamp the Vining Sweet Pea with Leaf Green ink and ink the stems with the same ink.  Use the Stack and Store dauber to color the blooms of these vines with Magenta Hue ink.  Cut out with coordinating dies. Stamp the leaves with Fern Green ink and color with Leaf Green ink.  Cut out with coordinating dies.  Edge the leaves with Olive ink.

Stamp the blooms with New Sprout ink and color using Magenta Hue.  Cut out with coordinating dies.  Color the backs of the blooms with also with Magenta Hue ink.

Lay the blooms and leaves into the mold, spritz with water and run through the die cut machine.  Turn them out onto the desk and use the Golf tool to ad a bit more shape to the petals.  Allow them to all dry.  At this point you can use the Hydra Sponge and Dries Clear Adhesive to add the Crystal Clear Glitter to the flowers.  Allow them to dry.  

Once everything is dry, decide on placement of the pieces and glue down to the card front.

The card is finished. 


Wednesday, March 2, 2022

Simply and Elegantly Framed....Inspiration Wednesday with Heartfelt Creations

Good morning my friends here on the first Wednesday of March!  Can you believe that March is here and Spring is coming!  I'm here to share another card I made using this pretty Vining Clematis Banner stamp and die from Heartfelt Creations.  You can see the products used for my card in the Heartfelt Creations Gallery.


My finished card size is 4 1/4" X 5 12".  Make card base using white cardstock and then cut a piece of green cardstock just a bit smaller and attach to card front.  Cut a piece of white cardstock 4" X 5 1/4", spritz with water and run through the die cut machine inside the embossing folder.  Use Scor-Tape to attach green ribbon to the white embossed piece and glue it to card front.  

Using Jet Black ink, stamp the Vining Clematis onto watercolor paper and emboss with clear embossing powder.  I used Distressed Inks and a brush to color the imege.  Cut out with coordinating dies.  Cut two of the shadow pieces and then cut out the area for the sentiment to show through from the back piece.  Stamp the sentiment using Jet Black ink.  Adhere the two pieces together using dimensional tape then glue the colored design to the top and mount onto card front.  I used more Scor-Tape on this medallion piece to adhere to card front.  

Tie a bow using the green ribbon and then adhere to card front using Scor-Tape and Dries Clear adhesive.

The card is finished.