Wednesday, May 31, 2023

Inspiration Wednesday with Heartfelt Creations....

Good morning friends.  I'm here this Wednesday morning to share another card with you using Heartfelt Creations products!  You can find my card in the Heartfelt Creations Gallery.   


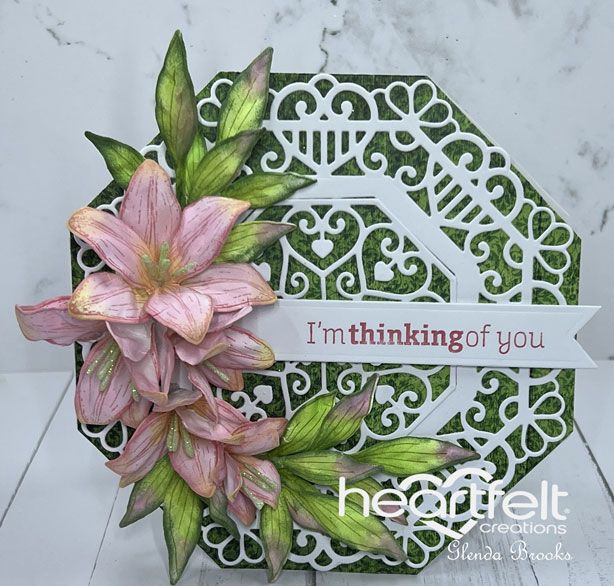
Using the Simple Centerpiece Dies make the shaped card. Cover with a piece of Sheet 6A of the paper collection.

Cut out the Elegant Hearts Centerpiece dies using white cardstock.  Glue to the card front then set aside. 

Stamp the flower petals onto the Deluxe Flower Shaping Paper in Rose Madder ink and color using Buttercup and Pink Peony then cut out using coordinating dies.  Stamp the leaves in Leaf Green ink onto Deluxe Flower Shaping paper then color using Pink Peony and Vivid Chartreuse and cut out with coordinating dies.  Edge the leaves with Olive ink.  Lay the petals and leaves onto the mold, spritz with water and run through the die cut machine.  Lay out onto the desk to dry.  When dry use the Golf Tool to punch a hole in the center and curl the edges under.  Thread through the stamens and use hot glue to hold in place.  I used two petals to form one flower.  

Stamp the sentiment onto white cardstock with Rose Madder ink and cut out with the Banner die and use dimensional tape to adhere to card front.  Next decide on placement of the flowers and leaves and glue down.  The card is finished.  
Monday, May 29, 2023

Can You Handle The Pressure...Anything Goes with a Twist of Birdhouse/Bird...

Good Monday Morning my friends and it is also Memorial Day today!  I have been having so much fun playing along with the Can You Handle The Pressure Challenge since it started.  Now that Heartfelt Creations is closing I only have two more months to post as a member of the Design Team so I find myself looking for cards to make.  I do plan to start making Mini Albums and Folios again but for now I'm just hanging out playing along with this challenge.  Why don't you come join the fun!  


Recently I spent a few days making flowers and leaves with various flower stamps and dies and these are a few of those paired with a sweet little birdhouse and bird.  All Heartfelt Creations supplies except for the lovely embossing folder which is one of the Anna Griffin folders (Ornate Quatrefoil)

I didn't use a sentiment because at this point I'm not going to use this card but when I need it all I have to do is add a sentiment banner and off it goes.  I hope you enjoy this card as much as I have enjoyed making it. 

Wednesday, May 24, 2023

Inspiration Wednesday with Heartfelt Creations....

Good morning my friends and welcome to my Wednesday post!  I'm here this morning to post another Heartfelt Creations card using the  Floral Sentiments Collection. I made a slimline card with a cut out for the sentiment to show through. You can find my card in the Heartfelt Creations Gallery   All the products used are listed there.


My card base is 4" X 9" and I used the Deluxe Flower Shaping paper because it is a perfect weight for cardmaking.  Make card base and cover inside and out with pieces of 1B of the paper collection.  Using a die from the set cut out an opening in the front of the card.  Cover the cut out piece with a piece of Sheet 3A of the paper collection and glue to the inside of the card.  This then becomese the piece that will hold the sentiment. Stamp the sentiment in Rose Madder and cut out 3 times and glue together so the piece is very dimensional.  Glue to the inside panel.

Stamp the flower petals onto Deluxe Flower Shaping paper using Rose Madder and color the centers with Buttercup and the edges with Rose Madder.  Cut out using coordinating dies, lay onto the mold, spritz with water and run through the die cut machine.  Turn out onto the desk to dry.  When dry add Prills to the center and allow to dry.  I glued two petals together to make the flowers.

Stamp the leaves in Leaf Green, color with Vivid Chartruese and cut out with coordinating dies.  Edge the leaves with Olive ink, lay onto the mold, spritz with water and run through the die cut machine.  Turn out onto the desk to dry.

Die cut the Slim Elegant Rectangle Die out of white cardstock and glue to the card front. Decide on placement of flowers and leaves and use hot glue to glue down.  Dilute some Designer Dries Clear Adhesive and paint with a brush onto the petals and sprinkle with glitter.  Allow to dry and the card is finished.    


Thursday, May 18, 2023

Amazing Friend...Can You Handle the Pressure Challenge...

Good morning friends and welcome.  I'm here sharing another card for the Can You Handle the Pressure Challenge.   I have a few embossing folders but never seemed to use them and this challenge has me looking through them trying to find just the right one for making a new card.  The challenge this time is "Anything Goes with a Twist of Floral" and it's right up my alley!


I used a coating of light blue ink to the inside of the folder to color the background and I think it is just beautiful.  The flowers and little bird are from Heartfelt Creations.  

I hope you enjoy this as much as I enjoyed making it!  

Wednesday, May 17, 2023

Inspiration Wednesday with Heartfelt Creations....

Good morning my friends and welcome!  I'm here again to share another Heartfelt Creations card made with the Floral Sentiments Collection. This is a great collection for making a card and I find myself reaching for it again and again!  You can find my card in the Heartfelt Creations Gallery for all the details for making one for yourself.  


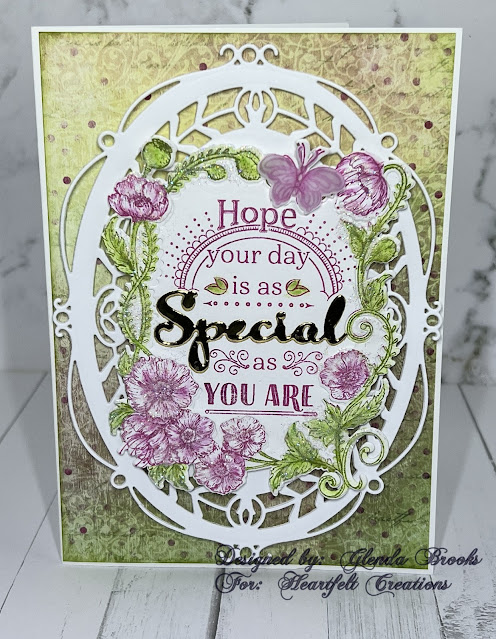
My finished card size is 5" X 7".  Make card base using Deluxe Flower Shaping Paper.  Cover with a piece of Sheet 3B of the paper collection.

Die cut two of the Simply Classic Oval Frame Die and glue together.  Add to card front using dimensional tape.  

Stamp the Special Floral Sentiment Cling stamp 2 times.  Once in Leaf Green, once in Vibrant Fushia.  Cut out using the coordinating dies.  Color the green piece using Vivid Chartreuse and add glitter using a mix of the two glitters.  Set aside to dry.  Color the flowers on the pink piece and then use a scissors to cut off the flowers.  Glue them over the green piece and allow to dry.  Glue the pink sentiment center to the green piece and then use the die to cut out a gold "Special" word and glue over the pink word.  

Stamp the little butterflies using Vibrant Fushia onto vellum and cut out using coordinating die.  Cut out the little pink butterfly from where we stamped the pink piece and adhere the vellum butterfly to that.  Glue onto the green stamped image.  

Adhere this piece to the card front using dimensional tape.  The card is finished.  It's a quick and easy card that packs a punch!

Wednesday, May 10, 2023

Debuting the Floral Sentiments Collection with Heartfelt Creations...

Good morning friends and welcome!  This morning I'm here to share a card I made to debut the brand new Floral Sentiments Collection from Heartfelt Creations!  You can find  my card in the Heartfelt Creations Gallery with all the details for making it.  


My card base is a split 5" X 7" card base.  Make 5 X 7 base using the Deluxe Flower Shaping Paper and cut the front at 1 1/2" to the fold line and at the 5 1/2" measurement to the fold line.  Now we cover the base card with the pretty papers.  The The two front flaps are covered with a piece of Sheet 6A of the paper collection.  The inside front flap is covered with 5A.  The inside of the card is covered with 3A as well as the Banner die cut that goes across the front.

Stamp the image twice, once in Leaf Green and once in Magenta Hue.  Cut out with coordinating dies so the green image can lay on top of the Magenta Hue piece.  Color the leaves with Vivid Chartreuse and set aside.

Stamp the flowers using Magenta Hue ink onto Deluxe Flower Shaping Paper.  Cut out with coordinating dies.  Color the centers and the edges with Magenta Hue Ink.  Lay face down onto the mold, sprinz with water and run through the die cut machine.  Turn out onto desk to dry.  Once dry fill with Prills and set aside to dry.  

Use hot glue to glue down flowers onto the card and then glue to the middle flap of the card front. 

Stamp the sentiment using Magenta Hue ink onto a  piece of the Deluxe Flower Shaping paper and cut out using the coordinating die.  Cut several of the words using cardstock and glue the layers together giving them added dimension.  Cut a banner out of cardstock and also using the selected paper and glue these together.  Glue to the two side flaps of the card front being careful not to glue anywhere except on the edges.  Glue the words onto the banner.

I cut a piece of white cardstock 3 3/4" X 4 3/4" and glue to the inside of the card so it is hidden by the middle front flap of the card.  This gives a place to write a message to the receiver of the card.  The card is finished.  


Wednesday, May 3, 2023

Hello May! Continuing along with the Iris Garden Collection.....

Good  morning sweet friends!  It's Wednesday once again and time to share another Heartfelt Creations card with you!  I'm continuing along with the Iris Garden Collection.  You can find my card in the Heartfelt Creations Gallery for all the details.   


My Finished card is 6" X 6".  Make card base out of Deluxe Flower Shaping Paper.  Cover with a piece of Sheet 5A of the paper Collection.

Die cut the Stairway Gardens out of white cardstock and glue down onto card front.  

Stamp the Iris Garden Bloom three times. Once in Leaf Green and twice in Cactus Flower.  Color the green blooms with Stack and Store Daubers and Leaf Green ink.  Color the two that are stamped in Cactus Flower with Cactus Flower.  Cut out with coordinating dies.  Use the Deluxe Flower Shaping kit to shape the blooms so they have a bit of dimension then glue down onto the base piece.  Adhere to card front using dimensional tape.

Cut out one of the tags from Sheet 12A of the paper collection. Cut out a tag from white cardstock and glue the two together giving the tag more stability.  Stamp the sentiment onto the tag and use dimensional tape to adhere to card front.  The card is finished.