Wednesday, December 28, 2022

Cascading Floral Basket ... Inspiration Wednesday with Heartfelt Creations

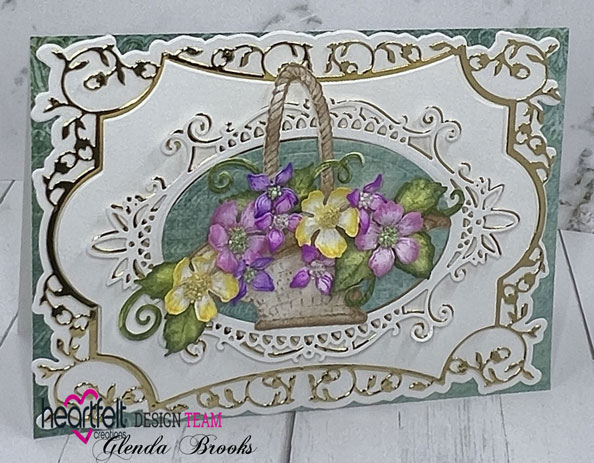
Good morning my friends and welcome!  I'm here this morning to share another card using the Floral Basket Collection from Heartfelt Creations.   It has been cold and snowy here in East Tennessee so this basket just says "Spring" to me.  Most of us have been experiencing terrible weather so I hope you enjoy my card!  You can find it in the Heartfelt Creations Gallery with all supplies used.


My finished card is 5" X 7".  Make card base and cover with a piece of Sheet 6A from the paper collection.

Using HCD2-7384 Fancy Classic Rectangle Frame Die, cut pieces using Deluxe Flower Shaping paper and Luxe Gold cardstock.  Glue white shadow die cut onto card front and glue the gold die cut onto that.  Cut a plain piece of white like the gold piece and use the center portion to layer ontop of the gold die cut.  I used Double Dots to pop it up to give dimension.  Using the smaller oval die from the Royal Elegance Frames,  cut two pieces;  one in gold and one in white.  Use the plain oval die that fits inside this more decorative die and cut a piece of sheet 6A and glue to the center of the oval.  Layer the gold piece behind the white piece shifting slightly so the gold shows through behind.  I used dimensional tape behind this piece to add dimension and give it the appearance of a medallion.  

Stamp the basket onto Deluxe Flower Shaping Paper using Memento Toffee Crunch ink.  Cut out with coordinating die and color using Stack and Store Daubers and Toffee Crunch ink.  Glue the handle onto the basket and glue the basket down onto the medallion piece on the card front. 

Stamp leaves using Leaf Green ink and color using same Leaf Green ink.  Cut out with coordinating die and edge the leaves with Olive ink to give them more dimension.  Lay leaves onto the mold, spritz with water and run through the die cut machine.  Lay aside to dry.

Stamp the flowers onto Deluxe Flower Shaping paper using Buttercup for the yellow flowers, Magenta Hue for the pink flowers, Cactus Flower and Majestic Violet for the purple flowers. Color with same colors and cut out with coordinating dies.  Place on coordinating mold, spritz with water and run through the die cut machine.  Turn out onto the desk to dry. Once dry add Prills to the centers of the petals and allow to dry. 

Once everything is dry, decide on placement and glue down onto card front.

Wednesday, December 21, 2022

Inspiration Wednesday with Heartfelt Creations....

Good morning my friends and welcome to my Inspiration Wednesday post for Heartfelt Creations.  We have entered the final count down for Christmas and everyone is in a mad dash to get everything finished.  Let's take a moment to breathe and you can enjoy my card I have made.  I think the best thing about this card for me is it isn't a Christmas card.  It was a marathon here in my craft room to get all my cards made and ready to go but it is all done and I think I'm ready for this wonderful holiday!

You can see my card in the Heartfelt Creations Gallery with all the supplies used to make this one.  


My card size is 5" X 7".  Make card base and cover with a piece of Sheet 1B of the paper collection.  Set aside while we work on all the elements.

Stamp the basket and floral using Rich Cocoa and color the basket with Rich Cocoa ink and a Stack and Store Dauber.  Color the florals with Prisma Color pencils, odorless mineral spirits and blending stumps. Stamp the bow with Goldenrod ink and color with a dauber and Goldenrod ink.  Cut everything out with coordinating dies and glue everything together to make the floral basket.

Stamp the sentiment with Goldenrod ink and cut out with Ornamental Tags Die and set aside. 

Using white cardstock and the Luxe Gold Cardstock cut out one each of the Regal Lattice Gateway Die.  Glue these two pieces together with the gold piece under the white and offset a bit so it shows through.  
Use the archway die from the set to cut out a piece of white cardstock and place it in the Embossing Folder and run through the die cut machine.  Glue this piece on top of the two die cuts creating a sort of medallion. 

Now glue the basket to the top of this medallion piece and using dimensional tape glue down the sentiment.  Now add dimensional tape to the medallion piece and adhere to card front.  The card is finished.  


Wednesday, December 14, 2022

Introducing the Floral Basket Collection from Heartfelt Creations...

Good morning everyone and welcome as we happily introduce the brand new Floral Basket Collection from Heartfelt Creations!  Let me just say you are going to love this collection.  It brings memories of garden parties with tables filled with baskets of flowers!  You can find my card in the Heartfelt Creations gallery with a listing of all the products used.  


My finished card size is 5" X 7".  Make card base using the Deluxe Flower Shaping Paper.  Cover with a piece of Sheet #8B and set aside.

Cut out the Fancy Classic Oval Frame twice, once with white cardstock and once with Luxe Gold cardstock.  Glue the two pieces together off setting just a bit so the gold shows through behind the white piece.  Glue to card front.

Stamp the florals for the basket onto watercolor paper using black ink.  Color with a brush and the Zig colored markers.  Add glitter to the Baby's Breath and allow to dry. Cut out with coordinating die.

Stamp the basket onto white cardstock using Rich Cocoa ink and color with the Stack and Store Daubers and Toffee Crunch ink. Cut out with coordinating dies.  Glue the florals onto the basket and cut a slit in the flowers then slip the basket handle into this and glue down.  Slide the base of the basket into the bottom of the Fancy Classic Oval Frame and glue down.  I added Double Dots to the top part of the flowers to add some dimension.  Glue down.  The card is finished.


Wednesday, December 7, 2022

wild Rose Curved Border....

Good morning my friends!  It's Wednesday and once again time to share another card with you that I have made using Heartfelt Creations products.  You can find a photo of my card and all the details in the Heartfelt Creations Gallery.


My card size is a slimline 4" X 9".  I used The Deluxe Flower Shaping Paper and made the card base.  Cover the front with a piece of Sheet 3A of the paper collection.  Cover the inside of the card with a piece of Sheet 1B of the paper collection. Using the curved border die and one of the decorative dies that does not cut an edge, cut the front piece of the card giving a beautiful cut out border to the card front.  I think the die I chose is quite simple but elegant and I just love the way it looks.  

Stamp the flower petals using Magenta Hue ink and color the centers with Golden Rod ink and then the edges with Magenta Hue.  Cut out with coordinating dies. Spritz with water and lay onto the mold then run through the die cut machine.  Turn out onto the desk to dry.  Stamp the leaves with Leaf Green and then color with same Leaf Green ink.  Cut out with coordinating dies and then edge them with Olive ink to give them more dimension.  Lay onto coordinating mold and spritz with water then run through the die cut machine.  Turn out onto the desk to dry.  

When everything is dry hot glue two petals of the flowers together then add Prills to the centers of these.  Decide on placement and glue down using hot glue.  The card is finished.