Tuesday, July 27, 2021

Introducing Spellbinders Be Merry Collection...

Good morning friends and welcome!  I'm here again with another card using the new Spellbinders Be Merry Collection!  Can you tell I'm in love with these stamps?  I'm having so much fun using different elements of the collection to make my cards.  I'm thinking of so many of my Christmas cards and getting quite a few of them finished way ahead of time! 


My card is 4 1/4" X 5 1/2".  Make card base using white card stock and then add a layer of silver cardstock to the card front.  The paper I chose for the next layer is Heartfelt Creations Snowy Pines collection and I love this shade of green.  I chose one of the sentiments from STP-057 Home for Christmas Sentiments and stamped onto a piece of white cardstock.  This was then layered onto another piece of designer paper and another piece of silver cardstock.  This was glued to the card front and set aside.  

I wanted some flowers for my card front but my Spellbinders flower dies are limited so I used the S5-436 Cinch and Go Flower Etched Dies from Make a Scene Collection by Becca Feeken to make some flowers that look like Christmas! When they were finished they didn't look like poinsettia but the red and green colors does remind me of Christmas and they will do!

Once the flowers were made the card came together so quickly and easily and I think it is a lovely addition to my Christmas card stash!  I hope you enjoy this as much as I enjoyed making it!

Supplies:
STP-057 Home for Christmas Sentiments from the Be Merry Collection
S5-436 Cinch & Go Flowser from Make a Scene Collection by Becca Feeken
Heartfelt Creations Snowy Pines Paper Collection 
White and Silver Cardstock
ANC-814 Lettuce Entertain You Prills
Designer Dries Clear Adhesive
Archival Ink Mulberry, Olive and Leaf Green


Monday, July 26, 2021

Spellbinders Be Merry Collection - Friendly Snowmen...

Good morning friends!  I'm back this morning to share another card I have made using the Spellbinders Be Merry Collection.  When I saw this brand new collection, I literally fell in love!  These little snowmen just captured my heart.  My card this morning is a clean and simple design focusing on a little snowman family.(STP-052 Friendly Snowmen)  The sentiment is from STP-057 Home for Christmas Sentiments.  I wanted to be able to send this through the mail using only one first class stamp and I think I have achieved that!  I made this into a Christmas card but these cute little snowmen could be used to make a winter card.  I'm sure they will be gracing the fronts of many of my cards!


These images are stamped in Tuxedo Black ink and colored with Prismacolor pencils and mineral spirits.  I added a bit of glitter but of course it isn't showing in my photo.  The sentiment piece is stamped onto white cardstock using Faded Jeans Distress Ink then matted with a piece of the blue cardstock.  I used dimensional tape to adhere to the card and to add some dimension.

I hope you enjoy my card as much as I enjoyed making it!   Follow this link to see all of the Be Merry Collection!  

Other Supplies:  Blue and White Cardstock, Prismacolor Pencils, Odorless Mineral Spirits, #85 Crystal Glitter, Designer Dries Clear Glue, Memento Tuxedo Black ink, Dimensional Tape, Faded Jeans Distress Ink

Thursday, July 22, 2021

Introducing the Spellbinders Be Merry Collection....

Good morning friends and welcome!  I'm here this morning to help introduce the brand new Be Merry Collection from Spellbinders!  

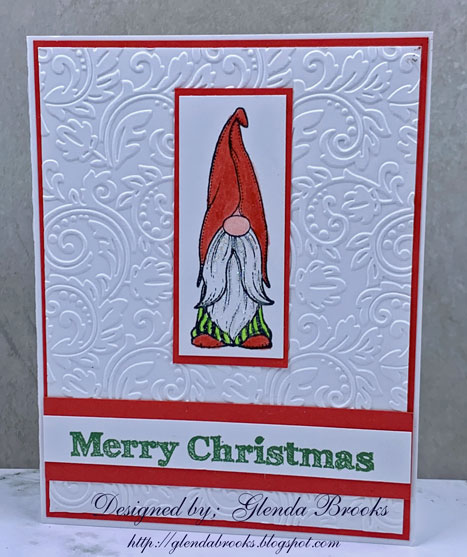
I'm using STP-047 Holiday Gnomes stamp set for my Christmas Card.  When I saw this stamp set, I just fell in love with these little guys and am so honored to be able to introduce them to you!


My card size is 4 1/4 X 5 1/2.  I stamped the image using Memento Tuxedo Black and colored with Prismacolor Pencils and Odorless Mineral Spirits.  I did just a bit of glitter in his beard but it isn't showing up really well here.  I used #SES007 Floral Embossing folder and I stamped the Merry Christmas sentiment using Archival Olive ink.                                                                                                                                                                                                                                                                

Supplies:  

Red and White Cardstock, Die Cut Machine, Misti Stamp Platform, Prismacolor Pencils, Odorless Mineral Spirits, Archival ink Olive, Memento Ink Tuxedo Black, Designer Dries Clear Glue, #85 Crystal Glitter


Saturday, July 17, 2021

Four Seasons Design Team Call.....

This is one of my most favorite creations.  This is being submitted for the Four Seasons Design Team Call.


I used Heartfelt Creations stamps, dies and paper to create this summer flowers card.  I hope you enjoy seeing this one again!  Wish me luck! 

Wednesday, July 14, 2021

An update on the Festive Poinsettia Collection.......

And here we go again!  The Festive Poinsettia Collection is being delayed due to shipping issues.  This is just one more gift from the pandemic and so we will have to wait until these issues are resolved.  

But don't worry, Heartfelt Creations does have a plan!

  • They will be notifying you as soon as they have a new release date for the Festive Poinsettia.
  • The collection will still be released on a Wednesday, the Wednesday after it arrives.
  • You'll still have until the Saturday after the Release to save 10% with the I Want It All Bundle (while supplies last!).
  • Platinum Members can still purchase the collection on the Tuesday before the release.

You might be asking, "So, what do I do until then?"  Heartfelt Creations is having a  special savings event starting today, Wednesday, July 14th, 2021!  This Summer Savings run July 14-21st and feature 20% off all paper pads and several sku's related to the Insta Album. Check out the savings here:

HCD1-7201 Ticket and Tags Die
HCD1-7202 Album Tags and Accents Die
HCD1-7203 Ornamental Tags Die
HCD1-7204 Arrows and Banner Die
HCD1-7211 Decorative Pocket Accents Die
HCD1-7212 Petite Pocket Accents Die
HCD1-7213 Elegant Pocket Accents Die
HCD1-7214 Ornate Pocket Accents Die
HCD1-7245 Adorn It Pocket Accents Die
HCD1-7246 Fanci-Fold Pocket & Accents Die
HCD1-7247 Regal Pocket Accents Die
HCD1-7248 Regal Frame & Accents Die
HCIA1-470 12 x 12 Insta-Album - Kraft
HCIA2-477 8 x 8 Insta-Album - Kraft


Wednesday, July 7, 2021

Another Inspiration Wednesday with Heartfelt Creations....

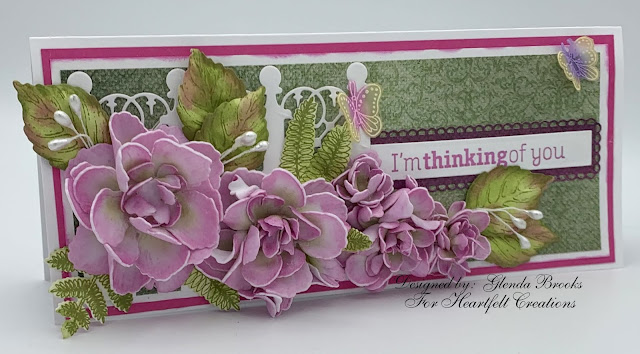
Good morning friends and welcome to Inspiration Wednesday with Heartfelt Creations.  This morning I am here to share another card made using Heartfelt Creations products and I hope you enjoy.  On this card I decided to use foam flowers and I just love how they turned out!  As always for more inspiration you can visit the Heartfelt Creations Gallery.  You can also see my card in the gallery.  


My finished card Measures 3 3/4” X 8 3/4”.  Cut a piece of white cardstock 7 1/2" X 8 3/4” and score at 3 3/4 “.  Cut a piece of pink cardstock 1/4" smaller than the card and edge with Magenta Hue ink. Glue to card front. I cut a piece of green paper from the Wild Rose Paper collection 1/4" smaller than the white layer and glued it down.

Die Cut the Lattice Flourish Gateway die and cut it down to fit the card front.  It will serve as a fence.  Cut the scalloped piece of the Ticket and Tags Dies using a dark pink piece of the paper collection.  Stamp the sentiment using Magenta Hue onto a piece of white cardstock and use the plain piece of the Ticket and Tags dies to die cut it.  Glue it to the scalloped piece and cut off one end of the die cuts.  Glue down the fence piece with the sentiment piece under the edge.

Stamp the Large and Small Wild Rose flower petals onto the Art Foam Paper using Magenta Hue ink and let them sit for a couple of hours to be sure the ink is dry.  Color the petals with New Sprout in the center and Magenta Hue on the edges.  Use coordinating dies to cut out the petals.  Using the heat gun, heat the petals until they start to curl.  Glue together with hot glue.  At this point you can do a bit more shaping.  You can use as many petals as you like to achieve a thickness that suites you.  

Stamp all the Wild Rose leaves with Fern Green ink and color with Leaf Green and Olive ink.  The rose leaves also have some Magenta Hue ink here and there on them.  Cut out with coordinating dies and lay onto the mold and spritz with water and run through the die cut machine.  Lay them aside to dry.  Stamp the ferns from the Floral Butterfly Accent cling stamp set using Fern Green ink.  Color the ferns with Leaf Green ink.   Cut out using coordinating die At this point I just shaped the ferns a bit with my fingers to give them a bit more dimension.  Decide on the placement for flowers and leaves and glue down.  Here I also glued some stamen just to accent the flowers.  

Stamp the butterflies from the Large Floral Butterfly cling stamp set onto vellum paper using white ink and emboss with white embossing powder.  Use coordinating dies to cut out and then color the centers with Magenta hue and the outside edges have Sunflower ink on them.  Glue to card front and the card is finished.