Wednesday, February 29, 2012

Welcome to Another Heartfelt Creations Wednesday......


Since it is Wednesday, I'm here to share another project I did for Heartfelt Creations.  Today it is a tag I made using purples and greens.  For all the products I used and the instructions for this tag, just head on over to the Heartfelt Creations blog.  Everything is listed there along with the instructions for this project.  While you are there you can see all the beautiful submissions from the other design team members.  You can always visit each individual team member's blog by clicking on the names on the sidebar of my blog.  You will truly be inspired when you visit. 

I know this is short and sweet this morning, but I have a ton of stuff to do today and I need to get to moving!  So have a wonderful day and I hope you enjoy my tag!

What's On Your Workdesk? Wednesday #143


If you happened along here and are wondering why I would show you my work surface, the answer is it's Wednesday and I'm supposed to!  For any that aren't familiar with the Wednesday happening,  I will fill you in!   A bunch of crafty people take a picture of their work surface and then we link it to Julia Dunnit's blog so we can all have a little nosy!  It's so addictive and you get to have a look around and see what everyone is doing.  It does me so much good and I am so inspired by everyone's desk that I usually spend the whole day looking around.  So why don't you go over to Julia's blog and have a look around.  Join us, leave some comments along the way and generally just enjoy yourself!

So as you can see, I have very little going on.  I took this picture yesterday afternoon and this morning it still looks the same.  I'm in between projects and just hanging out.  I have a few things I need to put away and some new shimmer sprays I just received.  I left these out so I could play with them.  I have to say, I love them.  

Monday, February 27, 2012

Pink and White


Good morning everyone!  My card today is to be entered into the challenge over at Joan's Gardens.
Joan's challenge this week called for the following:

Create a card with lots of layers...
Color scheme should be pink and white
Add some dimensional flowers
Use a rectangle and an oval

OK, I think I covered all the bases on this one.  Thanks Joan and Selma for another fun challenge.  If you are curious about this, just visit the link above and at the top of the blog you will see "This week's Challenge" just click on it and you can get all the specifics.  Why don't you join in; you will quickly become addicted and you can find so much inspiration from all the wonderful submissions.

So what do you have planned for this wonderful day?  I hope you have some fun time planned and that you can spend it creating something beautiful!  As always, remember to "Breathe"!

Friday, February 24, 2012

Cute little Tilda.....


Well bloggers, we have come through another week and we are ready to step into the weekend!  This morning I'm sharing a little Magnolia image sent to me by a good friend, just ready for me to color!  I've been struggling trying to get back in the groove and coloring this little lovely has helped me a lot.  My card is very simple.  I colored the image with Ranger Distress inks and I made a frame using Spellbinders ovals and framed it with Wild Orchid Crafts flowers and a triple bow.  All of this is set up on a pretty piece of designer paper and I call it finished!  I like how it turned out and hope you enjoy it too.  It would make a great get well soon card, or a happy birthday card.  Just add a sentiment to the inside of the card and it's ready to go.

Well I'm off for a second cup of coffee...I hope you have a good day and a fun filled weekend!  Try and spare a little time to play!  As always remember to breathe!

Thursday, February 23, 2012

How Do You Feel About Circles?


As part of our design team creations this month, we were given limited edition embossing folders from Couture Creations from Crop Stop  and asked to use them to create a card or project.  This is my card using that folder.  I wanted to use this sentiment and with the circles in the embossing folder I decided to make a circle frame for it.  For all the specifics on this card you can visit the Heartfelt Creations blog.  Everything is listed there as well as some beautiful creations from the other design team members.  Go have a look around you will be inspired! 

So what do you have on your agenda today?  I will be playing a bit in my craft room.  I need some good quality time as I haven't been very creative lately!

Our temps are supposed to hit 70 today!  Can you believe it?  Also heavy thunderstorms are predicted.  We had rain yesterday, and now rain again later in the day.  I'm afraid to step outside, I might sink up to my knees!  I guess I should be glad all this wasn't snow or we would be buried by now!  Well a Southern girl always wants to see a little snow!

OK that does it for me this morning!  I hope you have a great day and that you find a little time to be creative!  As always....."Breathe".

Wednesday, February 22, 2012

Welcome to Heartfelt Creations Wednesday.....


Since it is once again a Wednesday, I'm here to share another card I made for Heartfelt Creations .
This was so much fun to create and these wonderful stamps just make me want to use vellum!  You know I used to never use pink, but I have become attached to this color.  I'm sure you have noticed my frequent use of pink of late.  I also used heat embossing on this card and love the delicate look it gives to the flowers.  And don't you just love the cross? I do!  The stamp and die work beautifully together. 
Now if you are thinking....I could do this; why don't you head on over to the Heartfelt Creations blog and have a look around!  My card is there as well as the instructions and all the products used.  All the other creations from the other design team are there as well.  Just get yourself another cup of coffee and take a little time and look around!  You will be so inspired!  Make something for yourself!

I almost forgot to mention that Heartfelt Creations had a design team call going on.  You can get the details on the blog also!  Might be something you would want to consider!

As always you can visit all the design team blogs by clicking on their names on the side bar of my blog.

Well that about does it for me this morning.  Now go forth and create!

What's on Your Workdesk? Wednesday # 142


For any of you wondering why I'm showing you my desk this morning, it's a Wednesday thing and quite an addictive thing at that.  For all the details just go on over to Miss Julia's blog and you will see it's a place where we can photo our work space and then link it so we can all share what we have going on in our world!  Sometimes, I just can't make this work for me, but when I can I love to be a part of this WOYWW thing! 

Now, as you can see there isn't a lot going on here this morning.   Miss MoJo just politely slipped out the door about a week ago and she has been on holiday ever since.  Nothing I do can entice her back where she belongs.  So I have been coloring an image or two with Ranger Distress re-inkers and making some flowers too.  I'm 62 and as an older woman (you notice I didn't say an Old Broad") I have let my mind ramble back to my life as a child and all the things that have changed in it.  I started a Journal....this is nothing new for me.  The difference is, before when I wrote I wrote about all the things that were bothering me, making me mad, or sad, and things that I could do absolutely nothing about.  I always wound up burning them, because I just couldn't let anyone know my inner most thoughts about things that were hurtful, etc.  So I do not have a shelf full of little notebooks, collecting dust, waiting for me to die and then being read by my child or worse a total stranger!  This one is for my grandson.  It's about things I remember growing up, things that he can never relate to.....All the joyous things that are part of my life and really make up most of my life.  I like to think, if he doesn't want to read it, then he will squirrel it away somewhere, maybe in his attic and then sometime in the distant future, someone will find this book, filled with a handwriting that used to be wonderful and is now at best, chicken scratch.  Maybe this person will dust off this book and find many wonderful gifts hidden amongst the pages!  So, this might just be something you would want to think about doing for your children or some one's child in the distant future.  Talk about the things that mean so much to you and all the joy you have known in your life!  It makes for wonderful writing and reading!  For me, it is an awakening of all the joys in my life and it is making me realize what an amazing life I have had.  My life has actually been very ordinary, but for some it might prove very interesting.

So there, you have it...This is what is happening in my little corner of the world.  If you come visit, leave me a comment, and if you like what you see, Follow my Blog.  I love having visitors and I'll try come visit you!

Monday, February 20, 2012

Snow????........NO!!!!

Good Monday morning everyone!  Looks like the snow went right over us.  Some people say we dodged the bullet, but I'm a little disappointed!  There is something about rain, rain, and more rain that just makes my heart sag!  I know it is only February and we still have time for a good old fashioned snow storm, but I have to tell you, it's looking pretty doubtful we will have any snow this year.  Yesterday, I watched all day long and it just rained and rained some more.  The temps were way too warm to produce snow.  So here I sit in a wet soggy East Tennessee.

This morning I want to share another Heartfelt Creations card I made for the design team work.  These flowers make me think Spring for sure!


You can get all the specifics for this card by going to the Heartfelt Creations Blog.  Everything is listed there and you can also see all the beautiful creations from the other design team members!

Well that is about it for me this morning.  I'm still looking for my MoJo....if you happen to see her, tell her I miss her and want her to come home!

Have a great day and remember to "Breathe"!

Friday, February 17, 2012


Good morning everyone!  Happy Friday!  This morning I wanted to share another Heartfelt Creations card I made a couple of weeks ago.  Somehow I seemed to have missed this one!  This is one of my most favorite cards so far.  You know how sometimes you start to put a card together and it just seems to fall right into place; well that is how it was for this one.

What do you have planned for the weekend?  We are supposed to have more rain (no suprise), but maybe changing over to heavy wet snow before the weekend is finished.  Now I would love to see some snow this winter.  So far, we have had really warm temps and lots of rain.  One of our neighbors has flowers blooming in his yard!  Our dogwood trees are looking like they are ready to blossom right now.  I'm not a big fan of all the rain we have had, but we always need it.  Our grass is green and we have actually mowed twice since December.  Very unusual....but not very different for other parts of the country.  It has been a very different winter all over!

Well, I'm off for my second cup of coffee.  Have a wonderful weekend and we will talk on Monday!

Wednesday, February 15, 2012

Welcome to Heartfelt Creations Wednesday!


Well my friends it's the middle of the week and time for me to share another Heartfelt Creations card with you!  Sympathy cards can be the hardest to create and I've always felt that, just like any other card you create for someone, you have to keep that person in your thoughts as you create.  For me that is what determines how much frill I use.  When I was working on this card, I had a dear friend in mind and she loves pink and green so that is what I did.  If I needed to send her a sympathy card, this would be the one. 

The Heartfelt Creations products I used are:

HCPC 3450 Cross and Lilies PreCut Set
HCPC 3452 Pristine Lilies PreCut Set
HCD 719 Cross and Lilies Die

For the instructions for my card, visit the Heartfelt Creations Blog, everything is posted there and you get to see all the other beautiful projects submitted by the other design team members.  You can also visit the individual blogs of the design team by clicking on their names on my sidebar.

Well ladies, that's it for me this morning!  I hope you enjoy my card as much as I liked creating it!
Have a wonderful day and remember to "Breathe"!

Tuesday, February 14, 2012

Happy Valentine's Day!!


This is my Valentine...I did this one for me!  I cut a heart out of a cereal box and painted the back side in cream and the front in pink, then a layer of crackle paint, then a layer of cream and when it cracked the pink was showing through.  I used Ranger Distress Inks to distress the edges and I went over some of the crackle to add more pink to the heart.  Next I added the doily and left one side of the doily open so I could insert my tag inside.  The next step was to hot glue the edging all around the heart.  Then I cut a piece of card stock using the new Marianne (Anja) die and made my tag.  A couple of flowers from Wild Orchid Crafts edged in the same shade of pink distressed ink and a couple of skeleton leaves and it is all mine!  Most everything I do is for someone else, but this time, I decided I wanted to keep it.  I plan to make a wall hanging out of it and display it in my craft room.

I hope everyone has a great Valentine's Day and that your sweetie is good to you!

Be sure and come back tomorrow as it will once again be a Heartfelt Creations Wednesday and I have another card to share with you!

Monday, February 13, 2012

A Man's Box....


Good morning everyone.  This morning I'm here to share a Man's box that I have been working on for awhile now.  It didn't really take me two months to finish.....I just did a little and then set it aside.  This past week I decided it was time to finish and give it to my husband.  Please forgive my picture; it leaves a lot to be desired. 

I began with a cigar box, back in November of last year.  First I painted it brown and let it dry.  Next I found some scrapbook paper that I liked and I decoupaged the inside and outside of the box.  Once dry I added the feet (wooden balls painted brown) using Glossy Accents.  Once these were dry, I added the trim all the way around the bottom of the box, using hot glue.  I also added the keyhole accent...I think it was a Tim Holtz thing.  Then I set it aside and actually forgot about it for a month.
Then I did Christmas and in January I just sort of coasted along.  Last week I was moving some things around and there was my poor unfinished box.  I pulled it out and inspected it.  Everything was fine, so I decided it was time to finish it.  I found some coordinating papers and used the Tim Holtz Tattered Florals die and  cut out some flowers.  I distressed them, shaped them and glued them together and set them aside to dry.  I cut a butterfly out of black card stock from my scrap bin and used Stickles all over it.  I also found some rose leaves and some skeleton leaves and decided these would work well.  Next I dipped everything in UTEE and made everything look like glass...even the skeleton leaves!  I love the way they look!  I found another Tim Holtz frame.....I'm sorry I cannot remember which collection, and stamped my sentiment to fit in it.  Everything was then hot glued to the top of the box.  And I called it finished...Finally!  I think it would make a lovely piece to hold keys, change, etc.  Whew, thanks for hanging with me here; I got a little mouthy!

Well that is it for me this morning.  I hope you have a wonderful week...be sure and come back in the morning when I share my Valentine with you!  So no matter what you are doing today and no matter where you are, remember to take a moment and "Breathe"!

Friday, February 10, 2012

Joy and Love.....


Good morning everyone!  I hope you have had a good week and that you are looking forward to the weekend.  Winter is supposed to visit us this weekend with some colder temperatures and some snow showers.  It sounds like a good weekend to have a fire in our fireplace!

This morning I want to share another card I made for Heartfelt Creations.  This stamp is becoming one of my very favorites and you will be seeing it often I think!  The name and number of this stamp is:
HCPC 3455 Butter Fly and Lilies PreCut Set.  For all the specifics of this card you can visit the Heartfelt Creations blog and see it there.  Have a look around at all the lovely creations from the other design team members as well.  It is always inspiring to see how each one of us uses the stamp in a different way.  It will really get your creative juices flowing!

Well that about does it for me this morning.  I'm off to get my second cup of coffee and have a look around the blog world and see what everyone else is doing this morning.  I hope you have a good day and are ready to start the weekend.    Try and find a little time to be creative just for you, and remember to "Breathe"!

Thursday, February 9, 2012

My Rose Tutorial.....


Two or three of the ladies on the HC design team have asked me if I had a tutorial for my roses.  Sadly I did not.  It's not that I didn't want to share...I just feel I'm not that great at doing these and I'm always afraid my pictures won't show what I want them to.  I don't have anyone to help me with my photos as my husband is totally out of touch with the digital cameras.  So this morning I'm going to attempt to show you how I do it.  Be kind, this is only my second tutorial...ever!  When making roses I always, always use Heartfelt Creations Botanical Floral 1 and 2 PreCut sets.  HCPC 3406 and HCPC 3407.  Nothing else will work for me!


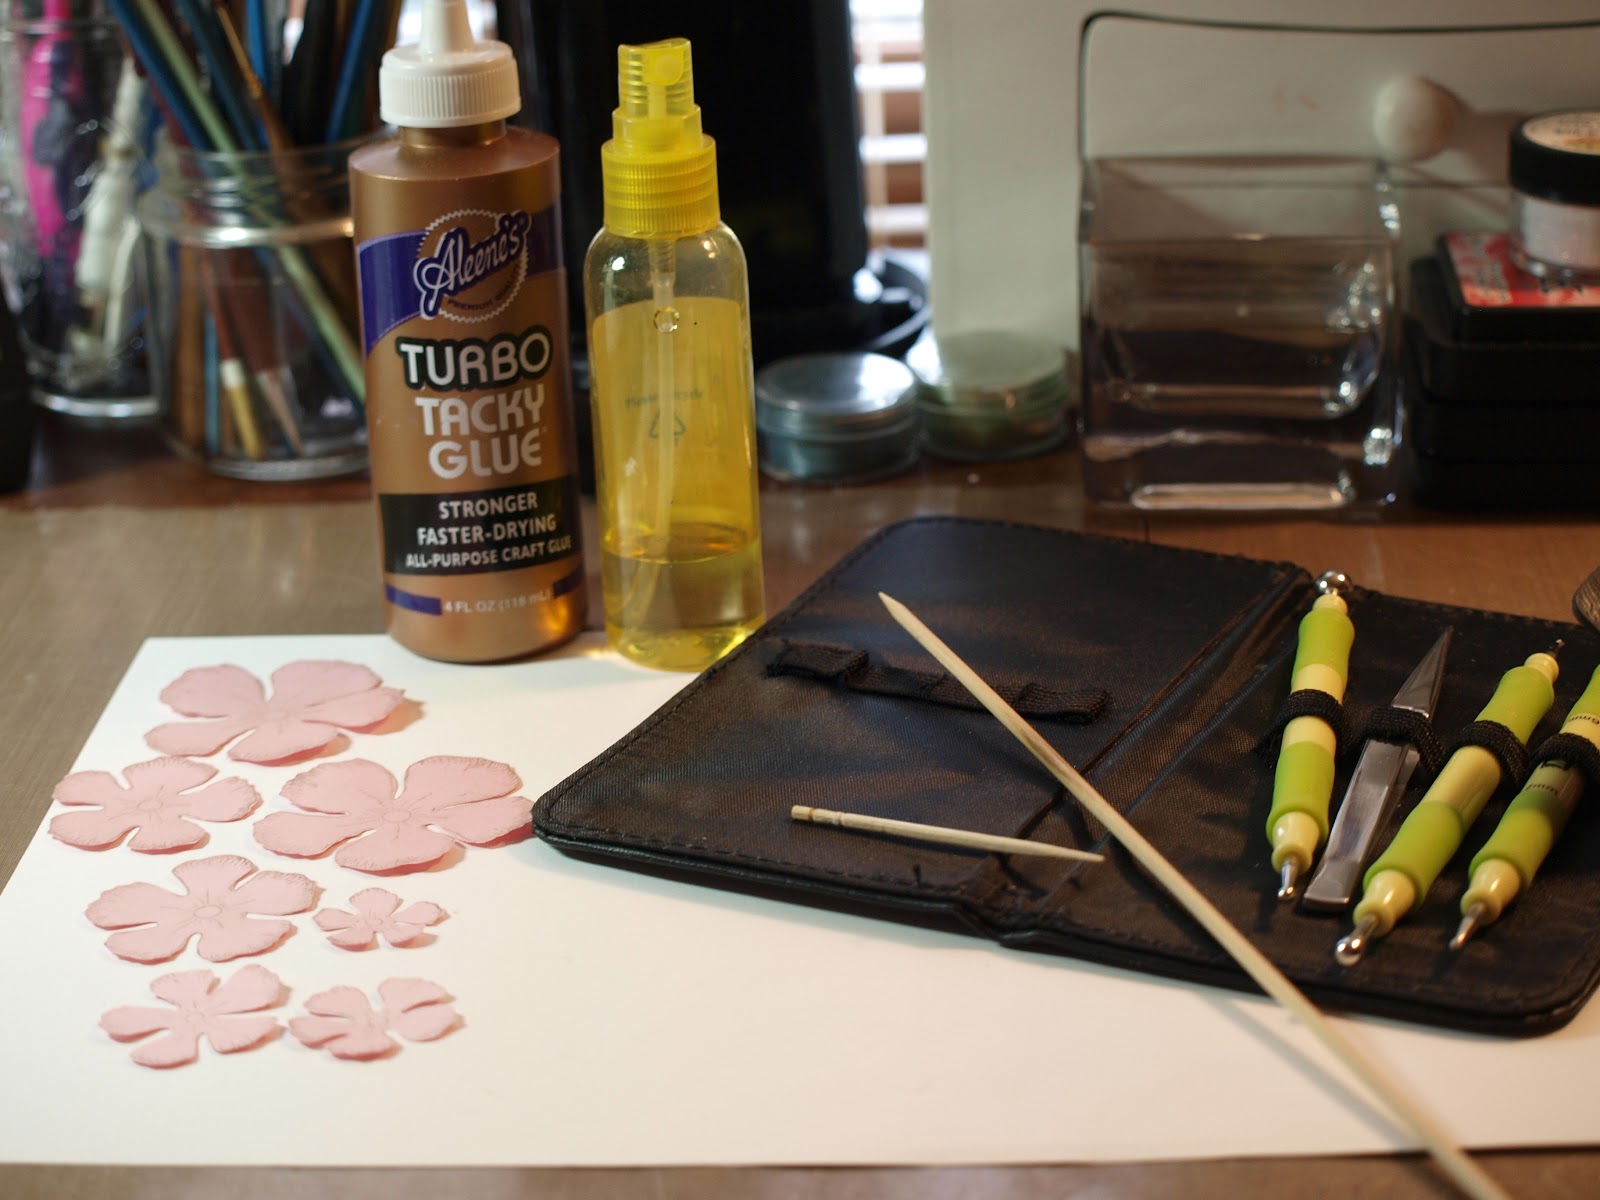
Here is what I use to shape the petals.  I stamp my flowers and cut them out.  I have a water spritzer, some glue...I use this glue, you can use anything that dries clear.  These kinds of tools are for breaking down the fibers of the paper, a wooden skewer and a toothpick.  I prefer the skewer, but sometimes you need a smaller something and then I use the toothpick. I usually use the cheapest card stock I can find; it works better to make flowers.   I always try and use some inks to darken parts of the petals like a natural flower would look.  You can also use embossing powders to emboss when you stamp the petals.  Whatever you like is fine.  Each and every flower is different.  There are no two alike and as far as I'm concerned, they are all perfect just the way they turn out!


Working on the back side of the flower use the tool to burnish the card stock.  Use circle motion and a medium touch, you don't want to break the petal and put your tool through it.  Work from the outside toward the center.  The closer to the center you get the more the petals curl.  Now turn it over and push down the center of the flower.  The next picture is what it should look like.  Notice how the outside edges of the petals look so curly.


When you get to the smallest flower, work on the front of the petal.  Burnish it and when you get toward the center really apply more pressure so it will really curl.  I use my fingers and apply pressure to this little bud.  I use glue to the outside portion, down low close to the center and sort of in between the petals.  When dry this will be the center of the rose.  You can make this as tight or as loose as you like.  Sometimes I want to make a more elegant rose and if that is the case, you don't use the burnishing step. Just burnish the rosebud and skip all the rest.   Just keep the fibers of the paper the way they are and pick up here.  If you don't burnish,the rose will be very elegant looking.  The rose I'm making is more of a shabby rose.  Either way you finish with a beautiful flower to add to your project.


How you doing so far...are you still with me?  I hope this doesn't seem like too much work for one little flower, because it really isn't.  Now spritz a little water into the palm of your left hand and then  rub a little off into your other hand.  Too much water and your petals won't hold their shape ... too  little and they won't curl at all.  Place your petal stamped side up in your palm and rub around to put moisture on the petals.  After you do this a couple of times you will be able to feel the right amount of moisture in your hand.  Now lay your petal down and use your skewer to curl the petals down on this first layer.


On the next layer I use the toothpick and curl some of the petals up and I use the tweezers to twist the paper to cause ridges in the petals.  Just position your tweezers down the center of the petal and twist.
Continue on with all the petals curling some up, some down, some just the corners and twist a petal here and there.


I'm sorry for the blurry picture, but you can see how the petals are all curled and the little rosebud is dry and ready to go into the center. 


Now we are ready to glue the petals together.  Start with the larger ones and apply glue to the center.  I always do this on my spongy pad and use the stylus to press down in the center of the flower which makes it pop up.  I hold this until the glue has a moment to set, then do the next petal until you get to the little bud.  I just glue it into the center and don't apply pressure to it because it has too small an opening to get the stylus through.


And here is the finished rose.  You can add Stickles or glitter at this point,if you want.  Personally I like a little shine on the finished petals. 

So there you have it!  A pretty rose made by you and you can say...I did that!  Now go play and make some pretty flowers.  Don't be afraid, just jump in and get your fingers dirty.  And remember, each flower is different and perfect in every way.  When my MoJo leaves, I make flowers!  That always seems to get me creating again.  While I'm making the flowers, my mind is racing thinking about what I can add these to.  I hope this is a help and I will be looking to see what you come up with!

Now I'm off to get another cup of coffee this morning and get my day started.  I hope you have a good day and have time to be creative.  And as always remember to "Breathe"!


Wednesday, February 8, 2012

Introducting Heartfelt Creations Floral Cross Collection!


Heartfelt Creations is pleased to release the Floral Cross Collection. This collection is as fresh as a blooming yellow lily on a sunny spring day: intricate flowers compliment the typographical, linear, and wooden crosses. There are 6 new PreCut Stamp Sets and one beautiful new exclusive Spellbinders die designed for Heartfelt Creations.

Leave a comment on the HC blog by February 14 to be eligible to win the entire release valued at $125.93. The winner will be announced on February 15 on the HC Blog.

My card this morning uses the following products from Heartfelt Creations:

HCPC 3450 Cross and Lilies PreCut Set
HCPC 3451 Going to the Chapel PreCut Set

Other Supplies: Spellbinders Parisian Accents and Labels Twenty Two, Memento ink, Ranger Distress Inks, Scor-Tape, Design Paper, Canson watercolor paper, zip dry glue, pop dots

Instructions: Card Size 6 X 6
Make the card base out of watercolor paper for stability. I cut my design paper the same size and taped it together. Stamp the image onto watercolor paper and color with distress inks. I used a cotton ball and distress inks to add some color around the church. Using the labels dies, I cut out the church and then created a frame for it. I stamped the sentiment onto watercolor paper and cut out using a smaller labels die. I also used inks to add color to the paper. I cut two of the borders and while still in the in the die I sponged them with inks to match the image and sentiment. I also used this technique on the corner piece. Next I attached pop dots under the frame and attached to the image. I taped this to my card base. I popped the sentiment also. I taped the two borders together and used pop dots to attach to the border over my image and sentiment. I glued the corner into place and the card is finished.

I'm really pleased with how this one turned out!  For more gorgeous creations from all the design team just go on over to the Heartfelt Creations blog; while you are there remember to leave a comment for a chance to win the whole release!  As always you can also visit the individual blogs of all the design team members by clicking on their names on the side of my blog.  We all love reading your comments!

Well that about does it from me this morning.  So wherever you are and no matter what you are doing, just take a moment and "Breathe".

Monday, February 6, 2012

Another Candy Wrapper for Joans Gardens Challenge


Good morning everyone!   I hope you had a great weekend and that you are ready to face another work week!  I'm struggling with shoulder pain, so no great plans for this old broad!  The woes of getting old! 

This morning I'd like to share another candy wrapper I made to enter into the challenge over at Joan's Gardens.  You can follow the link and get all the instructions for this challenge.  I need to do three more of these little babies for my grandsons.  They are getting older but still look forward to my sending them mail....especially if they contain candy or money. 

Well I'm off for my second cup of coffee and to think about getting my day started.  Hope your day is a good one and that you have an opportunity to be creative in some way.  And as always, remember to breathe!

Saturday, February 4, 2012

Joan's Creations Weekly Challenge


Good morning everyone.  I'm getting a late start this morning but I wanted to show you a candy wrapper I made for Joan's challenge using the tutorial supplied by Selma Stevenson.  This works up so quickly and her instructions are very easy to follow.  Then you can decorate anyway you want.  If you want all the specifics on the challenge just go to Joan's Gardens.

Create a (or several) cute Pouch
Be as creative as you can using different embellishments
Follow Selma's instructions

I think I did everything requested on my pouch.  I think it turned out really well and I will put a candy bar inside and give as a small Valentine's Day gift.  I'm seeing several of these in my future!

OK, that's it for me this morning.  I hope you have a wonderful weekend!  Remember to breathe!


Friday, February 3, 2012

The Play Date Cafe PDCC 117

Good morning blogging friends. This morning I'm sharing a card I made to show over at the Play Date Cafe.  This will be the first time I have participated in their challenge and I am very excited to play along.  The colors they are using this week are:


These are lovely colors and so much fun to work with.  So here is my card:

I used some pretty paper, Marianne dies, a Spellbinders Die, some pretty flowers and a little glitter.  I think it turned out pretty well.  So if you are looking for some fun challenges just go to the Play Date Cafe and try them out! 

Supplies:
Marianne dies, Spellbinders dies, Wild Orchid's Crafts flowers, Heartfelt Creations Sentiment, glue, glitter, Scor-Tape,  card stock, design paper

Thursday, February 2, 2012

Roses by the Window.....


Good morning my blogging friends!  We are having more rain this morning.  It seems this winter, it has rained every other day.  At least our temps are fairly mild so the heating bills are going to be quite low.  But I would love to see some snow! 

My card this morning is another I did for Heartfelt Creations.  The products I used were:
HCD 718 Decorative  Chateau Gate Die, HCPC 3407 Botanical Floral 2 PreCut Set
HCPC 3448 Dainty Blooms & Birdies PreCut Set.  I colored the image with Ranger Distress Ink and I made the roses myself.  I think they turned out pretty well, and I hope you like them.

So today I will be trying to find time to play.  I'm slowly making a card or two that I will be showing you soon.  This dreary weather has really put a wrench in my creativity.  All you want to do is get a good book and a blanket and snuggle down!  We had a gorgeous couple of days with temps in the mid 60's and they sure spoiled me.  Lots of wonderful sunshine and it really made me think of Spring.  We even have the robins back!  I've been seeing them for a little over a week now.  They are a little early, as I don't usually notice them until mid February.  I don't know about you, but when I see Robins, I know Spring is just around the corner! 

Well, I'm off for a second cup of coffee and to get my day started.  Have a wonderful day and I hope you have time to play!

Wednesday, February 1, 2012

Welcome to Another Heartfelt Creations Wednesday!


Good morning my blogging friends!  It is Wednesday and once again time to share another project I did for Heartfelt Creations!  I can't tell you how much I missed being able to play last Wednesday.  Today, I'm a happy camper since I'm back up and running.

This morning my project is a decorative piece that can be displayed on an easel or made into a wall hanging.  I chose to use the easel.  This idea is inspired by a Tim Coffee video I saw and I loved the look and so here is my take on it.  I used all Heartfelt Creations stamps and just started to play.  The idea is to stamp the images and then outline with hot glue.  This is quite difficult for me and it takes an extremely steady hand but I still love the results.  Once you get everything outlined you paint over everything, then crackle everything and do some color washes and shimmer sprays and suddenly everything begins to come together.  You can go to the Heartfelt Creations blog to see all the stamps and products I used and the full instructions are there as well.  I think it turned out with a sort of Shabby look and feel to it and I love the soft colors that came through!  While you are on the Heartfelt Creations blog spend a few minutes and see all the other beautiful cards and designs that are posted there.  You can get so many wonderful ideas.  Also you can visit each of the design team's blogs by clicking on their names on the side of my blog.  Go visit and leave them a message.

That's it for me this morning!   I hope you have enjoyed seeing my project.   Have a great day and a good rest of the week!