Thursday, March 25, 2021

He Lives...

As we continue to march toward Easter, I have another card to share with you!


I made a bunch of these Dogwood flowers and little doves so I got several cards out of these.  The Flowering Dogwood collection has been retired by Heartfelt Creations but I still have these products and will continue to use them as I'm in love with these flowers.  I have several Dogwood trees in my yard so you can understand my love for all things Dogwood!

The background die is HCD2-7328 Lattice Swirl Gateway Die.  Heartfelt Creations knocked it out of the park with these new dies!  

Wednesday, March 24, 2021

Flourishing Slimline Card...

Good morning friends and welcome of Heartfelt Creations Inspiration Wednesday!  As we continue along with the Spring Garden Collection I want to share this slimline card.


Other Products: White Cardstock, Purple Cardstock, Dimensional Tape, Die Cutting Machine, Hot Glue Gun

Instructions: My card size is 3 3/4" x 8 3/4". Make card base and add dark purple layer then a piece of sheet 4A from the paper collection. Die cut the Ornate Flourish Gateway die twice, using the lighter purple cardstock. Edge both pieces with the Majestic Violet ink to add some more dimension then lay them end to end on the card front and glue down. Stamp the sentiment using Majestic Violet.

Stamp the flowers onto the Flower Shaping Paper using Majestic Violet ink and using the Stack and Store Daubers add Majestic Violet to the center of each flower. Cut out using the coordinating die and then add Majestic Violet ink to the edges of the flowers Lay them into the 3D mold and spritz with water then run through the die cut machine. Turn them out onto your desk and using the Flower Shaping Kit use pressure to the center of each flower causing them to be more dimensional. When dry, add prills to the centers and allow flowers to dry. Stamp the Hyacinth onto Flower Shaping Paper using Fern Green ink. Color the leaves with Leaf Green and edge the leaves with Fern Green. Cut out using the coordinating die. I used hot glue to glue down the flowers so they would dry quickly. Add glitter to the flowers and allow to dry. Center the Hyacinth onto the card front and using dimensional tape glue down. The card is finished.


Tuesday, March 23, 2021

Easter Card.....

Good morning friends!  I'm here this morning to share with you one of the Easter cards I made this year.


 I used items from the Flowering Dogwood collection that is retired all except for the flowers.  I always just loved the look of these flowers and the paper collection was one of my favorites.  I was so sorry to see it retire.  Every now and then I pull it all out of the retirement box and give it a play again.  The background die cut is HCD2-7339 Regal Lattice Gateway Die.  I cut one out of white cardstock and one out of the gold cardstock and staggered the two together so the gold is just peeping out behind the white die cut.  I just love this die and have used it a lot.  

That does it for me this morning.  We are supposed to have another gorgeous day here in East Tennessee as Spring is trying to make an appearance.  I hope your day is filled with joy!

Wednesday, March 17, 2021

Spring is Bursting...

Good morning my friends!  I hope this post finds you well and happy.  My title this morning is "Spring is Bursting".  Here in East Tennessee we have begun the roller coaster of season change...one day it is cold and windy and the next is is a balmy 70 degrees and sunshine.  Daffodils and Hyacinths have begun to bloom and it makes my heart sing to gaze out a window and see these little faces dancing in the wind!

As we continue along with the Spring Garden Collection from Heartfelt Creations, this is my next card.  I hope it makes you smile. 


Products Used:
Spring Garden Paper Collection, HCDP1-2125
Spring Daffodil Cling Stamp Set, HCPC-3946
Spring Daffodil Die, HCD1-7344
3D Daffodil Shaping Mold, HCFB1-496
Fragrant Hyacinth Cling Stamp Set, HCPC-3947
Fragrant Hyacinth Die, HCD1-7345
3D Hyacinth Shaping Mold, HCFB1-497
Floral Shoppe Accents Cling Stamp Set, HCPC-3932
Floral Shoppe Accents Die, HCD1-7330
Deluxe Flower Shaping Kit, HCST1-401
Stack and Store Daubers-Pack of 30, HCDA2-450
Pastel Bead Stamens-Medium, HCS1-457-3
Groove Golf Tool Set, DMCT4185
Designer Dries Clear Adhesive, 159723
Metal Tip for Adhesive Bottles, 352854
Rajni Chawla's Crystal Clear, PGM15015
Lemon Chiffon Prills, ANC809
Ranger Archival Ink Pad - Fern Green, RACP962


Other Products: Dandelion Memento Ink, White Cardstock, Purple Cardstock, Die Cutting Machine, Hot Glue Gun, Dimensional Tape

Instructions: My card size is 4 1/4" x 5 1/2". Make card base from white cardstock and set aside. Cut purple cardstock layering piece and cover with a piece of the paper collection. I used sheet #4A. Glue the two pieces together and use dimensional tape to adhere to the card front.

Stamp the flowers using the same color of ink you will use to color them. I used Dandelion for the daffodil, Majestic Violet and Vibrant Fuchsia for the two Hyacinths. Color the centers and use the coordinating dies to cut out. Lay the flowers onto the matching 3d Shaping Molds, spritz with water and run through the die cutting machine. Turn the flowers out onto your desk to dry. Use hot glue to glue, and on the Daffodils, I poked a hole in the center using the Golf Tools and threaded the stamens through. As the Hyacinths come out of the mold, I used the shaping tools to add a bit more dimension. When the Hyacinth flowers are dry, add Prills to the centers and allow it to dry.

Stamp the leaves in Fern Green as well as the Hyacinths and color using Leaf Green. Use the coordinating die to cut out. Using the hot glue gun, glue the Hyacinths to the stamped flowers and then you can decide on the placement of the flowers and leaves and glue them down. The card is finished!

Wednesday, March 10, 2021

Debuting the Spring Garden Collection from Heartfelt Creations...

Good morning my friends.  I hope my post finds you all well and looking forward to Spring!  As my daffodils continue to bloom in my yard they are also bursting forth in my craft room.  Heartfelt Creations is bringing to you their next lovely collection called Spring Garden.  So here we go with my first creation using this lovely collection.  Truthfully, I never expected to make a 3D daffodil but with the stamps and dies from this collection it was easy.  You are going to love this collection and I know you will reach for it time and again!


Products Used:

Spring Garden Paper Collection, HCDP1-2125
Spring Daffodil Cling Stamp Set, HCPC-3946
Spring Daffodil Die, HCD1-7344
3D Daffodil Shaping Mold, HCFB1-496
Delightful Daffodil & Hyacinth Die, HCD1-7342
Delightful Daffodil & Hyacinth Cling Stamp Set, HCPC-3944
Teardrop Lattice Gateway Die, HCD2-7337
Floral Shoppe Accents Cling Stamp Set, HCPC-3932
Floral Shoppe Accents Die, HCD1-7330
Large Floral Urn Cling Stamp Set, HCPC-3931
Large Floral Urn Die, HCD1-7329

Other Products: Memento Dandelion Ink, White Cardstock, Die Cutting Machine, Dimensional Tape, Hot Glue Gun

Instructions: My card size is 5 x 7”. I used the Teardrop Lattice Gateway Die and cut a shaped card out of white cardstock. I covered the base card with a piece of Sheet 7B from the paper collection. Cut out the largest die with the lattice areas using white cardstock and glue over the piece of the pretty paper.

Using the smaller dies in the set I cut out a piece of Sheet 2B from the paper collection and then used white cardstock to cut out the lattice piece. I used dimensional tape to adhere to the card base and give a bit of dimension.

I stamped the Large Daffodil from the Delightful Daffodil & Hyacinth using Rich Cocoa ink and colored using Dandelion Ink, Fern Green and Leaf Green ink. Cut out using the coordinating die.

Next, stamp the flowers and leaves and fillers for the card. I used Fern Green for the leaves and fillers and Dandelion for the Daffodils. I colored the Daffodils with Dandelion ink as well and cut out using the coordinating dies. The filler pieces were colored with Leaf Green and Majestic Violet and then use the coordinating dies to cut them out. Lay the Daffodils onto the mold, spritz with water and run through the die cut machine. Turn them out to dry. I used hot glue to put the daffodils together then poked a hole and run through the stamen and hot glued them into place.

Lots of glitter was sprinkled over these flowers and leaves and also on the lattice of the Teardrop Lattice Gateway Die.

The card is finished. I love how this card turned out...it is a definite statement piece!

Wednesday, March 3, 2021

Definitely Delightful Daffodil...Inspiration Wednesday with Heartfelt Creations...

Good morning friends.  It is definitely the season for the Dellightful Daffodil!  I actually have some blooming in my yard.  They are my first blooms of the season and such a welcome sight!  I'm here this morning to share another card I made using the Delightful Daffodil Collection from Heartfelt Creations!


Products Used:
Delightful Daffodil Paper Collection, HCDP1-2124
Delightful Daffodil & Hyacinth Cling Stamp Set, HCPC-3944
Delightful Daffodil & Hyacinth Die, HCD1-7342
Swirly Accent Spray Die, HCD1-7263
Eyelet Oval & Basics Large Die, HCD1-7157
Eyelet Oval & Basics Small Die, HCD1-7156
Stack and Store Daubers-Pack of 30, HCDA2-450
Rajni Chawla's Crystal Clear, PGM15015
Designer Dries Clear Adhesive, 159723
Metal Tip for Adhesive Bottles, 352854
Memento Dye Ink Pad - Rich Cocoa, TSMP800
Ranger Archival Ink Pad - Paradise Teal, RACP500
Hydra Sponges, RLHS100

Other Products: White Cardstock, Die Cut Machine, Dimensional Tape, Prisma Color Pencils: PC911, PC912, PC908, PC918, PC916, PC917, 742 1/2, PC931 Dimensional Tape, Gamsol, Blending Stumps

Instructions: My finished card size is 5" x 7". Make card base and cover with a piece of the paper collection Sheet 6B. Cut a piece of the teal cardstock and layer on the card front. Cut a piece from Sheet 9B and add dimensional tape to the back and adhere to the card front. Distress the edges of all papers before adhering.

Die cut the two of the Swirly Accent Die and cut them apart to form the top and bottom of the medallion piece. Next cut out the white Eyelet Oval and glue this to the two pieces that we cut apart. Next cut a piece of sheet 10A from the paper collection and add layer onto the eyelet oval piece. Add dimensional tape to the back of the medallion piece and adhere to the card front. Add glue to the sponge and put onto the end pieces of the medallion and add glitter.

Stamp the flowers using Rich Cocoa ink and color with the colored pencils. Use coordinating dies to cut out. Add glitter and set aside to dry. Once dry decide on placement and glue down. The card is ready to go.

Wednesday, February 24, 2021

Inspiration Wednesday with Heartfelt Creations...

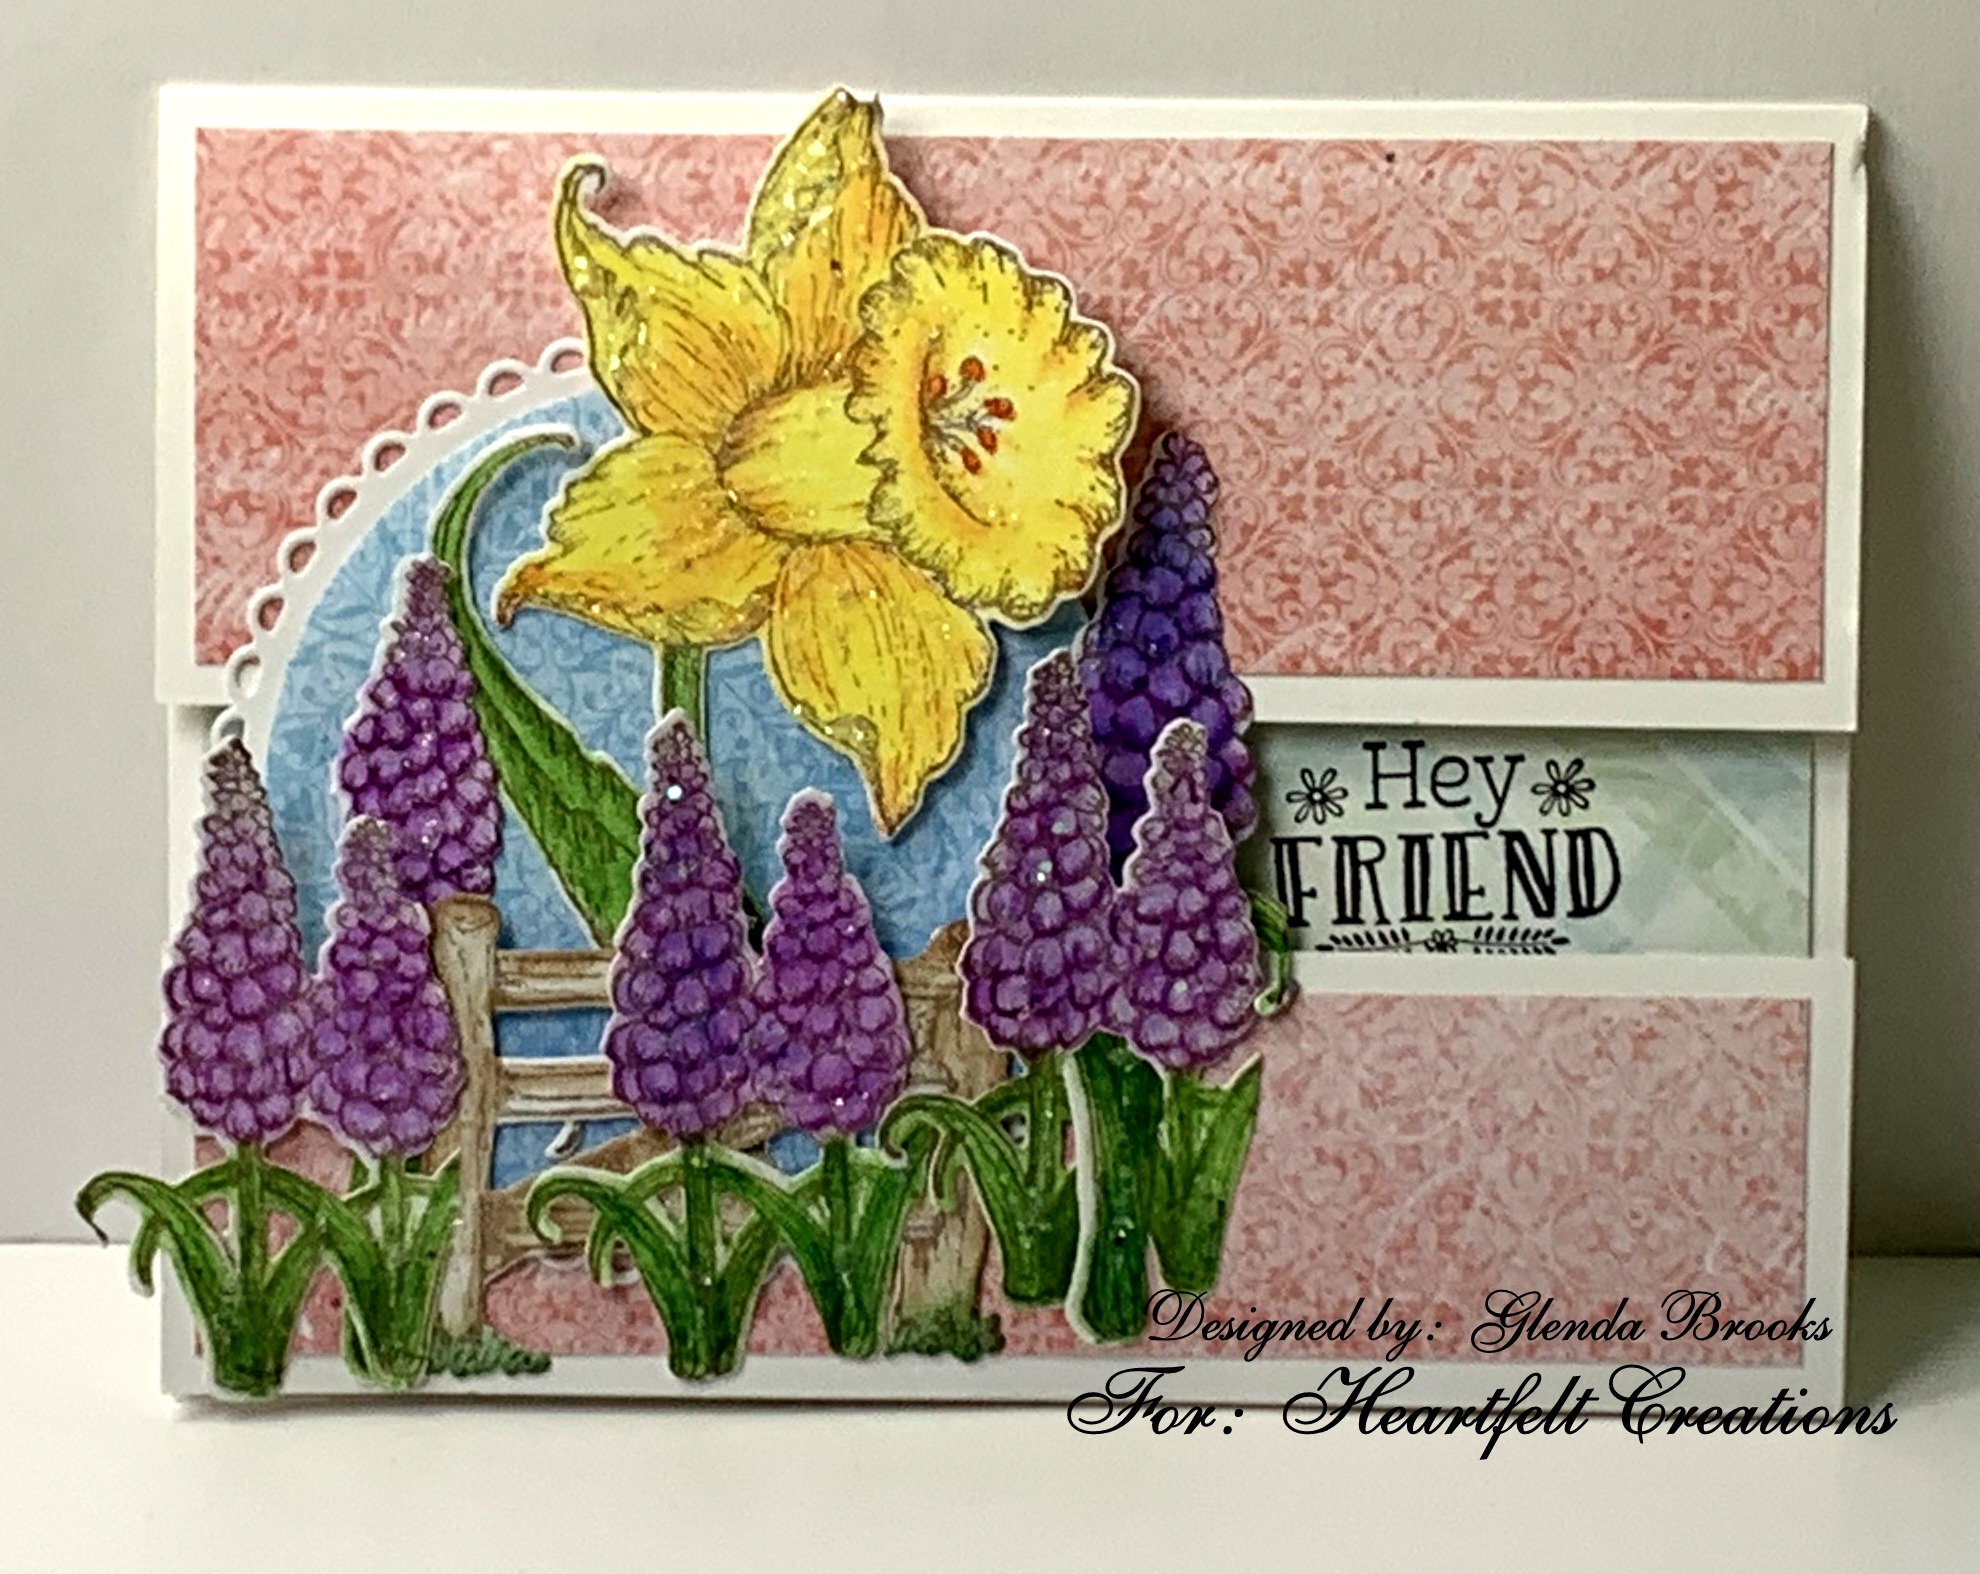
Good morning my friends!  I'm here this morning to share with you a card I have made for Heartfelt Creations using the Delightful Daffodil Collection!  As Spring nears we have been enjoying a few days of Spring temps.  We are approaching highs of 70 degrees and this old girl is definitely ready to welcome Spring!


Products Used:
Delightful Daffodil Paper Collection, HCDP1-2124
Delightful Daffodil & Hyacinth Cling Stamp Set, HCPC-3944
Delightful Daffodil & Hyacinth Die, HCD1-7342
Delightful Daffodil & Butterfly Cling Stamp Set, HCPC-3943
Delightful Daffodil & Butterfly Die, HCD1-7341
Barnyard Accents Cling Stamp Set, HCPC-3927
Barnyard Accents Die, HCD1-7318
For My Friend Sentiments Cling Stamp Set, HCPC-3844
Decorative Circle Frames Die, HCD2-7306
Circle Basics Large Die, HCD1-7155
Stack and Store Daubers-Pack of 30, HCDA2-450
Memento Dye Ink Pad - Rich Cocoa, TSMP800
Memento Dye Ink Pad - Toffee Crunch, TSMP805
Ranger Archival Ink Pad - Jet Black, RACP468
Designer Dries Clear Adhesive, 159723
Metal Tip for Adhesive Bottles, 352854
Rajni Chawla's Frosting Powder, PGM15016 

Other Products: White Cardstock, Die Cut Machine, Dimensional Tape, Prismacolor Pencils: PC918, PC930, PC929, PC933, PC932, PC912, 742 1/2, PC917, PC931, PC911, PC908, PC916, 734 Gamsol, Blending Stumps

Instructions: My finished card size is 4 1/4" x 5 1/2". It is a split front card. Make card base and measure down 2" and cut and then the piece that is left cut at 1 1/2". I cut a piece of Sheet 7B of the paper collection and covered the inside of the card. I used Sheet 11B to cover the front of the card. I used a piece of tape to hold the bottom portion of the card front in place then I cut out the circle medallion and I used dimensional tape to adhere a piece of Sheet 12B of the paper collection that was also cut using the circle die. Add glue to the top and bottom of the circle medallion and glue down. I stamped the sentiment through the opening in the card front.

Using Rich Cocoa ink stamp the flowers and the fence. Color the flowers with the colored pencils and cut out using coordinating dies. Add glitter and set aside to dry. I colored the fence with Stack and Store Daubers and Toffee Crunch ink and cut it out using the coordinating die.

Once everything is dry, decide on placement and glue down the elements and the card is finished.