Wednesday, February 22, 2023

Heartfelt Creations - Sweet Lilies....

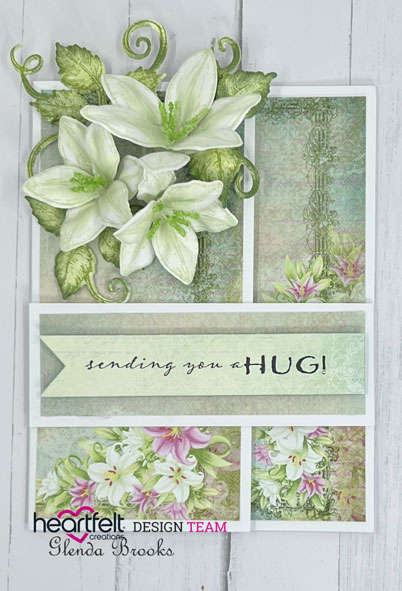
Good morning my friends and welcome.  We are speeding toward the end of February and March is fast approaching.  Spring is close!  This morning I'm here to share another card made with the Heartfelt Creations Garden Lily collection!  These florals just speak to me so I hope you enjoy my card!  You can find my card in the Heartfelt Creations Gallery with a listing of all the products used.

My finished card size is 4 1/4" X 5 1/2".  Make card base and cut 1 1/2" off the front flap giving you a piece of cardstock 1 1/2" X 5 1/2".  Score at 4 1/4" and glue this piece to the inside of the card.  This piece comes across the front of the card to act as a closure.  I added the magnets onto the closing flap and covered with the decorative paper and onto the card front and covered that as well.  This type of card tends to fall open and it is a pet peeve of mine so I just use the magnets to take care of this.  Cover the card with pieces of the paper collection...I used pieces of Sheet 10A.  For the sentiment I used a scrap of Sheet 3A and stamped the sentiment then I cut out the sentiment using the Arrows and Banner Die.  I adhered it to the closing flap using dimensional tape.

Stamp the flower petals using Sap Green ink and cut out using coordinating dies.  Layer onto mold, spritz with water and run through the die cut machine.  Use two petals per flower and poke a hole in center and add the stamen and hot glue to hold into place.  Stamp the leaves with Leaf Green ink and color with same then cut out with coordinating die.  Lay onto the mold, spritz with water and run through the die cut machine.  Turn out onto the desk to dry.  When everything is dry decide on placement of flowers and leaves and hot glue down.  The card is finished!
  

Saturday, February 18, 2023

Can You Handle the Pressure Challenge...

Good morning my friends and welcome.  It's the weekend and even though all days are basically the same for me since I'm retired and love being home, the weekends still make me very happy.  This morning I've made a quick and easy card for the Can You Handle the Pressure challenge.  I have several embossing folders but neglect them terribly.  I'm hoping this challenge has me using more of my supplies.   This morning I'm using a Gemini folder called Contemporary Lace and I think it makes such a beautiful impression.  The heart is a Heartfelt Creations Die and I die cut it twice, once in white and once in silver and layered them together to have the silver cardstock peeping out from behind the white.  The heart die comes with the word Love and I think it is just stunning!  So a few trips through a die cut machine and some glue and this card is ready to go.  I love it when a plan comes together!  


If you have a few minutes go check out this challenge...the design team is quite talented and I know you can get some fun ideas for cards.

Friday, February 17, 2023

You Brighten my World....

Good morning everyone.  I'm here this morning to share with you a card I have made to submit to the Beautiful Blossoms Challenge.  These ladies have hit my weak spot with this challenge.  You know I love making flowers and I'm hoping to get to play along with many of these challenges in the future.  When you visit the site there is a mood board for inspiration; here is the board for this month:  


Here is my card:  Pink florals with yellow Prills centers and just for fun a dragonfly!


I used supplies from various Heartfelt Creations collections to make my card.  I hope you like it!

Wednesday, February 15, 2023

Inspiration Wednesday with Heartfelt Creations....

Good morning my friends and welcome to my blog.  Wednesday has rolled around once again and I'm here to share another card I made using the Ornate Peacock Collection.  You can find my card in the Heartfelt Creations Gallery with a listing of all the products used.  


My card's finished size is 6" X 6".  I made the card base using Deluxe Flower Shaping Paper because it is such a great weight for making cards.  I picked one of the card bases on Sheet 1A of the paper collection and covered the base.  I used one of the squares of the Cut Mat Create dies to cut a piece of Sheet 1B of the paper collection to cover up the center of the card front.  

Stamp the window with Night Sky ink onto watercolor paper.  Cut out with coordinating die.  Also cut just the window topper which has also been stamped with Night Sky ink. Emboss with clear embossing powder.  I used Night Sky to color some of the window just to add a bit of color to the white edges.  Glitter the topper using #85 Crystal Glitter and set aside to dry.

Stamp the peacock and the flower topper with gold ink and emboss using clear embossing powder.  Using a waterbrush and Peacock Feathers Distress ink color the peacock.  Cut out with coordinating die.  Using a pink Zig marker color the flowers and cut out with coordinating die. Add Heart of Gold Prills to the flowers.  Set aside to dry.  Use #85 Crystal Glitter to add sparkle to the flower topper and the peacock.  Set aside to dry.

Cut a center for the window using clear cardstock and glue to the back of the window.  When dry add dimensional strips to the back of the window and pour in chunky glitter, Minnie Pearl Prills and blue sequins and glue to the card front making it a shaker card.

Glue the window topper to the window then add the peacock and floral topper with dimensional tape.  

Using Night Sky ink stamp the sentiment onto one of the tags on the paper collection and cut out with coordinating die.  Add glitter to tag and allow the glue to dry.  Using dimensional tape adhere the tag to the card front.  The card is ready to go.

Wednesday, February 8, 2023

Introducing the Ornate Peacock Collection from Heartfelt Creations...

Good morning everyone and welcome to my blog!  I'm here this morning to share a card I made using the brand new Ornate Peacock Collection.  You can find my card in the Heartfelt Creations Gallery along with all the details for making one of your own!


My finished card is 5" X 7".  Cut a piece of cardstock 7" X 10" and score at 5" to make card base.  Cover with a piece of Sheet 6B of the paper collection.  

Using the largest die in the Rectangle Filigree Frame Die, cut two die cuts; one in white and one in gold.  Glue the two together with the white on top of the gold and offset a bit so the gold shows through behind the white piece.  Glue this to the card front and lets focus on the medallion piece.  Cut two of the next size down in the die set, one in gold and one in white.  Glue together with the gold under the white and offset so the gold shows through.  Glue this to the center of the card front.  Cut the next size of the dies using white cardstock and lay inside the embossing folder, spritz with water and run through the die cut machine. Glue this piece to the medallion piece.

Now we are going to work on the peacock.  Stamp with Encore Gold ink onto watercolor paper and sprinkle clear embossing powder over the image.  Use heat gun to set the embossing powder. Using Peacock Feathers Distress ink and a water brush color the peacock.  I colored the flowers and leaves with Zig Clean Color markers.  Cut out with coordinating die and set aside.  Edge the peacock with Archival Night Sky ink.    When it dries, glitter and allow that to dry.  I added Heart of Gold Prills to the centers of the flowers.  Allow to dry.  I used Double Dots to adhere the peacock to the medallion and give some dimension.  


Monday, February 6, 2023

You are the World.....

Good Monday morning my friends!  I hope you all had a great weekend!  As for me...why yes I did!  I'm here this morning to share a card made for the challenge over at the Beautiful Blossoms Challange.  This is their very first challenge and you all know me....I love me some flowers!  

So I recently purchased a new die set from Anna Griffin called Folding Screen Slimline Dies.  I did some alterations to the card as I just cut some off the top to make a shorter screen.  Added a bit of gold die cuts to the bottom and the sentiment and flowers are from Heartfelt Creations.  I usually keep some small flowers and leaves ready to go to add as fill in on my cards and these are just some of those.  


The mood board for this challenge is showing blues and I don't usually do blue florals but the paper has a blue look and I stamped the sentiment in blue ink.  Hope this will pass.  You should all go over and check out this new challenge.  It promises to be a lot of fun and I think I'll be playing along quite often!

Wednesday, February 1, 2023

Ornate Hollyhock Slimline - Inspiration Wednesday with Heartfelt Creations...

Good morning friends and welcome to this first day of February, 2023!  It seems like January has flown by and we are charging into February at such a fast pace.  I am such a lucky woman as I can have beautiful flowers on my desk any month of the year thanks to Heartfelt Creations.  The  card I'm sharing this morning is sprinkled with Hollyhocks a flower my mother grew beside our back steps and it is a wonderful reminder of my youth!  You can find my card in the Heartfelt Creations Gallery along with all the products used to make it.  


My finished card size is 4" X 9".  Make card base using Deluxe Flower Shaping Paper. Cut a piece of this paper 8 1/2" X 9" and score at 4 1/4 then fold. I took the largest die in the Slim Ornate Rectangle set and positioned it just over the fold line and cut out making the card base 4" X 9".  Cut another piece of cardstock using this same die and glue it to the card front.  Now cut a piece of Sheet #5A of the paper collection and also glue to the card front. 

Cut the next smallest die in the set using white cardstock and cut one using the Luxe Gold Cardstock.  Glue these two die cuts together with the white one on top and with just a bit of the gold showing through.  Glue to the card front.  

Using the next smallest die cut a gold piece and a white piece.  Discard the white die cut except for the center which we are going to glue inside the gold die cut.  This is where we are going to mount our sentiment.  Cut the sentiment strip using Luxe Gold Cardstock and glue the words to the white strip of the die cut.  

Now we are going to work on the flowers and leaves.  Stamp the flower petals onto the Deluxe Flower Shaping Paper in Magenta Hue and lightly color the centers of the petals with Buttercup ink.  Cut out with coordinating die and then color the edges of the petals with Magenta Hue.  Lay the petals onto the mold, spritz with water and run through the die cut machine.  Lay out onto the desk to dry.  Once dry put a mound of hot glue in the enters and dump the Prills onto that and allow to dry.  Shake off any excess Prills and put back into the container. Using a Hydra Sponge and Designer Dries Clear Adhesive add glitter to the petals and allow to dry.   

Stamp the leaves onto Deluxe Flower Shaping Paper using Leaf Green ink. Color using Leaf Green and Vivid Chartruese then die cut with coordinating dies. Edge in Leaf Green and Olive inks to add a bit of contrast. Lay onto shaping mold, spritz with water and run through die cut machine then turn out onto the desk to dry.

Once everything is dry, decide on placement and hot glue down.  The card is finished.