Showing posts with label Sunflowers. Show all posts

Monday, August 21, 2023

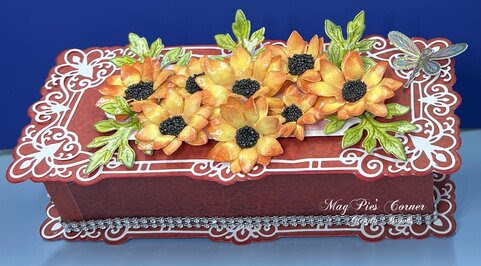
More Sunflowers.....

Good Monday morning everyone and welcome.  Today I'm sharing more sunflowers and a box I made.  I got the instructions for the core box from Liz Gaze, one of the ladies making videos for Heartfelt Creations but I chose the paper, flowers and that sweet little dragonfly.  I am entering this box on the Double D Challenge (Sunflowers).  I have always loved sunflowers and when I make them I make a bunch, so you may be seeing more in the coming days.  


I hope  you enjoy this box as I really enjoyed making it.  I actually made four of these boxes over a couple of weeks so I used many sunflowers in the process.  If you have time and would like to play along, hop over to the challenge and have a look around.  It's lots of fun!

Thursday, August 17, 2023

Sunflowers...

I love when the sunflowers bloom and I love making them as well!  So here is a sunflower card made using lots of stamps, dies, papers, molds, inks etc.  This one has been received so I can post, as it is no longer a surprise!  I'm also playing along in the Double D Challenge which is "Sunflowers".  This is the first time I have entered this challenge ... I have been entering a few here and there.  It's nice to be on my own and making things that I love making.  I made a bunch of sunflowers lately so there is more to come in the next few days.  


I'm not going to list all the products as they are all Heartfelt Creations. (No surprise there)  Well that does it for me this morning.  Short and Sweet and off to the races. 

Wednesday, September 29, 2021

Inspiration Wednesday with Heartfelt Creations...

Good morning friends!  I'm here this morning to share with you another card I have made using the New Simply Elegant Centerpiece die from Heartfelt Creations.  

You can see my card details in the Heartfelt Creations Gallery.


My finished card size is 6 X 6.  Make card base using Deluxe Flower Shaping Paper.  Cut a piece of Orange cardstock just a bit smaller and glue to card front.  I distressed the edges so they would curl a bit.  Cut a piece of Sheet 11B of the paper collection just a bit smaller than the orange cardstock.  I adhered this to the card front using dimensional tape.

Using White Cardstock die cut the Simply Elegant Centerpiece die.  I used a Hydra Sponge and Designer dries clear glue to add Crystal Clear glitter to the die cut piece.  Set aside to dry.  Once dry glue it to the card front. I shifted this die cut off center just a bit because I plan to add flowers and leaves down the side and I wanted as much of this beautiful die cut to show as possible.

Stamp the flower petals using Dandelion ink and stamp a few using Fern Green.  The green petals will be used to make the Sunflower buds. Stamp leaves using Fern Green.  Color green petals and leaves with Leaf Green and highlight with Olive.  Color the yellow Sunflower petals using Dandelion, Sunflower, Cantaloupe and Rhubarb Stalk. I used the Deluxe Flower Shaping Paper for the flowers and leaves.  Use coordinating dies to cut out the flowers and leaves.  Lay onto the mold, spritz with water and run through the die cut machine.  Turn everything out onto the desk to dry.  Once dry glue two petals together to make the Sunflowers.  I used the Deluxe Flower Shaping Kit to add more dimension and shaping to the green petals and then used hot glue to secure the shape.  Add glitter to the flower petals using Hydra Sponges and Dries Clear Adhesive and allow to dry.  Now you can add the homemade Sunflower Center product to the flowers.  Allow to dry. Once everything is dry decide on placement and glue down.  

Stamp the sentiment onto a piece of Sheet 1B of the paper collection using Olive ink and cut out using the decorative center piece of the die set.  Adhere to the center of the Centerpiece die using dimensional tape.

I was able to slip it behind the flowers and leaves I had already glued down.  You might want to add this before you secure your flowers. 

Friday, January 22, 2021

Just For You Sunflowers....

Good morning everyone from a very chilly East Tennessee!  I'm here to share with you another card I made using the Heartfelt Creations Countryside Garden Collection and inspired by Tracey Fehr.  Thank you Tracey, you have me started making these cards and I love that I can mail with just one stamp! This is just another way to use the Countryside Garden Collection for quick and easy cards!


I stamped the image with Memento Rich Cocoa onto watercolor paper and colored with my Zig markers and a water brush.  The sentiment is stamped with Archival Jet Black ink and the sunflowers have Express-O Yourself Prills in the center!  


Wednesday, September 20, 2017

Heartfelt Creations....Embrace Life...

Good morning friends and welcome to Heartfelt Creations Wednesday!  This morning I'm here to share another project with you using the Beary Fun Retreat Collection.


What a fun tri-fold card and just look at those sunflowers!  Sunflowers are another one of my favorite flowers and I jump at the chance to get to add them to a card!

Products Used:
HCDP1-282 Beary Fun Retreat Paper Collection
HCPC-3798 Happy Time Treehouse Cling Stamp
HCD1-7152 Happy Time Treehouse Die
HCPC-3626 Classic Sunflower Cling Stamp
HCD1-753 Classic Sunflower Die
HCD1-745 Luggage and Tags Dies
HCPC-3736 Tropical Hibiscus Cling Stamp
HCD1-796 Tropical Hibiscus Die
HCST1-401 Deluxe Flower Shaping Kit
ANC829 Express Yourself Prills
#159723 Designer Dries Clear Adhesive
TSMP900 Tuxedo Black Memento Ink
TSMP800 Rich Cocoa Memento Ink
TSMP300 Ladybug Memento Ink

Other Supplies:  White Cardstock, Canson Watercolor Paper, Dimensional Tape (Vintage Photo, Tea Dye,  Pumice Stone, Walnut Stain, Faded Jeans, Peeled Paint, Shabby Shutters, Forest Moss, Spiced Marmalade Distress Inks)


You can watch a video on making sunflowers here: https://www.heartfeltcreations.us/video/75/classic-sunflower-shaping-and-stamping

Instructions:  My card size is 4 1/4  X 5 1/2.  You can find instructions for this tri shutter card on Splitcoaststampers.  Do the card base and cover with pieces of coordinating paper from the collection.  Using Rich Cocoa Memento ink, stamp the treehouse, mailbox, stool and tea pot, steaming cup and sunflowers.  Next using Tuxedo Black ink stamp the leaves.  Using various shades of Distress inks watercolor all elements.  I added Glossy accents to the ladybug after coloring it with Ladybug Red Memento ink.  Set it aside to dry.  Shape the flowers and leaves and add the prills to the centers and set aside to dry.  When everything is dry decide where you want them to rest and either glue them down or use the dimensional tape to adhere.  Next cut out two tags from the paper collection and using the dimensional tape adhere them the panels.