Showing posts with label Other. Show all posts

Wednesday, September 9, 2015

New Challenge for The sisterhood of Crafters "Photo Inspiration"

Hi everyone!  Today is a brand new challenge for The Sisterhood of Crafters and it is a "Photo Inspiration" challenge!  This challenge is headed by Lisa!


I just love the colors of this photo and tried to pull some of these colors and incorporate them into my card.


And I made flowers!  I love these pretty blossoms and their black centers with these printed leaves.

Come join us in this great challenge and make something inspired by the photo! You have until Sept. 20th. at 8 PM EST to link your project to The Sisterhood of Crafters blog.  I can't wait to see what you make.

Now a little announcement.  After much thought and prayer, I have decided that I will be stepping down and today is my last post as part of The Sisterhood's design team.  These ladies have been so kind and gracious and I'm really going to miss them.

I will be entering my card in the following challenges:
Crafting From the Heart
Craft Your Passion
Sisteract Card Challenge

Monday, February 3, 2014

Welcome to the Very First Challenge for Craft Hoarders Anonymous Challenge Blog!

Good morning everyone and Welcome! This is Challenge #1 for Craft Hoarders Anonymous
The challenge for the next two weeks is:  "What's Your Style?"  For me that is a very good question.  I'm sort of  "Vintage", with a sprinkling of "Girly" and topped off with a smudgen of "Classic".

Share a project that showcases your signature style.  Dig into your hoard and pull out items that make you shout with crafty joy!  Whip up something that has your creative name all over it.  Do you, because no one is you-er than you!


One lucky winner will receive this prize pack, donated by Gloria Stengel Designs!

Here is my project:


I have to admit, this card is totally me.  I make my own flowers and I love pinks, greens and shades of browns together.  I use a lot of Heartfelt Creations, stamps, dies and papers.  Let's face it...I hoard them.  I confess. a few months ago I went through some of my "stuff" and sent three large boxes of supplies, along with some dies and a die cut machine to the nursing home.  Now when they have craft day, they have a few more supplies to play with.  I am now feverishly working to re-stock!

Challenge Rules are here: Craft Hoarders Anonymous  

OK, you have until February 16 PT to post your project on your blog and link to The Craft Hoarders Anonymous Challenge Blog.  The design team projects will be posted there as well.

Design Team Group "A" is posting today and February 10, Design Team Group "B" will post.  You may click on the names of the two groups on my right hand side bar and you will be whisked away to their blogs. Go visit and leave a comment.  We all love hearing from you!  

OK, now it's your turn...go pull out those supplies and get busy!  I can't wait to see what you do!  And remember if you don't enter, you cannot win!


Tuesday, January 28, 2014

Heartfelt Creations January Alumni Design Team Blog Hop

Good morning everyone and welcome to the January Heartfelt Creations Alumni Design Team Blog Hop!  As always I am so excited to be a part of this team and look forward to this time each month.  It is always so nice to get to spend a little time with you and to show you some of the things we have been working on.  I love working with Heartfelt Creations products and find almost every card I make has something from HC on it whether it is a die cut, a stamp or some of their gorgeous papers!

Be sure and leave a comment on as many of the blogs as you can because you never know which blog will be used to pick the winner of a $25 gift certificate for product on the Heartfelt Creations site.    So follow along and leave your comments and good luck to you all!


I love this sentiment; sorry for the uneven stamping; seems to be a trademark of mine!  My papers used are peach and green and I think the peach paper makes lovely flowers.  I will follow with a list of supplies used.  You should have come here by way of Mary Faus and your next step is to visit Alissa Wells.   Now remember leave a comment all along the way!

Supplies:
HCDP1-232 Balmy Breeze Paper Collection
HCD 722 Tattered Blossom Die
HCPC 3363 Inspire Me Sentiments Precut Set
HCPC 3468 Tattered Blossoms Precut Set
HCPC 3545 Open Leaf PreCut Set
HCPC 3546 Classic Leaf PreCut Set
Gold Gala Glitz
Sizzix Frame Ornate #2 Embossing Folder,Memento Ink,Shimmer spray, glue, Scor Tape,Tim Holtz distress tool, white watercolor paper

Giovana Smith
Cibelel Glazer
Amarilys Doria
Candy Slabaugh
Loretta Lock
Deneen Treble
Vicki Dutcher
Emila van den Heuvel
Lee Ann Barrett
Mary Faus
Glenda Brooks - You are here!
Alissa Wells
Linda Loew
Linda Payne
Caroline Duncan
Lisa Allen


Friday, November 29, 2013

Moving Forward.....


Hope you all survived Turkey Day and are ready to start the march to Christmas!  I had a wonderful evening with lots of food and family and a good time was had by all.  Now we move forward!


This tag is made using stamps, papers and dies from Heartfelt Creations.  I think it has a quiet elegance to it.

OK people, let's get cracking!  Are you headed to the Mall for the Black Friday sales?  No me...I'm afraid I might have to hurt someone!  I'm very content to be here in my pj's and slippers watching it all on TV.  My tree is up and decorated, most of the gifts are purchased and ready to wrap, I'm totally in the holiday spirit and I'm poised to start making cookies and candy. How's that for being organized?  I'm just too old for it to be any other way!

OK this is it for me this morning.

Have a wonderful day and no matter where you find yourself, or whatever you are doing, take a little moment of time and ....... "Breathe"!

Wednesday, October 16, 2013

Welcome to Heartfelt Creations Wednesday.......

Good morning everyone and welcome to Heartfelt Creations Wednesday!  I'm here this morning to share another project I did for Heartfelt Creations using the Sweet Juliet Collection.


Heartfelt Creations Products Used:
HCDP1 237 Antiquity Paper Collection
HCPC 3566 Beautiful Juliet PreCut Set
HCD 740 Sweet Juliet Die

Other Supplies: Canson watercolor paper, Ranger Distress Ink, Memento Ink, White card stock, Spellbinders Exquisite Labels Eleven, brad, Scor -Tape

Instructions:  Card Size 5” X 7”
Make card base using watercolor paper for stability, and cover with a piece of the pretty paper.  Use Distress inks to shade around the edges of the card.  Next cut out one of the labels and stamp the image on the center. (I used watercolor paper for this piece too.)  Color the image and place piece back into the die and use distress ink to go around the edge of the center part of the die cut.  Attach this piece to the card base.  Next I cut out the flower petals and the leaves and colored them with distress inks.  I used the brad to mount my flower and glued down the leaves and the flower.  The card is finished.


I'm so glad you stopped by this morning.  Now if you would like some more inspiration, just head over to the HC blog and have a look around.  There is so much talent on display there today!   Also, if you haven't voted for the new design team you should do that now.  The voting ends on Friday.  We are all on pins and needles waiting to see who the lucky people are.  Keep your fingers crossed for me!

Well that does it for me this morning.  I'm off to visit my design team sisters blogs and have a good look around.  I always love to see what they have been doing!  So you have a good day and may it be filled with lots of joy!

Wednesday, January 16, 2013

Welcome to Heartfelt Creations Wednesday!

Good morning everyone!  I'm so glad you are able to visit this morning.  Grab a cup of coffee and get settled in and I will share my card that I made for Heartfelt Creations.


Heartfelt Creations Products Used:
HCDP1 229 Countryside Evening Paper Collection

HCD 722 Tattered Blossoms Die
HCPC 3468 Tattered Blossoms PreCut Set
HCD 729 Decorative Blossom Corner Die
HCD 728 Timeless Amour Die
HCPC 3512 Antique Latern PreCut Set

Other Supplies:  Spellbinders Venetian Motifs, Floral Ovals, Fancy Lattice and Long Classic Rectangles, Memento Ink, shimmer spray, Ranger Distress ink, gold leafing pen, glue, card stock, Canson watercolor paper, glitter, Scor-tape, seam binding, dimensional tape, Lily Pad Dew Drops

Instructions:  Card Size: 5” X 7”
Make card base and cover with paper from the collection.  Cut out dies.  Color the petals with distress ink and spray with shimmer spray.  When dry edge with the gold leafing pen.  Glue the petals to make a flower.  Add glitter and seam binding to the lattice piece and glue a piece of the paper collection to the back; attach to your card base.  While oval die is still attached to the card stock, add color using distress ink.  Stamp sentiment onto this oval and attach over the lattice piece.  Next I glued paper to the heart piece and attach using dimensional tape.  Now glue dew drops where you like the way they look.  Attach the flowers and swirls where you like.  Now tie your bow and attach it to the bottom of the card.
Now I would love to invite you to visit the Heartfelt Creations blog and have a look around.  You are sure to be inspired.  Everyone has been working (playing) so hard to show you all the lovely stamps and dies and papers in the January Release!  I love each and every piece of the whole collection! 
 
That's it for me this morning.  It's still raining and flooding here in East Tennessee; a little sunshine would be welcome!


Wednesday, January 9, 2013

Introducing Heartfelt Creations Countryside Evening Collection......

Heartfelt Creations has created a delightful ‘Countryside Evening’ for you. There’s beautiful typography, countryside scenes, one awesome die, and 24 beautiful papers.This set is a beautiful choice for the beautiful moments. Get yours now at www.heartfeltcreations.us. Leave a comment on the HC blog by January 15th and you will be eligible to win the entire release valued at $150.92 .


Sunny Days Tag
Heartfelt Creations Products Used:
HCPC 3511 Melodious Songbird PreCut Se
HCD 729 Decorative Blossom Corner Die
HCDP1 229 Countryside Evening Paper Collection
HCD 727 Vintage Floret Die
HCD 3500 Open Vintage Floret PreCut Set
HCD 3502 Mini Vintage Floret PreCut Set
HCPC 3405 Leaf Medley PreCut Set

Other supplies:  Spellbinders Foliage and Labels Twenty Dies, Ranger Stickles, glue, Paper Blossoms Tool Kit, Ranger Distress Ink, gesso, Mod Podge, tag, memento ink, Ranger distressing tool
Cut decorative paper to cover tag, mod podge it to tag.   Distress the edges and use distress ink to add some color to the edges.   Cut out corner die using a coordinating piece of the decorative paper and glue that to the upper corner of the tag.  Stamp the sentiment onto another piece of paper and cut out using the labels die; adhere to bottom of the tag. Next I stamped and cut out the flowers and leaves.  I used gesso to coat, leaving some areas of the paper showing through.  I also added stickles here and there to add some texture and interest to the flowers and leaves.  Once dry, arrange the flowers and leaves and glue down. 
 
For more beautiful creative ideas visit the HC blog and have a good look around.  You can see what the designers have made this week and get all the supplies used and the instructions for their projects.  And don't forget to leave a comment there to be in the drawing for the whole collection!


Wednesday, November 28, 2012

Welcome to Heartfelt Creations Wednesday...

Good morning everyone and welcome to Heartfelt Creations Wednesday!

 
I have really enjoyed working with the Timeless Amour collection of stamps and dies and gorgeous papers.  The heart die is going to be one of my favorites and I can envision using it over and over again.  I love girly cards and this collection leans in that direction. 
 
If you would like to know more about my card, just go visit the Heartfelt Creations blog.  My creations are shown there, along with all the other beautiful creations from the rest of the design team.  All supplies and instructions are listed with the photos.  You can also visit each design team member's blog by clicking on their names in the right hand side bar of this blog.  Leave us a comment, we love hearing from you. 
 
I hope each and every one of you has a great day and no matter where you wind up or what you are doing, take a moment for yourself and "Breathe"!

Wednesday, November 14, 2012

Welcome to Heartfelt Creations Wednesday!!

I think my title says it all!  This is my first post for my third term with the Heartfelt Creations design team and I am super excited to be back among friends!  As you know I love this company and believe in what they are doing.  Their stamps are top quality and such beautiful images and dies and the flowers stamps and dies are simply amazing.  Can you tell I'm  happy to be back?

That being said, here is my first card:

 
Faith Is:
Heartfelt Creations Products Used:
HCPC 3500 Open Vintage Floret PreCut Set
HCPC 3502 Mini Vintage Floret PreCut Set
HCPC 3309 Faith Heb.11:1 PreCut Set
HCPC 3494 Delicate Asters PreCut Set
HCD 727 Vintage Floret Die
HCD 726 Delicate Asters die
HCDP1-226 Delicate Asters Collection Paper

Other Supplies: Canson watercolor paper, white card stock, Spellbinders dies (Std. Circles Large, Lacey Circles and Venetian Motifs) Ranger Distress Inks in Scattered Straw, Forest Moss  and Victorian Velvet, glue, Shimmer Spray, Scor-Tape, Wooden Skewer, Paper Blossoms Tool Kit, piercing mat, Memento Ink in brown and black
Instructions: Card Size 6” X 6”
Make card base out of watercolor paper, I use this for added stability.  Next I cut a piece of the design paper in a 6” X 6” size.  I sprayed this with the shimmer spray and left to dry.  Once dry, I adhered it to the card base.  Next I stamped my sentiment on a piece of watercolor paper and cut out using the Lacey die.  I created a frame using two of the circle dies and a piece of the paper from the stack.  I edged the frame with distress ink. Glue this frame to the sentiment piece and then adhere it to the card base.  Now it is time to work on the flowers.  I stamped and cut out the flowers from white card stock; then I used the distress inks to color the petals.  I sprayed the petals with shimmer spray and wound them around a skewer and then I pinched the petals to give them a more natural look.  As the petals began to dry I added more of the darker color of ink to the edges of the petals because the spray caused the ink to run and blend a little and I wanted the darker tones.  When the petals are all dry I use the spongy piercing mat and the embossing tools to shape them a little more.  Glue them together and set aside to dry.  While your flowers are drying stamp the leaves and cut them out as well as the swirls.  Position the flowers and the leaves and swirls where you like them and glue down.  I think the papers and the flowers give this card a soft elegant feel.

You can head over to the Heartfelt Creations blog for more beautiful creations and loads of creative ideas.  Also you can click on the design team names to the right on my blog to visit each members blog.  Go visit and leave a comment...we love hearing from you.

Monday, November 12, 2012

A Quick and Easy Tag.....


Good morning everyone!  I'm here to share a quick and simple tag I have made to go along with a Christmas gift.  Tags are so wonderful, I think, as they can go along with a gift or be tucked down inside a gift bag or they can just be a gift all on their own.  I just added some Distress inks and spritzed the tag with shimmer spray.  Once it was dry I cut out some Spellbinders dies and stamped the sentiment and a little ribbon and it is ready to go.  How easy is that?
 
Well that's it for me this morning.  I will be back on Wednesday with my first official post with the Heartfelt Creations Design Team.  Come back and visit, we'll do coffee!

Monday, November 5, 2012


Good morning everyone!  This is my second post this morning but I really wanted to show you this card I made for Heartfelt Creations   This was one of the projects I submitted for the final round of competition for the design team. 


Heartfelt Creations Products Used:
HCPC 3468 Tattered Blossoms PreCut Set
HCD 722 Tattered Blossoms Die
HCPC 340l Bella Rose Scroll PreCut Set
HCPC 3405 Leaf Medley PreCut Set
October Paper Pack

Other Supplies Used: Spellbinders dies (Squares Large, Lace Doily Motifs) glitter, Memento Ink, shimmer sprays, Ranger Distress Inks, glue, Scor-Tape, Canson Watercolor Paper, dimensional tape, green card stock, white card stock, Paper Blossoms Tool Kit

Instructions:  Card Size 6” X 6”
I used watercolor paper for the card base for stability.  Cut a piece of design paper just a little smaller and adhere to the card base.  Next I cut out the motifs using watercolor paper and set aside.  I stamped the sentiment on a piece of watercolor paper and cut out using one of the square dies.  Next I created a frame for the sentiment using two of the square dies.  I placed one inside the other and cut them out of watercolor paper.  I put some dimensional tape behind the frame and adhered it to the stamped piece and then glued that to the square motif.  Mount the square motif to the center of the card base and position the decorative pieces around the square and glue them down.  I then stamped and cut the leaves using the green card stock and some ink was added to the edges.  I sprayed these with the shimmer spray and while damp I used the tool kit to shape the leaves until I was happy with the look.  Next I stamped the flowers onto plain white card stock and used distress inks to color.  I used water to dampen the petals and shaped them and then laid them aside to dry.  Once dry I glued the layers together and added some glitter to the center of the flowers.  I positioned the flowers and leaves around the square motif until I was happy with the look and then I glued them down. 


Monday, October 22, 2012

I'm on a Roll....


Good morning everyone.  I'm here to share another holiday card I have made using a Mo Manning digital image.  I colored her with distress inks and brushes and I really love how she turned out.  Some pretty elements and some holiday paper and she is all set to go. 

Have you started your holiday cards yet?  I'm getting several made and of course some of mine will be sent to the nursing home.  I really like to hand deliver the ones I give away and that way I get a little visit too. 

I hope you have a great day planned today.  We are experiencing some gorgeous Fall weather here in East Tennessee.  The trees are beginning to turn and there are pops of color everywhere.  Have a great day and remember to "Breathe"!

Friday, October 12, 2012

White on White Holiday Card....


Good morning everyone.  Here we are with again ready to jump into the weekend and I for one am ready!  We have had a few days of rain and cooler temps and now we are warming back into the 70's...very nice!  I love this time of year! 

This morning I'm sharing another holiday card I made using the embossing paste and glitter and a brass stencil.  The glitter isn't showing that well, but it is there.  I stamped the sentiment onto white card stock and cut out the frame using a Spellbinders die.  A little white ribbon and it is finished.  This is much better in person.  Sometimes my camera just doesn't pick up everything the way I want it to.  It's not the camera...it's the camera operator I'm afraid.  My photography skills are greatly lacking.

Well I hope you have a wonderful weekend planned.  As for me, I plan to play as much as I can!  Most of my chores are done and I will have some quiet time just for me.  I think I'll "Breathe"!

supplies:
Dreamweaver Translucent Embossing paste, brass stencil, watercolor paper, white seam binding,
glitter, Spellbinders dies (Antique Frame and Accents) Ranger Distress Inks, glue

Friday, September 28, 2012

Fall Leaves....

Good morning everyone.  In case you forgot, it's Friday!  The weekend is just around the corner and all is right with my world!  This morning I'm here to share another card I have made.  I love making Fall cards and this little cutie is just perfect to grace the front of my card.

 
I colored her with Ranger distress inks and a brush and mounted her on a doily.  The rest is Spellbinders dies and designer paper.  The leaves began as plain white card stock from Wal Mart and I used the inks to color them.  Pretty easy once the image is colored.  This little cutie will be going to the nursing home so that patient can have a card to give when someone does them a kindness. 
 
Well I hope you have wonderful plans for the weekend.  This old broad will be hanging out close to home doing her thing.  We are expecting rain so I will be playing indoors!  Not a bad thing.  Whatever you wind up doing and no matter where you are, take a moment and "Breathe"!


Friday, September 21, 2012

Clean and Simple.....

Good morning everyone!  Welcome to my little corner of the world!  Do you ever just want a simple little card to have in your stash just in case?  You know, just in case you need a thank you card, or a thinking of you card.  Well MoJo has taken a road trip and I'm just cooling my heels waiting for her and decided to do just a simple card. 


I used my Pro Markers to color this image and set it up on a white background with a Spellbinders die under that...then a simple purple layer and a white base card.  Next I took the purple marker that I used on the flowers and colored a piece of seam binding, tied a simple bow and that's it!  How easy is that?  I'm forever more needing little thinking of you cards and now I have one more that is all ready to go.  All I have to do is write inside and send it on it's way. 

That's it for me today...if you see MoJo out there, tell her it's time to come home!  Have a wonderful Friday and enjoy your weekend!  I hope you find time to be creative!

Saturday, September 15, 2012

My New Favorite Halloween Tag.....


Can you believe that Saturday has rolled around again.  It seems like the weeks are flying by and before you know it, the snow will be flying.  But before we get into the snow, I want to share a tag I made for Halloween.  I just love making tags; they are such little treasures!  There is almost as much  work in them as a card but they are just little works of art.  You can write a message on the back and slip them into a gift bag or they can be the gift itself.  So you see they are very useful!

I used some corner dies I had, painted black and then edged with Rub-N-Buff.  The birds are Tim Holtz and the little owls are from a piece of designer paper I have.  The clock is a Tim Holtz Stamp that I embossed in black and then cut out with a circle die.  Just layer a different color under the clock and it is ready to go.  The flower is some pre-made flowers I have that I spritzed with shimmer sprays.  How's that for quick and easy?

OK I am off to get my day started.  Have a great weekend!

Friday, September 14, 2012

A Holiday Card.....


As you can see, I can't make up my mind if I want to do Christmas or Halloween!  Today it's Christmas and I also have a Halloween Tag I will be sharing next!  So for today ... Christmas.  This is a card I made using Heartfelt Creations stamps.  I love these two sets and use them quite often.  HCPC 3309 Faith Heb. 11:1 PreCut Set and HCPC 3432 Magnificent spruce Trees PreCut Set.  Of course Spellbinders dies and pretty ribbon.  also embossed the large tree for part of the background.  You know, I just noticed, it looks like I might have gotten my background paper upside down!  Wonder if anyone else will notice? 

Well people, we are well on our way to another wonderful weekend.  Do you have amazing plans?  As for me, no plans, just hanging out and maybe a little crafting!  What could be better than that?
Have a great day

Friday, September 7, 2012

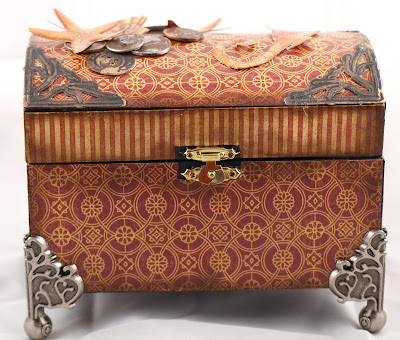
My Altered Chest....

Good morning everyone!  I want to share a work-in-progress with you this morning.  I can't quite decide if I declare this finished or not.


I've been working on this for a few days and sometimes you just need to step back and give it a rest.  From here I could keep going and going and adding and adding but sometimes less is more.  I kind of like it just the way it is.  I'm going to sit this one to the side and let it rest for a couple of days and see how I feel about it after the weekend. 
 
Well that's it for me this morning.  Have a wonderful day no matter where you are or what you get into, take a moment and breathe!

Monday, August 6, 2012

A Little Grundge, A Little Elegance, A little Christmas!

Good morning friends!  I'm here to share another Christmas card I have made for the upcoming holiday season.  I know it's early, but I do get distracted and go off in different directions, so I need to do this while I'm at least a little focused!    My card uses a sentiment from Heartfelt Creations and lots of Spellbinders dies of course.  You know I have to have them on most everything I do.  Some pretty sparkle and bling, some pretty paper and I'm off and running.  I even used a gold leaf pen on the edges of the green oval layer although it's pretty hard to see in my photo.   But trust me it's there.  It's also on the burgundy layer.  I love those pens and think they add such an elegant feel to projects.

So what are you doing today; do you have to work or is this a day off for you?  I'm planning another day in my craft room but as always, that's subject to change.  It seems I have really good intentions and then I run a wheel off and have to go see if I can find it in the bushes.  So whatever you are doing today, I wish you well and remember ..... take time to breathe!

Supplies:  Canson watercolor paper, Prima paper, music paper, cardstock, Spellbinders, Prima bling, gold leafing pen, Ranger Distress Inks, Zip Dry Glue, Heartfelt Creations Stamps

Monday, July 30, 2012

How About a Little Christmas Joy.....

I have been seeing some of the most gorgeous Christmas Cards and other cute ideas for the Holidays and it has just put me in the mood.  My glasses arrived and I am back among the seeing world and actually feeling like some holiday crafting.  I saw the cutest snowman hat decorated for Christmas on Pinterest, I'm sorry I can't remember where it came from to give credit but they used a coffee can to make theirs.  I decided to be different in that I used a nut can and a bowl to make a pattern for the brim.  Then I just let my imagination run wild and used lots of glue and glitter!


 I found some really stiff backing board from a paper pad and used it for the base.  I cut it out with Tim Holtz scissors and then sanded the edges where they were not quite as circular as I would like.  The base and tin were first painted with Gesso and then black acrylic paint; then I splattered antique white paint onto that.  Next I just started adding my goodies.  There is a gorgeous piece of lace under there but once I finished, you just can't see it.  I used some Heartfelt Creations stamps and dies for some of the accessories and also some purchased roses and leaves in there. 

You can still get the lid of the tin off, so you could fill it with goodies for the holidays if  you want.  I will probably keep this one and it will be sitting on my table at the end of my sofa.   I most definitely will be making more of these with different thems for gifts for the holidays.  A larger one would be great for filling with cookies for a gift.

Well guys that is it for me this morning.  Monday has arrived and it's back to the yard work for me.  I have lots to do and you have to remember, I'm slow.  Have a great day and I will be back on Wednesday with the WOYWW show and tell!