Wednesday, June 29, 2022

Inspiration Wednesday with Heartfelt Creations....

Good morning everyone and welcome!  I'm here to share a slimline card I made using Heartfelt Creations Wild Aster flowers.  You can see my card and all supplies used to make it in the Heartfelt Creations Gallery.


My finished card size is 4" X 7 1/2". I used Deluxe Flower Shaping paper to make the base.  It is the perfect weight to use for cards. Cover with a piece of Sheet 3A of the paper collection.  Using Luxe Gold Cardstock cut the Rounded Window Frame Die and cut it half.  Glue one half on the left side of the card and the other half on the bottom of the card.  

Stamp the flower petals using New Sprout ink and color the centers using Pink Peony and cut out using the coordinating dies.  Shape the petals using the Deluxe Flower Shaping kit and glue three petals together to make the flower base.  Glue a pearl in each petal and set aside to dry.  Stamp the leaves with Leaf Green ink and color with same the add some Olive ink to add more dimension.  Cut out using coordinating dies and I just used my fingers to shape the leaves a bit.  Decide on placement on the card and glue down flowers and leaves.

Stamp the sentiment onto a piece of white cardstock using Jet Black ink and use Banner die to cut out.  I cut a piece of gold cardstock just a little bit larger than the sentiment piece and then just eye balled where to cut out the peak and hand cut that with just a pair of scissors.  Glue the gold piece and the white sentiment piece together.  Tuck the end under the gold Rounded Window die cut and glue down allowing a bit to hang over the edge of the card.  

The card is finished.  


Wednesday, June 22, 2022

Inspiration Wednesday with Heartfelt Creations....

Good morning my friends!  I'm here this morning to share another card using the Heartfelt Creations Mushroom Cottage collection.  

You can find my card in the Heartfelt Creations Gallery and all the products used and instructions are listed there as well.


My finished card size is 5 1/2" X 5 1/2".  Make card base and cover with one of the card fronts from sheet 1A of the paper Collection.  

Stamp the Fairy with Jet Back ink and color using the Zig watercolor markers and the water brush.  Die cut with coordinating dies and at this point I cut off the wings.  Stamp the Fairy onto vellum cardstock twice using Cactus Flower ink and emboss using the Bridal Tinsel embossing powder.  Die cut the Fairy using coordinating dies and then cut the wings to use on the watercolored Fairy.  Glue the vellum wings onto the Fairy and allow to dry.  Stamp the fence using Toffee Crunch and then color with same and a Stack and Store Dauber.  Cut out with coordinating die and set aside.  Stamp the vine using Jet Black ink and color with Leaf Green and Magenta Hue.  Cut out with coordinating die and set aside.  Stamp the little frog with Leaf Green and color using same and use the Dove Blender pen and Lady Bug ink for the tongue.  Cut out using coordinating die and set aside.  Stamp the little butterfly with Cactus Flower ink onto vellum and then heat emboss with Bridal Tinsel embossing powder.  Use coordinating die to cut out and I used some Leaf Green ink to color.

Decide on placement of the elements and glue them down.  Add some glitter here and there to make it all sparkle and the card is finished.


Wednesday, June 15, 2022

Inspiration Wednesday with Heartfelt Creations...

Good morning my friends and welcome!  Today I'm here to share another card with you using the Mushroom Cottage Collection.  These little guys are perfect for a mini slimline card and you can see my card in the Heartfelt Creations Gallery.


My finished card size is 3 1/4" X 6 1/4" which is the min slimline card size.  Make card base using the Deluxe Flower Shaping paper.  It is the perfect weight for card bases.  Cover with a piece of 10B of the paper collection and set aside while we work on the elements.

Stamp the Mushroom Cottages using Toffee Crunch ink onto watercolor paper and then use the zig markers and the waterbrush to color them.  I lay down color onto a acrylic stamping block and use the waterbrush to pick up and color on the watercolor paper. These watercolor pens come in so many colors and you can pick which colors you like the best. Stamp the leaves and little snails using Toffee Crunch and color the leaves with Leaf Green and the little snails are colored with the Zig markers.then Cut out everything with coordinating dies and decide on placement along the bottom edge of the card.  Glue everything down.  

Stamp the sentiment onto white cardstock using Vibrant Fushia and use one of the arrow dies to cut out.  I edge the arrow with Vibrant Fushia and cut off the pointed end.  Push behind one of the leaves and glue down.  The card is complete. This makes a quick and easy card and it is perfect for mailing with one stamp.  


Wednesday, June 8, 2022

Introducing the Mushroom Cottage Collection from Heartfelt Creations...

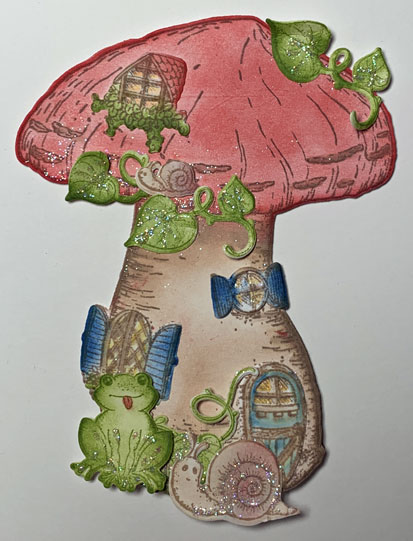
Good morning my friends and welcome!  We are introducing this wonderful collection with lots of great stamps and dies for all your card making needs.  My card this morning is a shaped card and I hope you enjoy it!  You can see it in the Heartfelt Creations Gallery for more details and all the supplies used.


My card us a shaped card.  Make card base using Deluxe Flower Shaping Paper.  Stamp the large mushroom onto white cardstock using Toffee Crunch and color using Lady Bug and Poppy ink for the top and Desert Sand and Toffee Crunch to color the bottom. Cut out with coordinating die. 
 
Stamp the windows, doors and the the snails using Toffee Crunch ink and cut out with coordinating dies.  The shutters are colored with Danube Blue and the light shining through the windows and doors is colored with Dandelion ink.  The frog and leaves are stamped with Leaf Green and colored with same then cut out using coordinating dies.  I used the Dove blender pen to color the frog's tongue. The snails are colored with a bit of Desert Sand and Poppy ink.  Layer the windows, door, snails and frog onto the front of the mushroom and glue down.  Add glitter to the ivy petals and glue down.  The shaped card is finished.

Wednesday, June 1, 2022

Inspiration Wednesday with Heartfelt Creations...

Good morning friends and welcome to June!  I'm here to share a card I made using the Wild Poppy Collection from Heartfelt Creations.  I love these flowers and you are going to be seeing these featured on my cards a lot! You can find my card shown here in the Heartfelt Creations Gallery 


My finished card is 5" X 7".  Using white cardstock make card base and cover with a piece of sheet 8B of the paper collection.  Set aside while we work on the die cutting.  

Using the large shadow die cut a piece of white cardstock and then using Luxe Gold cardstock cut the large border die.  Glue these two together and glue to card front.  Cut the next die size down using white cardstock and edge with the Poppy  ink.  Use Double D Dots to adhere to card front.  Use the remaining dies in the set and cut 2 of each out of white cardstock and 1 out of gold.  Glue together and layer the gold cardstock off setting just a bit behind the white pieces.  Glue these to the card front.  Stamp the sentiment on the center cut out of white cardstock using Jet Black Ink and use dimensional tape to adhere to the card.

Stamp the Poppy flowers and leaves onto the Deluxe Flower Shaping Paper using Poppy ink and color using Poppy, Tiger Lily and Carnation Red.  The leaves are stamped with Jet Black and cut off the main image to use with these blossoms.  I colored the leaves with Leaf Green Ink.  Use coordinating dies to cut out the flowers and leaves and lay the flowers onto the shaping Mold.  Spritz with water and run through the die cut machine and turn out onto the desk to dry.  Glue two flower petals together and on the larger flower I used one of the small florals to shape and glue down for the center.  On the smaller flowers I did Prills and then all flowers got a ring of Power Outage Prills.  Allow everything to dry and then I used a brush and Glossy Accents and coated the petals and sprinkled with glitter then allowed them to dry.  I did a bit of hand shaping on the leaves and then decided on placement of flowers and leaves and glued everything down.  The card is finished.


The Four Seasons Challenge - Summer- Anything Goes...

Good morning friends and welcome to The Four Seasons Challenge for June, 2022.  As always anything goes and this is the first challenge for Summer!  So gather your supplies think Picnics, Bicycle Rides and Gorgeous Flowers.  You can post your project here:  The Four Seasons Challenge Blog.  The challenge runs from 12:00 AM (EST) on June 1 until 12:00 AM (est) on June 25.  The winner will be announced on June 28.

We have an Mood board for June but this is just to help give you some ideas for the season.  Remember anything goes!  


Today I decided to share a card made using the Clematis flower along with a sweet birdhouse and a couple of bluebirds!  I decided to make this a Birthday card as I am always looking to add more to my stash.  


My finished card is 6" X 6". The stamps, dies and papers used are from the Clematis collection from Heartfelt Creations.