Thursday, October 29, 2020

A Mailable Christmas Card....

 Good morning friends.  I'm here this morning sharing another Christmas card and this time it is totally mailable with no extra postage.  I was so inspired  by Angelica Turner (she does the gorgeous paper designs for Heartfelt Creations!  So when I saw the card she made I was off to the races!  I already had the pinecone cut out and glittered and ready to go.  All I had to do was cut out some paper and it only took a very short time and it is ready to go!


I used some of the Luxe Gold Cardstock and a piece of the paper collection for the Snowy Pines Collection.  The sentiment is from a retired collection.  HCPC-3747 Celebrate the Season is the name of the stamp set.  I see more of these in my future because of being able to mail without extra postage.  Thank you Angelica for this inspiration!

Wednesday, October 28, 2020

Cheerful Floral....Inspiration Wednesday with Heartfelt Creations...

Good morning friends and welcome to my little corner of the world!  I'm here to share with you another card I have made.  Heartfelt Creations is known for it's wonderful flowers and my card is just full of them this week!


I love how you can take one flower and depending on the size, the coloring and how you shape it, make it look like all different flowers.  Here I just used the Garden Zinnia stamps, dies and molds to make all these wonderful florals!

Products Used:
Home on the Farm Paper CollectionHCDP1-2120
Barnyard Accents Cling Stamp SetHCPC-3927
Barnyard Accents DieHCD1-7318
Small Garden Zinnia Cling Stamp SetHCPC-3924
Small Garden Zinnia DieHCD1-7315
Small 3D Zinnia Shaping MoldHCFB1-492
Large Garden Zinnia Cling Stamp SetHCPC-3923
Large Garden Zinnia DieHCD1-7314
Ornate Ovals DieHCD1-7305
Eyelet Oval & Basics Large DieHCD1-7157
Cheerful Note Sentiments Cling Stamp SetHCPC-3848
Deluxe Flower Shaping KitHCST1-401
Deluxe Flower Shaping Paper Pack of 50 - WhiteHCPP1-475
Stack and Store Daubers-Pack of 30HCDA2-450
Designer Dries Clear Adhesive159723
Metal Tip for Adhesive Bottles352854
Lettuce Entertain You PrillsANC814
I Cannot Tell A Lilac PrillsANC822


Other Products: White Cardstock, Die Cut Machine, Dimensional Tape, Vintage Photo and Walnut Stain Distress Ink

For more tips on creating with the Home on the Farm Collection watch the tutorial at https://youtu.be/zJQQ7iljUw8.

For more tips on creating with the Summer's Garden Collection watch the tutorial at https://youtu.be/-dYnAWXIH3E.

Instructions: My finished card size is 5 1/4" x 7 1/4". Make card base and set aside. Using various oval dies, cut the opening layers for the card front and using dimensional tape adhere to the card front. I used sheet 8B and 1B of the paper collection for the card front and the oval layers. Stamp the sentiment onto the white cardstock center oval using Majestic Violet Ink.

Using Fern Green ink stamp the leaves from the Small Zinnia Cling Stamp Set and cut out using coordinating die. I colored the leaves with Leaf Green Ink and then ran them through the die cut machine using the mold to shape. Add glitter and allow to dry.

Stamp the flowers with Rich Cocoa Ink, color with various ink colors and cut out. Here is where you can use your favorite colors to make these flowers your own. My flowers used Red Geranium, Magenta Hue, Majestic Violet and Buttercup. I used the Deluxe Flower Shaping Kit to add a bit of shape to the petals then I added Prills to the centers. Add glitter and allow to dry. I stamped the greenery from the Barnyard Accents Stamp Set using Rich Cocoa. I used sheet 11B from the paper collection then I shaded with Fern Green ink. Add glitter and allow to dry.

I stamped the fence using Rich Cocoa ink and colored with Vintage Photo and Walnut Stain. Decide on placement for the fence, greenery and the flowers and glue down. The card is finished.

 Well that's it for me this morning.  If you would like to see more samples, just head over to the Heartfelt Creations Blog and see what the other designers have to offer!  

Monday, October 26, 2020

Sympathy Card.....

I always hate making Sympathy cards and this past week I actually needed two!  I'm really going to try and add a few to my box to have on hand.  


 I was lucky to have a few flowers on hand to make this a quick and easy card when it was all said and done!  The large flower is a foam flower made using Sweet Peony Stamps and dies.  The dies I used are from the Majestic Swirl Frames Die (HCD2-7308.  I use this set often as it works so well with a 5 X 7 card.  

The sentiment is from HCPC-3848 Cheerful Note Sentiments; another of my go to products from Heartfelt Creations.

Well it's Monday so try and have a good week.  I'll see you back here on Wednesday for another Heartfelt Creations Wednesday post!

Wednesday, October 21, 2020

Barnyard Flowers...Continuing Along with The Home on The Farm Collection...

Good morning friends!  It's hard to believe it but another week has rolled around to Wednesday and I'm here to share another card I made for Heartfelt Creations.  This week I am continuing along with The Home on The Farm Collection.  


Take a colse look at my card...do you see the little rooster?  I just love this little guy!


Other Products: White Cardstock, Distress Ink in Vintage Photo and Walnut Stain, Archival Ink Pad in Dazed.

For more tips on creating with the Home on the Farm Collection watch the tutorial at https://youtu.be/zJQQ7iljUw8.

Instructions: My finished card size is 5" x 7". Cut a piece of cardstock 7" x 10"; score and fold at 5" to make card base. Cover the base with Page 8B and set aside.

Cut the Elaborate Oval Frames Die and cut a piece of Page 5A of the paper collection to fit in behind the Oval. I just glued the top of the piece of the paper behind the oval so I could slide things down behind the Oval frame. Stamp the chickens and the rooster using Jet Black Archival Ink and everything else is stamped using Rich Cocoa Ink.

Color everything using various ink colors and allow to dry. I added prills to the sunflower and the pink flowers. Slip the sunflower down behind the oval frame and cut off the bottom of it so it can be hidden from view. Next, slide the pink flowers some behind the oval frame and some on the outside of the frame. Glue down one of the chickens here. Glue the rooster to one of the fence posts and glue down flowers along the fence and allow to dry. Glue down the last chicken and the card is finished.

If you would love to see more samples from the talented design team, just head over to the Heartfelt Creations Blog and have a look around.  I just know you will find something to inspire you!

Wednesday, October 14, 2020

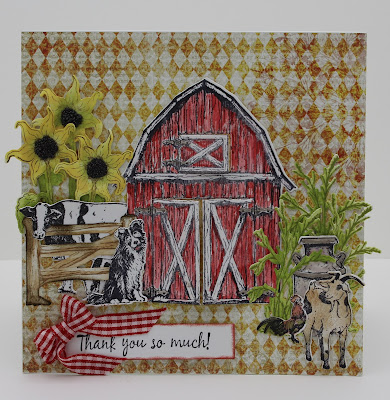
Debuting the new Home on The Farm Collection from Heartfelt Creations...

Well another month has rolled around and it again time to bring you a new collection from Heartfelt CreationsThe Home on The Farm Collection is available to purchase today.  Just follow the link and you will be taken to Heartfelt Creations site where you can see all the creations from their designers so you can gets lots of ideas and  click on the "shop" button at the top to be able to purchase the collection.  


Products Used:
Home on the Farm Paper CollectionHCDP1-2120
Home on the Farm Cling Stamp SetHCPC-3925
Home on the Farm DieHCD1-7316
Happy Meadows Cling Stamp SetHCPC-3926
Happy Meadows DieHCD1-7317
Barnyard Accents Cling Stamp SetHCPC-3927
Barnyard Accents DieHCD1-7318
Thank You Sentiments Cling Stamp SetHCPC-3846
Ornamental Tags DieHCD1-7203
Deluxe Flower Shaping Paper Pack of 50 - WhiteHCPP1-475
Deluxe Flower Shaping KitHCST1-401
Stack and Store Daubers-Pack of 30HCDA2-450
Designer Dries Clear Adhesive159723
Metal Tip for Adhesive Bottles352854
Color In Watercolor Brush - Fine409311
Power Outage PrillsANC845
Dove Blender Kit241159
Memento Dye Ink Pad - MoroccoTSMP201


Other Products: White Cardstock, Dimensional Tape, Ribbon, Scor-Tape, Distress Ink (Vintage Photo, Walnut Stain, Pumice Stone, Barn Door, Picket Fence, Tea Dye)

For more tips on creating with the Home on the Farm Collection watch the tutorial at https://youtu.be/zJQQ7iljUw8.

Instructions: My finished card size is 6" X 6". I used the Deluxe Flower Shaping Paper as the card base as it is very thick and a great weight for cards. Cover the card base with a piece of the paper collection. I used Sheet 11-A and chose one of the 6 x 6 panels. I used jet black to stamp the barn and most of the elements. I also used Rich Cocoa to stamp the plants and the fence. I colored the sunflowers with Leaf Green, Fern Green and Sunflower. I used the Deluxe Flower Shaping kit to add a bit of dimension to the flowers and plants. Add Prills to the center of the sunflowers and set aside to dry.

I used various inks to color the goat, rooster, milk can and the barn. This is a great place for you to use whatever color you like. Once everything is colored to your liking you can decide on the placement and start to glue everything down. I started with the barn then I added the milk can and the goat and rooster. On the other side of the barn I glued down the sunflowers and I glued the cow in front of the flowers. I cut up the cow's neck so it would fit down over the fence better. Next, glue down the fence and add the dog in front of the fence.

I stamped the sentiment onto a piece of white cardstock and cut it out with one of the Ornamental Tags Die then I distressed the edges with Distress Ink and used dimensional tape to adhere it down. Next, I tied a bow and used Scor-Tape to glue it to the corner of the sentiment. The card is ready to go.


Wednesday, October 7, 2020

Inspiration Wednesday with Heartfelt Creations.....

 Good morning friends!  We have made it to another Wednesday and it's time for me to share another project I made using Heartfelt Creations products.  


Products Used:
Large Garden Zinnia Cling Stamp SetHCPC-3923
Large 3D Zinnia Shaping MoldHCFB1-491
Large Garden Zinnia DieHCD1-7314
Small Garden Zinnia Cling Stamp SetHCPC-3924
Small Garden Zinnia DieHCD1-7315
Small 3D Zinnia Shaping MoldHCFB1-492
Fancy Special Day Cling Stamp SetHCPC-3935
Fancy Special Day DieHCD1-7320
Decorative Circle Frames DieHCD2-7306
Stack and Store Daubers-Pack of 30HCDA2-450
Deluxe Flower Shaping Paper Pack of 50 - WhiteHCPP1-475
Deluxe Flower Shaping KitHCST1-401
Rajni Chawla's Crystal ClearPGM15015
Designer Dries Clear Adhesive159723
Metal Tip for Adhesive Bottles352854
Ribbit PrillsANC825
Double Dots 100pc. -3D Foam CirclesDDOTS
Hydra SpongesRLHS100

Other Products: White Cardstock, Purple Cardstock, Die Cut Machine, Memento Dandelion Ink, Hot Glue Gun

For more ideas on creating with the Special Sentiments Stamps & Dies, watch the tutorial at https://youtu.be/-dYnAWXIH3E.

For more tips on creating with the Summer's Garden Collection watch the tutorial at https://youtu.be/-dYnAWXIH3E.

Instructions: My finished card size is 5" x 7". Make card base and cover with a piece of purple cardstock. Using white cardstock, cut out the Decorative Circle Frame. Apply the Crystal Clear glitter using a Hydra Sponge and Designer Dries Clear Adhesive. Just add glitter to the edges. Set aside to dry. Once dry, use DDots and glue to card front.

Cut the largest circle in the dies using purple cardstock and glue inside the Decorative Circle Die. Stamp the sentiment using Majestic Violet ink and cut out that and the shadow piece using the coordinating dies and glue together. Adhere inside the purple circle on the card front.

Stamp the leaves using Archival Fern Green then color with Leaf Green using Stack and Store Daubers. Cut out with coordinating dies. Lay onto the mold and spritz with water then run through the die cut machine. Turn out to dry.

Stamp the flower petals using Memento Rich Cocoa ink then color with Vibrant Fuchsia, Leaf Green and Dandelion ink and the Stack and Store Daubers. Cut out using coordinating dies and then lay onto a mold, spritz with water than run through the die cut machine. Turn out onto your work surface to dry. I shaped a bit more using the Deluxe Flower Shaping Kit just to add more dimension. When the petals are dry, glue several layers together then add Prills to the center. Add Crystal Clear to the flower petals and allow to dry.

When everything is dry, decide on placement on card front and glue everything down. Your card is finished.