Wednesday, November 30, 2022

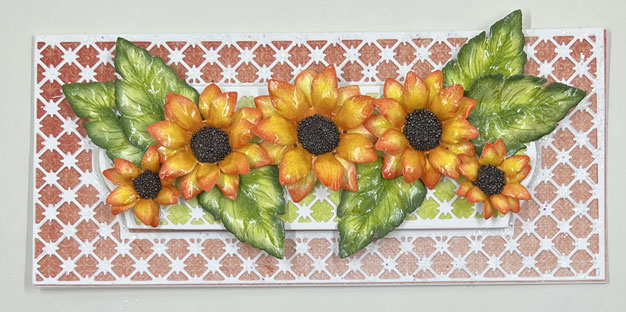
Sunflower Love....

Good morning friends and welcome!  I have a card to share with you this morning using the new Cyber Monday Die from Heartfelt Creations.  This is another gorgeous die and I can see myself using this quite often in the future.  You can see my card in the Heartfelt Creations Gallery as well as all the products used to make it!


I love this die and think it makes a lovely slimline card and it's very quick and easy!  

My finished card size is 4" X 9" which is a slimline card size. Make the card base using white cardstock and cover with a piece of Sheet 8B from the paper collection. Set aside while we work on the rest of the elements.

Die cut the Star Lattice Rectangle Die out of white cardstock. Then cut the outline die for the smaller center piece of the die. I did one in white cardstock and then I cut another piece using a piece of Sheet 7B of the paper collection. Glue the three pieces together making a sort of center medallion for the card. Using a Hydra Sponge and Designer Dries Clear Glue add Crystal Clear Glitter to the larger die cut of the Star Lattice Rectangle Die. Set this aside to dry. Once dry glue down on the card front. Now take the smaller medallion and adhere it to the center of the card front using Double Dots to add dimension.

Now we are going to work on the sunflowers. Stamp the petals onto Deluxe Flower Shaping Paper using Memento Cantaloupe ink. I colored these petals in layers of color beginning with Dandelion, then Sunflower and lastly I used Goldenrod. Die cut these petals using coordinating dies and add Morocco ink onto the edges of the petals as well as the center of the petals. Next using Leaf Green ink, stamp and color the leaves and cut out using coordinating dies. Use Olive ink to add dimension to the leaves by going over the centers as well as the outside edges of the leaves. Now lay the petals and leaves onto the shaping mold spritz with water and run through the die cut machine. Turn out onto the desk to dry. Once dry using 3D Crystal Lacquer and a brush paint the flowers and leaves. This deepens the colors and adds a beautiful sheen to everything. Allow to dry. Once dry use hot glue to glue two flower petals together and then add a clump of hot glue to the centers and spoon Power Outage Prills over this. Once the glue hardens your flowers are ready to go onto the card front. Decide on placement of flowers and leaves and hot glue down and your card is ready to go.

Friday, November 25, 2022

Heartfelt Creations - Black Friday Release....

Good morning friends and welcome to the Heartfelt Creations Black Friday Release!  So many dies...so little time!  I have absolutely fallen in love with these dies and I just know you are going to as well.  You can find my card in the Heartfelt Creations Gallery with all the products used.


My finished card size is 4" X 8 1/2".  Make card base and cover with a piece of Sheet 10B of the paper collection.  Cut a piece of white cardstock 3 1/4" X 7 3/4" and use one of the Slim Basics Rectangles dies to cut a piece of sheet 3A and glue together.  Adhere to card front using dimensional tape to add dimension.  Cut the Slim Lattice Oval Die out of white cardstock and then cut it apart about half way down.  Using a Hydra Sponge and Designer Dries Clear Adhesive add Crystal Clear Glitter and set aside to dry.  When dry glue down on the card front.

Using a piece of Sheet 6B cut out the small oval in with the Slim Lattice Oval die and then cut another out of Sheet 9B.  Stamp the sentiment onto the light pink piece and glue it into the center of the dark pink die on the card front.  

Stamp the flower petals onto Deluxe Flower Shaping Paper with Magenta Hue ink and then color the edges with Magenta Hue as well.  Color the centers with Leaf green and then cut out with coordinating dies.  Lay on the mold, spritz with water and run through the die cut machine then turn out onto the desk to dry.  Glue two petals together to form the larger flower and add Prills to the center.  Also add Prills to the centers of the smaller petals as well.  

Stamp the leaves onto Deluxe Flower Shaping Paper with Leaf Green ink and color with Leaf Green ink as well as some splashes of Magenta Hue ink.  Cut out with coordinating dies and place onto the shaping mold, spritz with water and run through the die cut machine.  

Stamp the Dragonfly onto the Vellum and again on Deluxe Flower Shaping paper using Paradise Teal ink and emboss with gold embossing powder.  Color using Leaf Green and Paradise Teal inks and cut out with coordinating dies.  Glue the two pieces together making the dragonfly look like it is in flight.  

Decide on placement of flowers, leaves and the dragonfly.  Glue down and the card is finished!

Saturday, November 19, 2022

Christmas Card ... 2022

Like most of you I have been working on my Christmas cards lately and I will be sharing one or two with you in the coming days.  I have really been striving to make cards that can mail with a first class stamp because of the very high postal rates.  A card with 3D flowers and packed in one of the plastic boxes Heartfelt Creations has in their shop can cost almost $5.00 to mail.  I have a few that I spend that kind of money on but not many.


The hero of this card is the Filigree Accents die which is one of the latest released by Heartfelt Creations. I layered a bit of gold behind the die to jazz it up a bit.  Then Heartfelt Creations pretty poinsettia and some gold fillers and it will be all set.

I hope you enjoy my card!  Have a lovely weekend!

Wednesday, November 16, 2022

More Inspiration with the Friendship Rose Collection from Heartfelt Creations...

Good morning friends and welcome.  I'm here this chilly Tennessee morning to share with you another card I made using the Friendship Rose Collection from Heartfelt Creations.     My card is titled Locked Hearts and I just love how it turned out!  You can find it in the Heartfelt Creations Gallery with all the products used.


My card size is 5 1/2" X 7 1/2".  Make card base using the Deluxe Flower Shaping Paper. It is quite sturdy and makes a great card base.  Cover with a piece of Sheet 4B of the paper collection cutting it at 5 3/8" X 7 3/8".  

Using the Filigree Companion Frame die cut a piece of Sheet 4A and set aside.  Using the decorative frame cut a piece of Luxe Gold cardstock and glue this to the die cut.  

Cut three of the decorative hearts, then cut two of the hearts so  you can entertwine the three hearts together.  Glue down and then trim so the center heart does not have any of the other two dies showing inside the heart opening.  Use a hydra sponge to add glue and then glitter to the hearts and set aside to dry.  Once dry glue the hearts to the card front.  

Stamp the Budding Rose Heart onto white cardstock and use the Prismacolor pencils to color. Cut out using coordinating die and adhere this to the center heart.  The card is finished.  

Wednesday, November 9, 2022

Debuting the Friendship Rose Collection...

Good morning my friends!  It's time for another Heartfelt Creations Release and the Friendship Rose Collection is quite Beautiful.  Heartfelt Creations has done it again with this lovely collection and I just know you are going to love it.  You can find my card in the Heartfelt Creations Gallery  with a listing of all products used to make my card.  

My card size is 5 1/4" X 7 1/4".  Make card base and add a layer of Luxe Gold Cardstock.  Add another layer of Sheet 3A of the paper collection.  Set aside while we go to work on the die cuts and Rose Heart.

Cut two of the largest dies of the set; one is gold and one in white. Cut the next smallest die out of the white die cut and it leaves a heart opening showing the gold piece behind it.  Offset these and glue together so the gold just peeps through behind the white.  Cut the decorative heart shaped die out of white cardstock and set aside while we work on the coloring of the rose stamp.

Stamp the Friendship Rose Cling Stamp onto white cardstock and color with the colored pencils.  Cut out using coordinating die.  I used the Designer Dries Clear adhesive and added dots of glue onto the image where I wanted to add glitter.  Add the glitter and allow to dry.

Glue this colored heart onto the decorative heart shaped die cut then add to card front using Double Dots to add dimension.  The card is finished.  


Wednesday, November 2, 2022

Another Inspiration Wednesday with Heartfelt Creations....

Good morning everyone and welcome!  Come on in and sit a spell!  I'm here this morning to share another project for Heartfelt Creations.  


You can see this card in the Heartfelt Creations Gallery with all the products used listed there!  

The finished card size is 6" X 6".  Using the Rounded Sunlight Window die cut a circle out of Page 5A and glue to the circle of the card front.  Next I die cut the window dies from the same die set out of Gold cardstock and glued them to the card front. Now we need three 6" X 6" card fronts to cover the card front and the inside.  I used sheet 9A and 11A and just chose some card fronts that were appealing to me.  The beauty of this paper collection is it is coordinated to work together so you can't go wrong in your choices! 

I stamped the sentiment using Jet Black ink onto a piece of Sheet 5A and cut out using the Arrows and Banners die.  Edge this die cut with Leaf Green ink.  Cut a banner using white cardstock and glue the piece that has the sentiment go it.  This gives the sentiment a bit more stability.  Glue this banner to the inside of the card.

Now let's work on our flowers.  Stamp the flower petals onto Deluxe Flower Shaping paper using Magenta Hue ink and color using the Stack and Store Daubers and Magenta Hue Ink.  Cut out with coordinating dies.  Lay the petals onto the mold, spritz with water and run through the die cut machine.  Turn out onto the desk to dry. At this point I used the Deluxe Flower Shaping kit to apply pressure to the center of the petals and make a place to hold the Prills.  Once dry glue two petals together and add prills to the center.  Stamp the leaves onto Deluxe Flower Shaping Paper with Leaf Green ink.  Color with same ink and cut out with coordinating dies.  Lay onto the mold, spritz with water and run through the die cut machine.  Turn out onto the desk to dry.

Decide on placement of flowers and leaves and hot glue down.  The card is finished!