Wednesday, February 23, 2022

Inspiration Wednesday with Heartfelt Creations...

Good morning everyone and welcome to another Heartfelt Creations Wednesday.  This morning I have another card to share with you using the Elegant Mosaics Collection.  You can find this card in the Heartfelt Creations Gallery here.


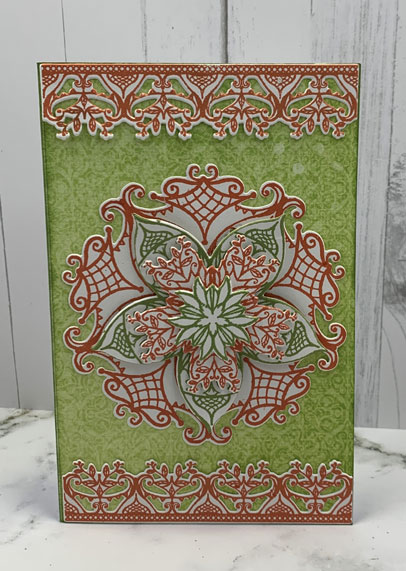
My card size is 4 1/4" x 6 1/2".  Make card base and cover with a piece of the paper collection.  I used Sheet #2B. 

Stamp the edge pieces onto white cardstock using Morocco ink.  Stamp the design twice.  Cut out with coordinating dies.  Next stamp the main image 4 times using Morocco ink and Bamboo Leaves.  Cut out using the coordinating dies.

Glue down the edge die cuts on the top and the bottom of the card front.  I used dimensional tape to adhere the center piece and on each layer used on top of the initial die cut. I think it gives a Kaleidoscope effect to the piece.  

I did not put a sentiment on the front of the card but the inside is left blank so you could write a message for the recipient.

Wednesday, February 16, 2022

Inspiration Wednesday with Heartfelt Creations....

Good morning friends.  I'm afraid I've been absent for awhile as I fell and broke my shoulder and had to have surgery.  I'm beginning to come around but I must tell you it has been a difficult road for me.  I have a Heartfelt Creations card to share with you this morning and I hope you enjoy it.  

You can find my card in the Heartfelt Creations Gallery here.  All the products used and full details are listed there.  Enjoy.


My finished card size is 5 X 7.  Make card base and cover with a piece of Sheet 12B of the paper collection

Die cut the Decorative Circle Frame out of white cardstock and glue to the card front.  Stamp the Elegant Mosaics stamp onto white cardstock 4 times.  Twice in Majestic Violet, Once in Morocco and once in Leaf Green.  Use coordinating dies to cut out the different elements for the centerpiece of the card.  Use dimensional tape and attach to the card front.  Pull the green layer forward to give the card more dimension.  

Stamp the flowers in leaf green and use coordinating dies to cut out.  Lay on the shaping mold, spritz with water and run through the die cut machine.  Set aside to dry.  Stamp the leaves in Fern Green and color in Leaf Green and Majestic Violet then use coordinating dies to cut out.  Lay onto the mold and spritz with water then run throlugh the die cut machine. Lay aside to dry.  Add Prills to the center of the flowers and set aside to dry.  Once dry, decide on placement and hot glue down.  Also glue down the leaves at this time.

Stamp the sentiment onto a  piece of white cardstock using Jet Black ink and then mat onto a piece of the paper collection.  I used a piece of Sheet 10A for this.  I used dimensional tape to adhere to card front.

The card is ready to go.  

Wednesday, January 5, 2022

Inspiration Wednesday with Heartfelt Creations...

Good morning my friends and welcome to my little corner of the world. First things first...It's that time of year again when I as a Heartfelt Creations Design Team member ask you to go and vote for me so that I can continue on the team for another year.  I'm always thankful for your wonderful comments so I'm hoping you will follow this link and Vote for me. 

I'm here sharing another card I made using the Heartfelt Creations Elegant Hearts Centerpiece Die.  You can see my card in the Heartfelt Creations Gallery.


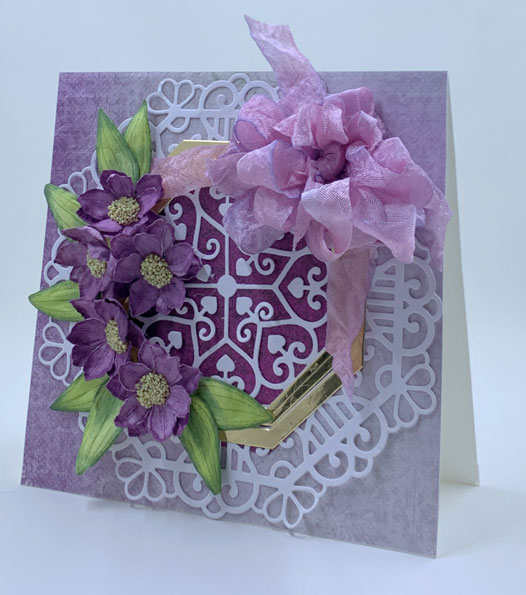
My finished card size is 6" X 6".  Using white cardstock, make card base and cover with a piece of 7B of the paper collectgion.

Using white cardstock, die cut the Elegant Hearts Centerpiece die.  I used a die from the Simple Centerpiece die and cut a piece of Sheet 12B to go behind the center die of this piece.  Using dies from the Simple Centerpiece die and some of the Luxe Gold Cardstock, I cut two frames to fit the center of this piece.  Glue everything down to the base card.

Stamp the flower petals onto Deluxe Flower Shaping Paper using Sweet Plum ink and color same using Sweet Plum ink and one of the Stack and Store Daubers.  Stamp the leaves using Fern Green ink and color with Leaf Green and edge with Olive to darken just a bit.  Die cut flowers and leaves using coordinating dies and layer onto the mold, spritz with water and run through the die cut machine.  Turn out onto the desk to dry. Glue two of the flower petals together using hot glue. Be sure to stagger the petals.  I also added a clump of hot glue to the center of the flowers and spooned the Prills over it and allowed the hot glue to dry.  Decide on placement on the card and glue down.  

Cut a length of white seam binding and spray with water and scrunch up.  Swipe the Sweet Plum ink pad onto the desk pad and spritz with water.  Swirl the seam binding through the ink to color and allow to dry. Tie a bow and use Scor-Tape and hot glue to glue to the card front.  The card is finished.
Saturday, January 1, 2022

The Four Seasons -Winter Season-January 2022-Anything Goes Winter.....

Good morning friends and welcome to The Four Seasons Challenge for January, 2022.  As always anything goes and this is the second challenge for Winter!  So gather your supplies and lets be creative.  You can post your project here:  The Four Seasons Challenge Blog.  The challenge runs from 12:00 AM (EST) on January 1 until 12:00 AM (est) on January 25.  The winner will be announced on January 28.

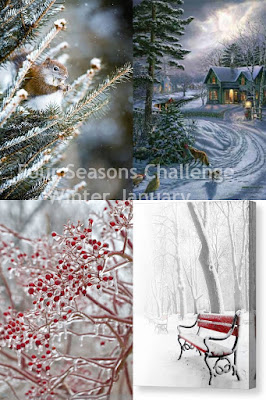
We have an inspiration board for January but this is just to help give you some ideas for the season.  Remember anything goes! 


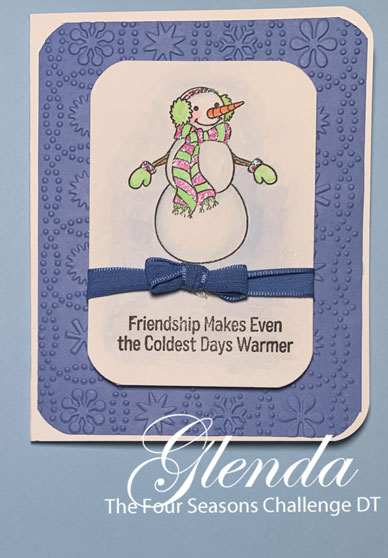
We seldom see this type of winter scene in my area of the country but a girl can dream!  I love a good plump snowman so I decided to try my hand at one and remember this is from memory.  I haven't actually seen a snowman in my yard for many years!


Come join us for this wonderful Winter Anything Goes Challenge.  You can see what the design team has created by visiting the Four Seasons Challenge Blog.

Supplies:  Spellbinders Friendly Snowman Stamps, Zig Clean Watercolor Markers, Canson Watercolor Paper,Water Brush, We-R-Memory Keepers Crop-A-Dile, Corner Chompers, Cuttlebug Snowflake Embossing Folder, Art Glitter #85, Designer Dries Clear Adhesive

Wednesday, December 29, 2021

Inspiration Wednesday with Heartfelt Creations...

Good morning friends and Happy Heartfelt Creations Inspiration Wednesday to you all!  I'm here this morning sharing another card I made with the Rustic Sunflowers.  You can find my card in the Heartfelt Creations Gallery and all the information for my card is listed there!   


My finished card size is 5" X 7".  Make card base and cover with a piece of sheet 4A of the paper collection.  Die cut two of the Fancy Classic Oval frames; one using white cardstock and one with the Luxe Gold cardstock.  The center die cut was done in white cardstock and a Luxe Gold cardstock oval die cut.  Glue the pieces together to make the center medallion piece.  

Stamp the Timepiece Sentiment onto a piece of the Deluxe Flower Shaping paper using Memento Bamboo Leaves ink.  I used a cotton ball dipped into the ink and swirled around the piece.  I covered this piece with 3D Crystal Lacquer and set aside to dry.

Using Memento Dandelion ink stamp the flower petals onto Deluxe Flower Shaping Paper.  Color the petals using Archival Sunflower, Memento Dandelion, Cantaloupe and then add some Rhubarb Stalk to the ends of the petals.  Cut out with coordinating dies.  Stamp the leaves onto Deluxe Flower Shaping Paper using Archival Fern Green ink. Color with Archival Leaf Green and then edge with Archival Olive ink.  Cut out with coordinating dies.  

Lay the flower petals and leaves onto the mold and spritz with water.  Run through the die cut machine and then turn out onto the desk to dry.  When dry, using a brush add 3d Crystal Lacquer to the flowers and leaves and allow to dry.  While it is still wet sprinkle with glitter.  When everything is dry add Double Dots to the sentiment piece and adhere to card front.  Decide on placement of the flowers and leaves and hot glue them down.  The card is finished!


Wednesday, December 22, 2021

Inspiration Wednesday with Heartfelt Creations....

Good morning my friends and welcome to another Inspiration Wednesday with Hearthfelt Creations!  This morning I have another card to share with you from the Moments in Time Collection!  I hope you enjoy and you can find my card in the Heartfelt Creations Gallery here:


My  finished card size is 4 1/4 X 5 1/2.  Make card base and cut a piece of Sheet 7B of the paper collection and cover front.  I edged it with Cactus Flower ink before gluing it down. I picked a sentiment piece from Sheet 4B of the paper collection and cut it out and rounded the corners.  Edge with Cactus Flower Ink and use dimensional tape to adhere to card front.

Stamp the flower petals using Cactus Flower ink onto Deluxe Flower Shaping Paper.  I colored the edges with Cactus Flower and cut out with coordinating dies.  Stamp the leaves using Fern Green and color using Leaf Green and then cut out using coordinating dies.  Lay petals and leaves onto coordinating molds, spritz with water and run through die cut machine.  Turn out onto desk to dry.  Once dry apply prills to the centers and glitter the edges using Dries Clear Adhesive and Hydra sponges then sprinkle with glitter.

Once everything is dry, decide on placement and hot glue down.  Tie the string into a loopy bow and glue to card front.  The card is finished!

Wednesday, December 15, 2021

Inspiration Wednesday with Heartfelt Creations Moments in Time Collection....

Good morning everyone and welcome to another Inspiration Wednesday with Heartfelt Creations. I have made another card featuring this wonderful Moments in Time collection and you can see it in the Heartfelt Creations Gallery 


My card base is 6 1/2" X 6 1/2".  To make card base I cut one piece of the Deluxe Flower Shaping Paper 6 1/2" X 7 1/2" and one piece 6 1/2 X 6 1/2.  Score the the 6 1/2" X 7 1/2" piece on the 7 1/2" side at 6 1/2".  Add Scor-Tape and join the two pieces to finish.  Cut a piece of Sheet #2B a little smaller than the card base and distress the edges.  Ink the edges with Magenta Hue and glue to card front.

Stamp the clock several times using Memento Bamboo Leaves ink onto Deluxe Flower Shaping Paper.  Use coordinating dies to cut out to make different layers of the clock.  I used cotton balls to add Magenta Hue and Bamboo Leaves to the different elements of the clock.  I just like the smooth look the cotton balls and ink gave the piece.  Stamp one of the Timepiece Sentiments onto Deluxe Flower Shaping Paper and color with the cotton balls as well.  I used dimensional tape to add the different layers of the clock.  It gives it a bit of interest and dimension.  Glue to the card front.

Using smooth white cardstock, stamp the rose petals using Memento New Sprout ink.  This barely shows on the flower petals.  Using coordinating dies cut out the petals.  Color the center of the petals with New Sprout and the edges with Magenta Hue ink.  Hand shape the petals and use hot glue to put the petals together to form a rose.  I used 3 layers of the largest petals and 3 of the next smaller petal to form the bud portion of the rose.  Using a Hydra Sponge and Dries Clear Adhesive sponge the edges of the roses and add Crystal Clear Glitter.  Set aside to dry.  

Stamp the leaves with Fern Green ink and color with Leaf Green and edge with Fern Green ink.  Use coordinating dies to cut out.  Lay onto the mold, spritz with water and run through die cut machine.  Allow to dry.

Once everything is dry, decide on placement and hot glue down.  The card is finished.  I hope you enjoy this as much as I enjoyed making it!