Monday, June 30, 2014
For You........
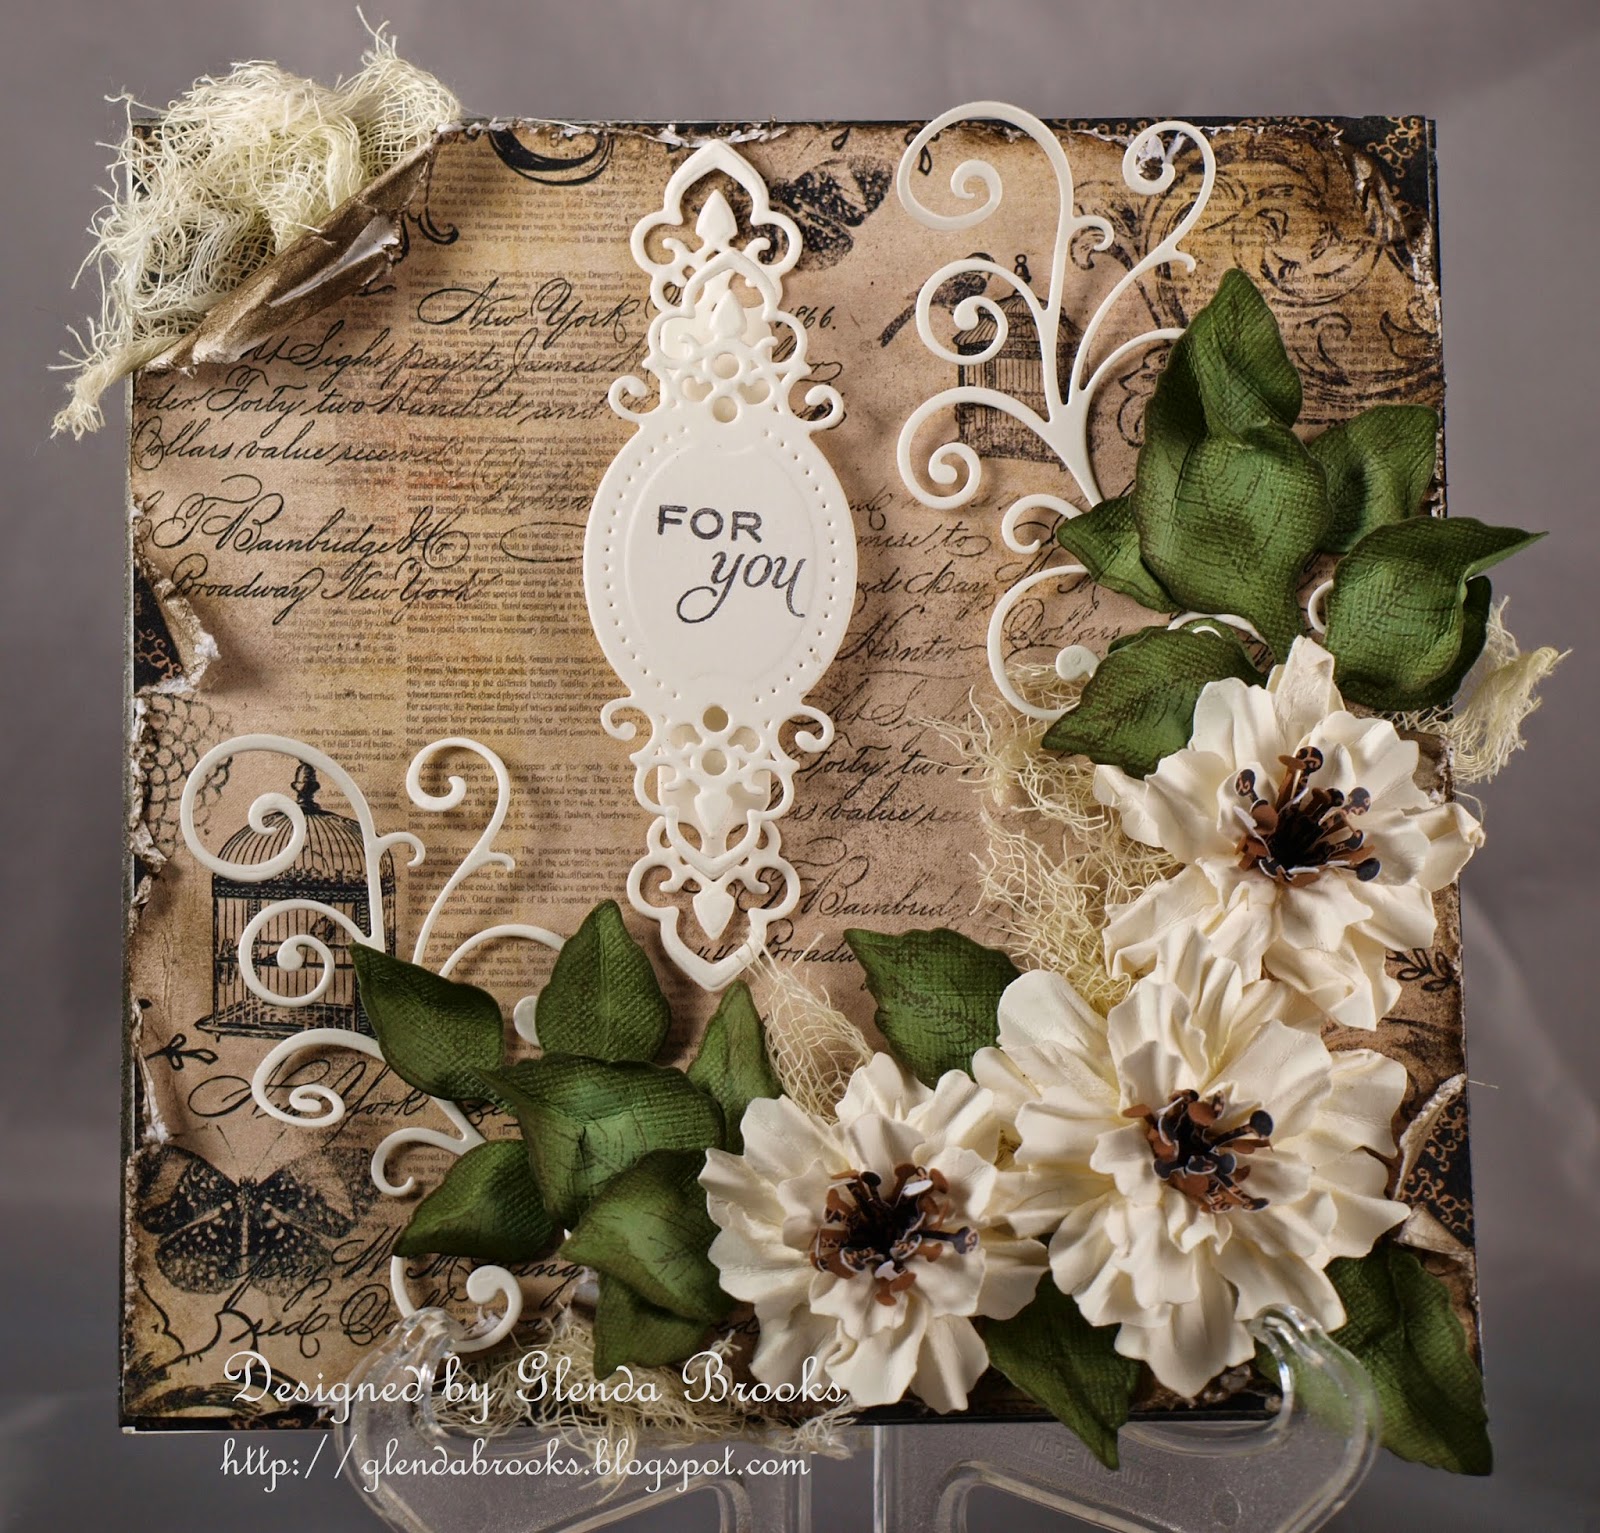
Good morning everyone and welcome. I'm sharing another card I have made using a mod podge of mixed products and just going where my MoJo leads me! I started out working with these cream colored flowers and then using my snowflake punch for the centers. The flowers and leaves are from Heartfelt Creations and the papers are from Prima. These pretty swirls are from Die-namics and the sentiment is from Flourishes and is displayed on a couple of Spellbinders dies. When I started this card, I had no clear idea of what I wanted to do I just started making flowers and then I chose papers and from there one thing led to another and this is what I wound up with. Sometimes you just have to let yourself go and play with no clear idea of what you are wanting your project to look like.
So there you have it! I hope you enjoy! Have a great Monday!
Supply list:
Canson Watercolor Paper
Prima Papers (Almanac Collection)
Die-Namics Swirl Die
Spellbinders Dies: Foliage, Valiant Honor
Heartfelt Creations: HCD 736 Classsic Leaf Die, HCPC 3545 Open Leaf Precut Set
HCPC 3405 Leaf Medley PreCut Set,HCD 722 Tattered Blossoms Dies
Ranger Distress Inks
Snowflake Punch from Punch a Bunch
Flourishes Sentiment
Cheese Cloth sprayed With Homemade Tea Dye Spray to Age
Glue
Saturday, June 28, 2014
Winner of the June Heartfelt Creations Alumni Design Team Blog Hop...
Good morning everyone! Hope you are about to be knee deep in the weekend! I just wanted to pop in and let you know the winner of the June Heartfelt Creations Alumni Design Team Blog Hop was chosen from Sarah Miller's blog! Congratulations to Rosy Newlun! You have won a $25 gift certificate from Heartfelt Creations. Please email EmmaLou@heartfeltcreations.us with the subject line "Winner of June Alumni Hop".
Again congratulations going out to Rosy and thank you to everyone hopped along with us! We will be back at the end of July for another hop and hope you can be with us then!
Wednesday, June 25, 2014
WOYWW #264
Good morning everyone and welcome to Wednesday and WOYWW! Each Wednesday we all get together and take a photo of our space and blog about it and then we link up over at Julia's blog. Once you have done that, the best blog hop ever happens. I love visiting all the wonderfully talented people and see what they have going on in their worlds. I sometimes miss a week and feel like I have totally been disconnected. It suddenly becomes a habit that is very hard to break! So come join us and show us your space!
I'm in between projects at this time and have some things I need to put away. I found my little punch that I am going to use to make flower centers. I think I purchased it a year or so ago and used it once. It went into the black hole and I totally forgot about it. I was rummaging through a drawer this morning and low and behold there it was! It was like running into an old friend! So it is now out on my desk so I can see it for a few days! Then maybe I can remember it.
Also lying there are my Tim Holtz scissors, some yellow ribbon, my flower stamen in the jar. Also my Tim Holtz paper distresser.
So that's it for me this morning. I'm off to visit as many desks as I can. Have a great Wednesday!
Tuesday, June 24, 2014
Heartfelt Creations June Alumni Design Team Blog Hop
Good morning everyone and welcome to the Heartfelt Creations June Alumni Design Team Blog Hop! Each month several of the Alumni Design Team get together to bring you this blog hop and I am always happy when I can be a part of it! If you arrived here from Linda Loew's blog you are right on track.
Here is my card. I have used some of my favorite papers, stamps and dies from Heartfelt Creations to create this special birthday card. I did lots of distressing on the edges and actually did some sewing on this one. That is something you seldom see me do these days but I want to begin doing more as I moved my sewing machine into my craft room.
Try to follow along the blog hop and leave a comment on as many blogs as you can. You can never tell which blog will be the one that they chose from. If your name is chosen you win a $25 gift certificate for products from Heartfelt Creations! You have until 12 midnight ET on Friday, June 27th. to leave your comments. Winner will be announced on Saturday June 28th. Good luck to you all!
Your next stop is: Mary Faus.
Supply List:
HCPC 3363 Inspire Me Sentiments PreCut Set
HCPC 3545 Open Leaf PreCut Set
HCPC 3546 Classic Leaf PreCut Set
HCPC 3578 Majestic Morning Background PreCut Set
HCDP1 234 Daphne Paper Collection
HCD 742 Majestic Bloom Die
HCD 736 Classic Leaf Die
Brown Gala Glitz
Ranger Distress Inks
Dimensional Tape
Glue
Giovana Smith
Candy Slabaugh
Here is my card. I have used some of my favorite papers, stamps and dies from Heartfelt Creations to create this special birthday card. I did lots of distressing on the edges and actually did some sewing on this one. That is something you seldom see me do these days but I want to begin doing more as I moved my sewing machine into my craft room.
Try to follow along the blog hop and leave a comment on as many blogs as you can. You can never tell which blog will be the one that they chose from. If your name is chosen you win a $25 gift certificate for products from Heartfelt Creations! You have until 12 midnight ET on Friday, June 27th. to leave your comments. Winner will be announced on Saturday June 28th. Good luck to you all!
Your next stop is: Mary Faus.
HCPC 3363 Inspire Me Sentiments PreCut Set
HCPC 3545 Open Leaf PreCut Set
HCPC 3546 Classic Leaf PreCut Set
HCPC 3578 Majestic Morning Background PreCut Set
HCDP1 234 Daphne Paper Collection
HCD 742 Majestic Bloom Die
HCD 736 Classic Leaf Die
Brown Gala Glitz
Ranger Distress Inks
Dimensional Tape
Glue
Giovana Smith
Candy Slabaugh
Monday, June 23, 2014
The Color of Sunshine .......
Good morning and welcome to a brand new week. I'm here very quickly to show you a card I made over the weekend just for you! It is pretty simple with a few layers, some Spellbinders dies, some homemade flowers and a little bit of stamping and coloring.
The pretty background papers are from Prima, the ribbon is from Really Reasonable Ribbon, the die cuts are Spellbinders and the sentiment is from Flourishes. Pretty simple really just a bit of work in making the flowers. The centers of the flowers are brown Gala Glitz and the stamen were originally white and I colored them yellow to match with a yellow alcohol marker.
There you have it! I hope your Monday is a good one. Now I'm off to do a little blog hopping to see what you guys were into over the weekend!
Friday, June 20, 2014
Recipe for Texture Paste.....
Let me just say right up front, this is not my recipe but I'm willing to share with everyone. I found a bunch of recipes online and it is just close your eyes and pick one. I have to say the reason I picked this recipe is because this lady did a video tutorial on the different recipes. (luvleescrappin on YouTube) This is her blog address http://luvleescrappin.blogspot.ca and I have to say I have spent hours checking out her blog posts and her video's on YouTube. Such a talent and I'm so taken with her designs! So when it came right down to it, it is just a matter of taste. Did I like the smell of baby powder? If not then use baking soda... Well I love baby powder so I chose this recipe.
1 1/4 C Baby Powder
1/2 C Gesso or White Paint ( I used Gesso)
1/4 C ModPodge
Mix it all together and store in a jar with good tight lid. I put a piece of seran wrap over the top and then put on the lid. If your recipe feels a little too thin just add a little bit more of baby powder until it reaches the consistency you want it to be. If it is too tight just add more gesso. You can also add a little sand to the recipe if you want to have that type of texture. Once you have your recipe...the possibilities are endless! So jump in and explore your messy side!
There you have it. Pretty cut and dried I think but a great savings for sure. This is what I use for my mixed media pieces and I do love it. It seems to perform well and it dries pretty fast. I honestly cannot tell a difference or at least not enough difference for the price difference. Modeling paste can get pretty expensive in these parts!
Have a great weekend!
Wednesday, June 18, 2014
Challenge #10 Spray It! Ink It! Paint It! Smear It! Emboss It! Day Three of the Blog Hop!
This week the Craft Hoarders Anonymous Challenge Blog is changing it up...with a blog hop! Challenge #10 is ready at the Craft Hoarders Anonymous Challenge Blog but we are doing things a bit differently this time! We are doing a week-long blog hop with STENCIL GIRL!
Each day this week you will visit the Craft Hoarders Anonymous Challenge Blog see the fabulous designs of the Craft Hoarders Anonymous Team, and then you will visit the StencilGirl Talk Blog to see what their team is doing! For the blog hop order, see the end of the post.
Now, for the challenge!
Challenge #10 Spray It! Ink It! Paint It! Smear It! Emboss It!
Show us your inner mixed media diva! Use spray mists, inks, paints, modeling paste, embossing powder, pastels, chalk, and whatever messy media you can find! Let's dig into that hoard, pull out some of that "messy stuff," and use it up! There is a mess-maker hiding in all of you! Let her/him out to play!
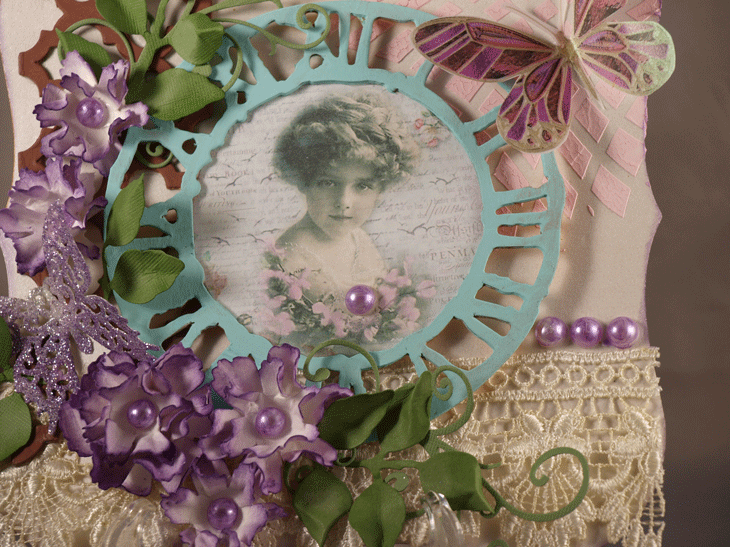
I pulled out all the stops on this little creation! I used a Spellbinders Die to cut out a shape from a cereal box and then I covered it with some of the shimmery paper from WorldWin Papers. Then I used a recipe I found online for homemade texture paste and made myself a big old jar of that. Next I put some of the texture paste onto a paper plate and added some pink acrylic paint to give it color and then, using one of the stencils from StencilGirl, I applied that to the piece. Once it was dry I begin adding the other elements. I cut out a Tim Holtz Frameworks die cut and painted it brown and added it to the side of the piece. Next I cut out a Tim Holtz Weathered Clock piece and painted it a blue green color. I found the cute image on Pinterest and printed it off and used a circle die to cut it out and it fit perfectly behind the clock piece. I used dimensional tape to adhere this to the piece and it gives it more dimension by raising it up some.
I cut out the flower petals using white card stock and colored them with Ranger distress ink. I had white half pearls and I colored them with alcohol marker purple to match the petals. I love being able to do that because you can match colors to your piece. I usually buy everything in white and color it to match. I shaped the flowers and added the pearls for centers and set them aside to dry. While that was drying I took a piece of white lace and sprayed it with a spray made of Tea Dye Distress Ink and water to make it looked aged. When it dried, I glued it to the base piece and then added the flowers and leaves framing the clock. I had a few of the pearls left over so I added them along the top of the lace. The butterfly at the top of the piece was from some I had printed off years ago and just stuck it in a drawer. I purchased a file of these butterflies and it has been so long ago and I have changed computers since then and I don't think that file made it to the new computer. So these are all I have (hoarded from long ago). The sparkly butterfly was one I had made for another project and it had white glitter on it. I used Ranger Distress Ink and sponged on color to make it purple also. I have to say it works pretty well. I didn't lose any glitter so I must have really glued it well way back when.
So there you have it...I think I painted, inked, sprayed and smeared, every little detail on this piece. I have a special place picked out for it and it will be displayed on an easel in my living room. I had a lot of fun and loved playing with everything. And I used some of my hoard as well.
Remember, you have two weeks to play in the new challenge! Challenge #10 closes June 29th at midnight PT. Link up your project here to Challenge #10.

Stencil Girl stencils are made by artists for artists. Unique designs for people who LOVE stencils like we love stencils. Owned and operated by artist Mary Beth Shaw. Visit the Stencil Girls Website and Blog, Stencil Girl Talk.
WorldWin Papers offers extraordinary paper, card stock, and envelopes for all paper crafting applications. We have teamed up with leading paper suppliers from around the world to bring some of the most colorful, elegant and sophisticated paper lines available to the craft market. All of our papers provide exceptional quality and design - perfect for scrapbooking, card making, rubber stamping and paper crafting.
Visit our website, worldwinpapers.com for more information. To locate a WorldWin retailer near you, call 1-888-843-6455 or email worldwin@worldwinpapers.com. Visit the WorldWin Blog for more projects.
This Week's Blog Hop Order:
June 16
June 17
June 18
June 19
June 20
Spellbinders Grand Labels One, Foliage, Standard Circles Large and Grand Peony Creations Dies
Plaid Paints
Homemade Texture Paste
StencilGirl Stencil
WorldWin Papers
Tim Holtz Weathered Clock Die
Tim Holtz Frameworks Die
Glue
Butterflies out of my hoarded items
Lace
Aging spray (Homemade using Tea Dye Ink and water)
Purple Alcohol Marker
Half Pearls
Image from Internet (free)
Lots of Love
Subscribe to:
Posts (Atom)