Wednesday, June 16, 2021

Inspiration Wednesday with Heartfelt Creations...

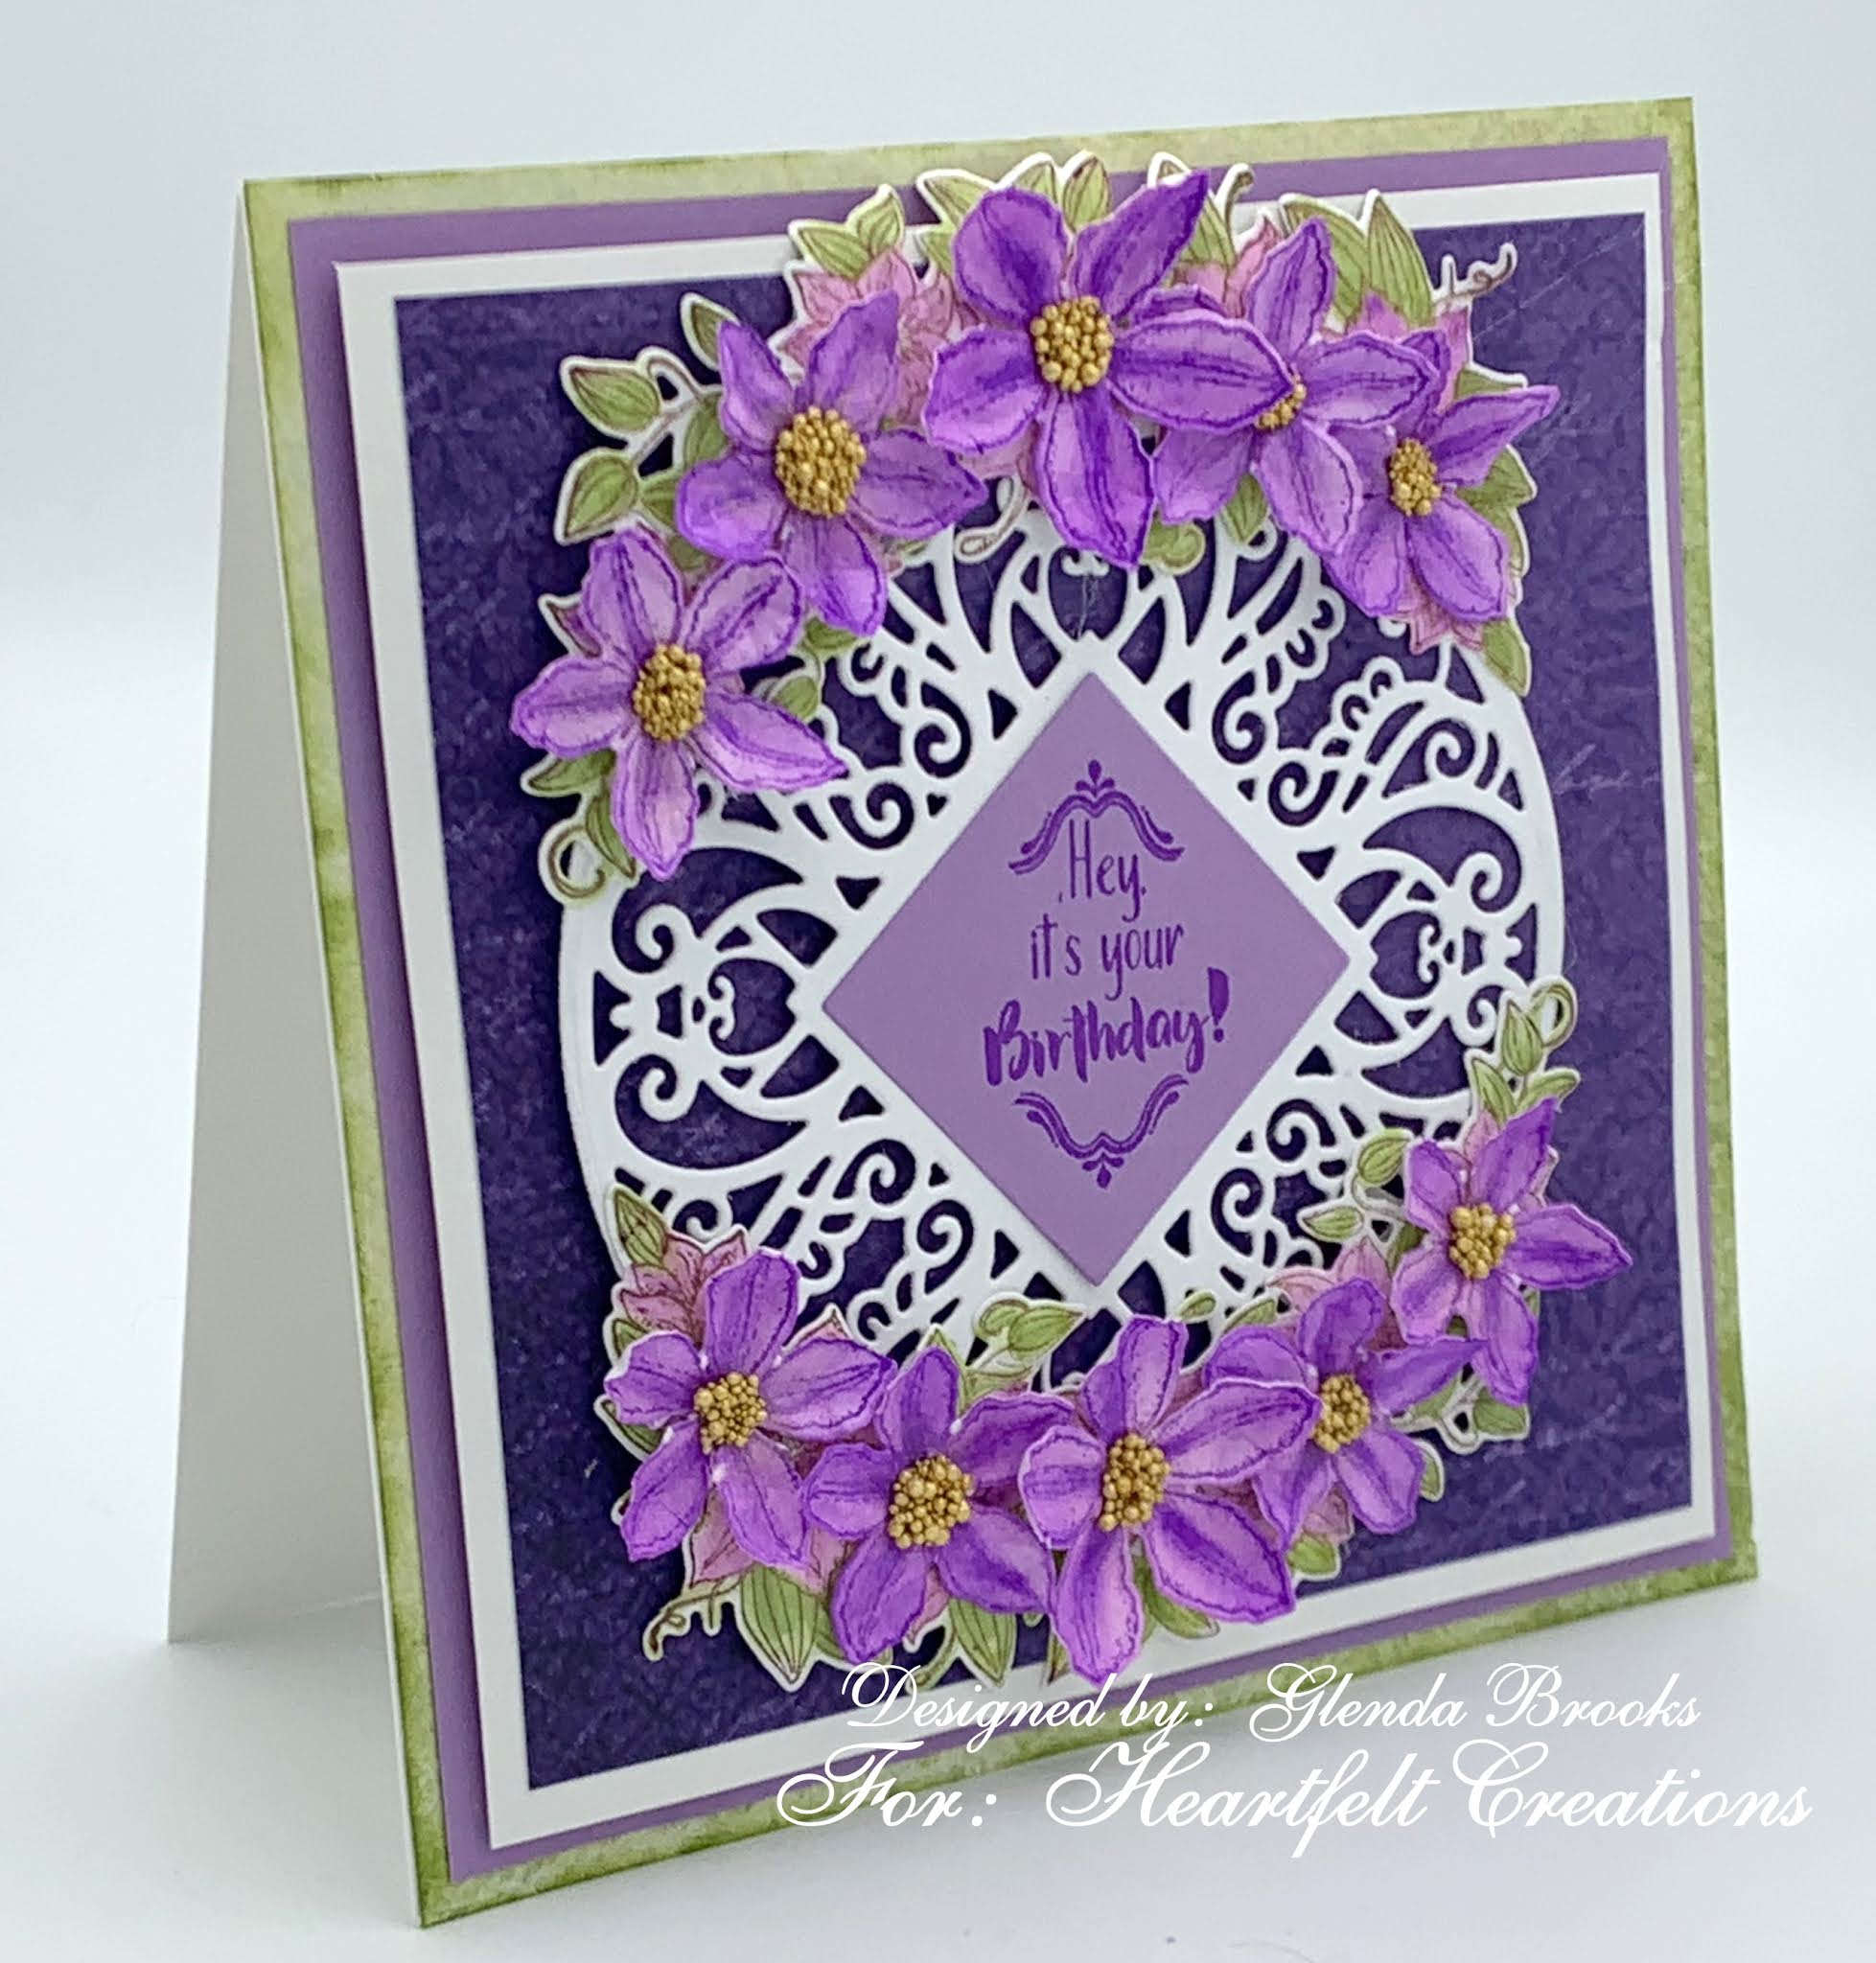
Good morning friends!  I'm here this morning to share another card I have made using the Climbing Clematis Collection.  This is going to be one I reach for time and time again!


Products Used:
Climbing Clematis Paper Collection, HCDP1-2128
Clematis Spray Cling Stamp Set, HCPC-3955
Clematis Spray Die, HCD1-7356
Clematis Cling Stamp Set, HCPC-3954
Clematis Die, HCD1-7355
Courtyard Elegance Die, HCD1-7283
3D Clematis Shaping Mold, HCFB1-5006
Special Birthday Sentiments Cling Stamp Set, HCPC-3843
Stack and Store Daubers-Pack of 30, HCDA2-450
Deluxe Flower Shaping Paper Pack of 50 - White, HCPP1-475
Designer Dries Clear Adhesive, 159723
Metal Tip for Adhesive Bottles, 352854
Dove Blender Kit, 241159
Heart of Gold Prills, ANC804
Memento Dye Ink Pad - Rich Cocoa, TSMP800
Memento Dye Ink Pad - Bamboo Leaves, TSMP707
Ranger Archival Ink Pad - Majestic Violet, RACP494
Ranger Archival Ink Pad - Leaf Green, RACP436


Other Products: White and Purple Cardstock, Die Cut Machine, Dimensional Tape, Hot Glue Gun

Instructions: My finished card size is 5 1/2" x 5 1/2". Make card base and cover with a piece of the paper collection. I chose sheet 1B. Cut a piece of purple cardstock 1/4" smaller than card base and adhere to card front. Cut a piece of white card stock 1/4" smaller and using dimensional tape, adhere to card base. I cut a piece of the paper collection 1/4" smaller measuring 4 3/4" x 4 3/4" and adhere to card base. I chose a piece of sheet 12B for this final layer.

I cut the center of the Courtyard Elegance Die and using dimensional tape in the center, adhere to card front. Using Majestic Violet ink stamp the sentiment onto a piece of the purple cardstock and cut out using the very center die of the Courtside Elegance Die then glue to the center of the die cut.

Stamp the Clematis Spray twice onto Flower Shaping Paper using Rich Cocoa ink and color using the Dove Blending Tool. Cut out with coordinating dies. Glue to the Circle diecut on the card front.

Using a sheet of the Deluxe Flower Shaping Paper and stamp the flower petals using Majestic Violet ink. I colored using stack and store daubers. Cut out using coordinating dies and lay onto the mold, spritz with water and run through the die cut machine. Lay them out onto a surface to dry. Add Prills to the centers and allow to dry. Use the glue gun to adhere to the two sprays on the card front. The card is finished.


Wednesday, June 9, 2021

Introducing the Climbing Clematis from Heartfelt Creations...

Good morning friends.  I'm here this morning to share with you a card I made using the brand new Climbing Clematis Collection from Heartfelt Creations! 


Products Used:
Climbing Clematis Paper Collection, HCDP1-2128
Clematis Cling Stamp Set, HCPC-3954
Clematis Die, HCD1-7355
Clematis Birdhouse & Trellis Cling Stamp Set, HCPC-3956
Clematis Birdhouse & Trellis Die, HCD1-7357
Regal Lattice Gateway Die, HCD2-7339
Eyelet Oval & Basics Small Die, HCD1-7156
Royal Elegance Frames Die, HCD2-7307
Celebrate Love Sentiments Cling Stamp Set, HCPC-3847
Art Foam Paper-10 Pack, HCFS1-465
Deluxe Flower Shaping Kit, HCST1-401
Stack and Store Daubers-Pack of 30, HCDA2-450
Hydra Sponges, RLHS100
Scor-Pal Measuring & Scoring Board, 173842
Dove Blender Kit, 241159
Designer Dries Clear Adhesive, 159723
Metal Tip for Adhesive Bottles, 352854
Rajni Chawla's Crystal Clear, PGM15015

Other Products: Die Cut Machine, Heat Gun, Misti Stamping Tool, Dimensional Tape, White and Black Cardstock

Instructions: My finished card size is 4" x 6". Make card base and cover with a piece of Sheet 3B of the paper collection. Next, I found one of the card fronts on the paper collection Sheet 3A. Mat that onto a piece of black cardstock to give it a more dimensional look and then using dimensional tape, adhere to the card front.

Using white cardstock die cut the center part of the Regal Lattice Gateway Die and the Royal Elegance Frames. Use the Eyelet & Ovals Basic die that fits best into the center of the Royal Elegance Frames and die cut an oval out of the lattice piece. Glue this lattice oval to the back of the Royal Elegance Frame and allow to dry. Using a sponge and Dries Clear Adhesive, add glitter to this piece and then glue it down onto the card front.

Stamp the flowers with Lulu Lavender ink on Art Foam and I allowed them to dry overnight. Using the stack and store daubers, color the centers of the flowers with Majestic Violet ink and then use coordinating dies to cut them out. Use the heat gun to shape the flowers. Add prills to the centers of the flowers and allow to dry.

Stamp the birdhouse with Rich Cocoa and the little birds with Tuxedo Black onto white cardstock and cut out with coordinating dies. Color with the Dove Blender Pen and various colors of ink to suit your taste. I used the flower shaping tools to add a bit of dimension to the birdhouse. Glue the birdhouse to the right side of the card front and add the flowers and the little birds and allow to dry.

Stamp the sentiment onto white cardstock. I covered part of the stamp with tape then inked it and pulled off the tape and stamped the one word. This allowed me to use one word of the sentiment. Mat this piece onto a piece of the Sheet 12B of the paper collection and then use a bit of dimensional tape to adhere to the card front. The card is finished!

Wednesday, June 2, 2021

Inspiration Wednesday with Heartfelt Creations...Sky Blue Dahlia

Good morning friends.  I'm here this morning to share with you a card I made using the Dazzling Dahlia flower from Heartfelt Creations and Art Foam Paper.  The foam paper makes such soft and lovely flowers and it is so easy to work with!


Products Used:
Floral Butterfly Paper Collection, HCDP1-2127
Large Floral Butterfly Cling Stamp Set, HCPC-3951
Large Floral Butterfly Die, HCD2-7352
Regal Lattice Gateway Die, HCD2-7339
Dazzling Dahlia Cling Stamp Set, HCPC-3928
Dazzling Dahlia Die, HCD1-7323
Dahlia and Leaves Cling Stamp Set, HCPC-3929
Dahlia and Leaves Die, HCD1-7324
Art Foam Paper-10 Pack, HCFS1-465
Stack and Store Daubers-Pack of 30, HCDA2-450
Hydra Sponges, RLHS100
Rajni Chawla's Vellum Flowerite - 10 Sheets, 18002
Designer Dries Clear Adhesive, 159723
Metal Tip for Adhesive Bottles, 352854
Rajni Chawla's Frosting Powder, PGM15016
Ranger Archival Ink Pad - Pink Peony, RACP649
Ranger Archival Ink Pad - Sky Blue, RACP656
Ranger Archival Ink Pad - Fern Green, RACP962

Other Products: Die Cut Machine, Hot Glue Gun, Heat Gun, White Enbossing Powder, Seam Binding, Stormy Sky Distress Ink, Scor-Tape, ColorBox Frost White Ink

Instructions: My finished card size is 5 1/2 x 7 1/2”. To make card base, use a sheet of 8 1/2 x 11” cardstock and cut at 5 1/2". Score one piece at 1" and fold. Add glue to this scored flap and glue the other piece of cardstock to it. Now cut off the 1" off overhang so that both pieces are the same. Cover the card base with a piece of the paper. I used sheet 9B for this.

Using white cardstock cut out the Regal Lattice Gateway Die and glue it to the card front and set aside while you work on the other elements of the card.

Stamp the flower petals onto Art Foam Paper using Sky blue and stamp the leaves using Fern Green ink. Set aside and allow to dry. It takes quite a while, so be patient. I actually let mine dry overnight. Using coordinating dies cut out the flower and the leaves. Using the Stack and Store Daubers add pink peony ink to the petals and then edge the petals with more Sky Blue ink. I added Leaf Green to the leaves and then edged them with more Fern Green. Using the heat bun and a pick to hold the petals, warm the petals until they begin to curl. I used a sponge and dries clear adhesive to add the Frosting Powder to the leaves and flower petals. Form the flower using hot glue and then adhere to card front with the hot glue as well.

Stamp the little butterflies with white ink and emboss with white embossing powder. Color using Pink Peony and Danube Blue inks. Glue them across the top of the card. They are so delicate, and I just love them fluttering there!

Now cut a piece of white seam binding and color using Stormy Sky Distress ink. Scrunch and allow to dry. Tie a bow and adhere to the card front. I used Scor-Tape and Dries Clear Adhesive to adhere the bow.

If you would like more inspiration just head over to the Heartfelt Creations blog and see what the other designers have created.


Wednesday, May 26, 2021

Inspiration Wednesday with Heartfelt Creations....

Good morning friends.  I'm here this morning to share another card with you using the Floral Butterfly Collection.  I've always been a huge fan of butterflies and Heartfelt  Creations  has given us so many to use in this collection!


Instructions: My card size is 3 3/4" x 8 1/2". Make card base and cut a piece of purple cardstock to cover and then add a piece of the Floral Butterfly Paper collection for the next layer. I chose sheet 11B because I love the beautiful plaid!

Die cut the center of the Regal Lattice Gateway Die and glue down toward the top of the card. Cut a piece of Vellum to fit the bottom and stamp the sentiment using black ink. Glue this down using Dries Clear Adhesive and when it dries it will not show through the vellum. Tie a bow using the thread and glue to the corner of the vellum piece.

Stamp the Floral Butterfly Accents flowers using Rich Cocoa ink and color using various colors of ink and the Stack and Store Daubers. Cut out with the coordinating dies and glue to the lattice piece. I stamped the butterflies two ways. Onto white cardstock and then I stamped on vellum using the Frost White ink and embossed with white embossing powder. Color the butterflies stamped onto white cardstock and using their coordinating dies cut out and lay aside. The butterflies embossed onto vellum are cut out and then colored on the front so they will have a bolder look. I used several butterflies on the front of this card as I'm just in love with them.

The last thing I did was to dab dots of Dries Clear Adhesive and sprinkle with glitter. Now everything just sparkles!


Wednesday, May 19, 2021

Inspiration Wednesday with Heartfelt Creations....

Good morning friends.  I'm here this morning to share another Heartfelt Creations card using the Floral Butterfly Collection.  I hope you enjoy this one because I really enjoyed making it! 


Products Used:
Floral Butterfly Paper Collection, HCDP1-2127
Floral Butterfly Accents Cling Stamp Set, HCPC-3952
Floral Butterfly Accents Die, HCD1-7353
Small Floral Butterfly Cling Stamp Set, HCPC-3953
Small Floral Butterfly Die, HCD1-7354
Large Floral Butterfly Cling Stamp Set, HCPC-3951
Large Floral Butterfly Die, HCD2-7352
Large Garden Zinnia Cling Stamp Set, HCPC-3923
Large Garden Zinnia Die, HCD1-7314
Large 3D Zinnia Shaping Mold, HCFB1-491
Fancy Special Day Cling Stamp Set, HCPC-3935
Leafy Accents Die, HCD1-7193
3D Leafy Accents Shaping Mold, HCFB1-467
Stairway Gardens Die, HCD1-7281
Deluxe Flower Shaping Paper Pack of 50 - White, HCPP1-475
Stack and Store Daubers-Pack of 30, HCDA2-450
Deluxe Flower Shaping Kit, HCST1-401
Rajni Chawla's Vellum Flowerite - 10 Sheets, 18002

Other Products: White Cardstock, Die Cut Machine, White Embossing Powder, ColorBox Frost White Ink Pad

Instructions: My finished card size is 6" x 6". Make card base using the Flower Shaping Paper and cover with a piece of the paper collection. I chose Page 3B which is a soft purple. Using white cardstock, die cut the stairway die and glue down onto the card front. I chose a colorful piece of the paper collection from page 2A and cut out a square for the center of the stairway die cut.

Stamp the purple flowers from the Floral Butterfly Accents Cling Stamp set with Rich Cocoa ink and color using Majestic Violet and Deep Purple inks. Color the leaves with Leaf Green. Stamp the yellow zinnia flowers with Buttercup ink and color using same. The leafy accents were stamped with Fern Green and then colored with Leaf Green ink. Cut everything out using coordinating dies and set aside. I used the flower shaping tools to shape the petals and glued two of the yellow petals together. Add prills to the centers and when dry add glitter. Dot glue here and there over the purple flowers and the leaves and add glitter there as well.

Stamp all the butterflies with Frost White ink on vellum and emboss using white embossing powder. Cut out using coordinating dies. I colored using various inks on the front side of the butterflies. That is just my preference. You can decide for yourself which side you choose to color.

Decide on placement of butterflies and flowers and glue down. The card is ready to go.

Wednesday, May 12, 2021

Debuting the Floral Butterfly Collection with Heartfelt Creations...

Good morning friends and welcome.  I'm here this morning as we are debuting the brand new Floral Butterfly Collection from Heartfelt Creations.  You are going to love this collection as it is all winged things!


Products Used:
Floral Butterfly Paper Collection, HCDP1-2127
Large Floral Butterfly Cling Stamp Set, HCPC-3951
Large Floral Butterfly Die, HCD2-7352
Floral Butterfly Accents Cling Stamp Set, HCPC-3952
Floral Butterfly Accents Die, HCD1-7353
6" x 6" Interlocking Fold Card - White, HCCB1-483
Rounded Lattice Window Die, HCD1-7274
Rounded Eyelet Window Die, HCD1-7273
Eyelet Circle & Basics Small Die, HCD1-7154
Just For You Sentiments Cling Stamp Set, HCPC-3845
Deluxe Flower Shaping Paper Pack of 50 - White, HCPP1-475
Stack and Store Daubers-Pack of 30, HCDA2-450
Rajni Chawla's Vellum Flowerite - 10 Sheets, 18002
Designer Dries Clear Adhesive, 159723
Metal Tip for Adhesive Bottles, 352854
Crystal Ultrafine Transparent Glitter 1/2 oz., 85-glitter
Color In Watercolor Brush - Fine, 409311
Memento Dye Ink Pad - Rich Cocoa, TSMP800

Other Products: White Cardstock, Canson Watercolor Paper, Magnets, Die Cut Machine, Metallic Cording, Cornflower Blue Ranger Archival Ink

Instructions: The finished card size is 6" x 6". Working on the four fold-out pieces of the card I cut pieces of 3B of the Floral Butterfly paper Collection and used the dies from the Rounded Lattice Window dies and the Round Eyelet Window dies. Glue down these pieces.


Using the Large Floral Butterfly shadow die, cut a butterfly using a piece of the Flower Shaping Paper. I covered this butterfly front and back using a piece of 8B from the paper collection. Now using watercolor paper, stamp the large butterfly using Cactus Flower ink. I used two zig clean markers and the water brush to color the butterfly (081 Light Violet and 042 Turquoise Green). Be sure and dry the color as you move across the butterfly to help the colors not to run together. When finished and dry, add glitter and allow to dry. Using the vellum, cut out the inside piece of the butterfly and glue to the colored butterfly. This makes the butterfly look like it is fluttering along.

Now open up the card flaps and let’s decorate as well as deciding where you want to put the magnets so the butterfly can hold the card closed. This needs to be done before you finish gluing down the paper pieces of the back of the shadow piece and on the inside of the right side flap. Now cut out pieces of 11B of the paper collection using the die from the Round Lattice Window die. Decide on a card front to go on the inside. It is very easy as the paper all coordinates well; the guess work is taken out for you. I chose a sunny piece and glued it down. Stamp the floral accent pieces onto a piece of the flower shaping paper. Use the Stack and Store Daubers to color in and then cut out with coordinating dies. I also stamped a pretty butterfly and colored it to fit on the right hand side. Stamp the sentiment and using the round dies cut it out and glue to the inside panel. Tie a bow using the metallic cording and adhere to the top of the circle sentiment. Glue down the greenery and flowers and add more glitter to all areas of the part of the card.

The card is finished and all you need to do is fold it together and put into a regular 6 x 6 envelope and it should mail with no problem. It can also go into a clear envelope. I love how this card came out and was so impressed at how easy it came together! Good luck with yours!


Wednesday, May 5, 2021

Inspiration Wednesday with Heartfelt Creations...

Good morning friends!  I'm here this rainy Wednesday morning to share with you another card I have made using the Sweet Magnolia Collection from Heartfelt Creations.  


Other Products: PrismaColor Pencils (PC930, PC1005, PC908, PC909, #738, 738 1/2) Pink Blending Stump, Odorless Mineral Spirits, White and Black Cardstock, Seam Binding, Burgundy Ink, Dimensional Tape, Die Cut Machine

Instructions: My finished card size is 4 3/4" x 6". Make card base and cover with a piece of the 11B Sheet from the Sweet Magnolia paper collection. Cut a piece of black cardstock 5 1/8 x 3 7/8 and then cut a piece of white cardstock 1/8" smaller and glue the white onto the black. This gives just a tiny bit of the black showing and it really brings out the image.

Stamp the Sweet Magnolia Bouquet image with Rich Cocoa ink and color with colored pencils. Add the prills and then add glitter and allow to dry. Color the seam binding with ink, scrunch and allow to dry. Tie a bow and adhere to the base of the colored image. Using Dimensional Tape, adhere to the card front.