Wednesday, December 30, 2020

Inspiration Wednesday with Heartfelt Creations....

Good morning friends and welcome to my last post of this crazy year!   I'm here to share another card with you featuring the Garden Zinnia flower from the Summer's Garden Collection!  My mother grew these flowers along the edge of our back porch when I was a child so they hold a place dear to my heart.  I can almost smell them when I remember her tiny garden.  Heartfelt Creations has truly captured these lovely flowers and I'm pleased to share another card with you!


Products Used:
Wild Aster Paper CollectionHCDP1-2106
Large Garden Zinnia Cling Stamp SetHCPC-3923
Large Garden Zinnia DieHCD1-7314
Small Garden Zinnia Cling Stamp SetHCPC-3924
Small Garden Zinnia DieHCD1-7315
Large 3D Zinnia Shaping MoldHCFB1-491
Small 3D Zinnia Shaping MoldHCFB1-492
Regal Frame & Accents DieHCD1-7248
Deluxe Flower Shaping Paper Pack of 50 - WhiteHCPP1-475
Designer Dries Clear Adhesive159723
Metal Tip for Adhesive Bottles352854
Rajni Chawla's Crystal ClearPGM15015
Lemon Chiffon PrillsANC809
Lettuce Entertain You PrillsANC814
Ranger Archival Ink Pad - ButtercupRACP632
Ranger Archival Ink Pad - Fern GreenRACP962
Ranger Archival Ink Pad - Leaf GreenRACP436
Ranger Archival Ink Pad - Cactus FlowerRACP985

Other Products: White Cardstock, Hot Glue Gun, Die Cut Machine

For more tips on creating with the Summer's Garden Collection watch the tutorial at https://youtu.be/-dYnAWXIH3E.

Instructions: My card size is 5" x 7". Make card base and pick a piece of the paper collection and cover the card front leaving just a small margin of white around the edges. Diecut the Regal Frame from white cardstock and adhere to the card front.

Stamp the flower petals in Cactus Flower and Buttercup then color with Majestic Violet, Cactus Flower and Buttercup. Make sure to color the backs of the flower petals and the leaves. Lay on the molds, spritz with water and run through the die cut machine. Lay out onto the desk mat to dry. I stamped the leaves with Fern Green then colored with Leaf Green. Lay onto the mold, spritz with water and run through the die cut machine. Lay out onto the desk mat to dry.

Make the flowers and add prills to the centers and allow to dry. You can use a bit of hot glue and drop prills onto that to add a more dimensional flower center. I did this with some of the flowers and some I just did the traditional way using Dries Clear Glue.

Decide on the placement of your flowers and leaves and glue down using hot glue. The card is finished.


Wednesday, December 23, 2020

Inspiration Wednesday with Heartfelt Creations ...

Good morning friends and welcome to my blog.  This will be my last post before Christmas and I want to wish you all a Joyful Christmas!  I'm also sharing a card I made with a Christmas theme for this week's submission:


Other Products: White Cardstock, Dimensional Tape, Art Extra Snowflake Paste, Die Cut Machine, blending brushes, Tangelo Memento Ink

For more tips on creating with the Floral Shoppe Collection watch the tutorial at https://youtu.be/unrqvzpfu1U.

For more tips on creating with the Snowy Pines Collection watch the tutorial at https://youtu.be/nVtKVcgg530.

or more tips on creating with the Candlelit Christmas collection, watch the tutorial at https://youtu.be/PJeFD_d3AiM.

For more ideas on creating with the Decorative Royale Square & Circle Dies, watch the tutorial at https://youtu.be/tqmtn_TiVVw.

Instructions: My finished card size is 6" x 6". Make card base and cover with a piece of sheet #12B from the Floral Shoppe Paper Collection. Using white cardstock cut out the Stairway Gardens die then glue it to the card front.

Using Lady Bug ink stamp the Large Urn and use a brush to blend some color for shading. Glue it down leaving the top open so you can place elements behind it. Stamp the elements using Fern Green, Lady Bug, or Jet black. I colored the cardinals in Lady Bug and used Tangelo for the beak. The Poinsettia Flowers are stamped in Lady Bug and colored with that and Leaf Green. Use coordinating dies to cut out elements. Spritz the Poinsettia and Holly with water and run through the 3D Mold and turn out onto the desk mat to dry. Add Prills and glitter and allow to dry. Add the snow to the limbs and glitter there as well. I'm a huge fan of glitter so I used it everywhere. Use it to suit your own taste. Once everything is dry, decide on placement and glue down. The card is finished!


Wednesday, December 16, 2020

Inspiration Wednesday with Heartfelt Creations...

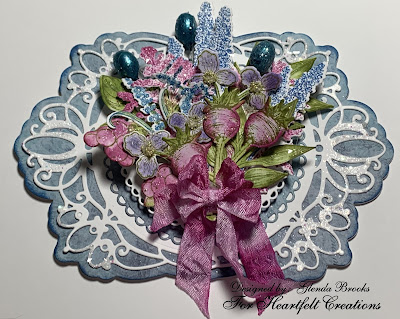
Good morning friends!  As we continue along with the Floral Shoppe Collection, I have another card to share with you this morning.  This one is a shaped card and I hope you like it! Heartfelt Creations knocked this one out of the park.  I know, I know I always say that!  


This next photo is a side shot to show a bit more of the dimension.  I just love all these filler flowers!


The next shot is a close up giving a bit more detail of all the elements going into the making of this card.  


Products Used:
Floral Shoppe Paper CollectionHCDP1-2122
Large Floral Urn Cling Stamp SetHCPC-3931
Large Floral Urn DieHCD1-7329
Floral Shoppe Accents Cling Stamp SetHCPC-3932
Floral Shoppe Accents DieHCD1-7330
Floral Shoppe Fillers Cling Stamp SetHCPC-3933
Floral Shoppe Fillers DieHCD1-7331
Decorative Circle Frames DieHCD2-7306
Eyelet Circle & Basics Small DieHCD1-7154
Stack and Store Daubers-Pack of 30HCDA2-450
Rose Hip Stamens - LargeHCS1-490
Designer Dries Clear Adhesive159723
Metal Tip for Adhesive Bottles352854
Double Dots 100pc. -3D Foam CirclesDDOTS
Rajni Chawla's Crystal ClearPGM15015
Lemon Chiffon PrillsANC809
Dove Blender Kit241159
Ranger Archival Ink Pad - Leaf GreenRACP436


Other Products: Grape Jelly Memento Dye Ink, Seam Binding, Hot Glue Gun, White Cardstock, Die Cut Machine

For more tips on creating with the Floral Shoppe Collection watch the tutorial at https://youtu.be/unrqvzpfu1U.

For more ideas on creating with the 5 x 7 Decorative Frame Dies, watch the tutorial at https://youtu.be/qdBFA5VpmSo.

Instructions: Make a shaped card using Decorative Circle Frames Die and cover with a piece of the paper collection. I used 10-B as it is a beautiful blue color. I used the die and this piece of paper and white cardstock to cut out different pieces of the die. I layered these die cuts onto the base card and the last scalloped circle piece was cut out of white cardstock and popped up with the DDots to give a bit of dimension.

I used various ink colors to stamp the different elements and then colored the pieces with the ink as well. Then I used the coordinating dies to cut out the elements. I added glitter to the elements and onto the base die cut piece and set aside to dry.

I took some of the Stamens and rolled them in the dries clear glue and then over into the glitter then set them aside to dry.

Cut a piece of the seam binding and spritz with water. Wet seam binding seems to take the color better if it is damp. I laid down color onto my desk mat by swiping the ink pad across the desk mat then I pulled the seam binding through the color. Scrunch the seam binding and then lay it out to dry. Once it is dry assemble the elements onto the top layer of the card and hot glue down. Tie a length of the seam binding around the base of the elements and then tie a bow and glue down to the base as well. Now it looks like a beautiful bouquet of flowers ready to send to someone very special.


Wednesday, December 9, 2020

Introducing The Floral Shoppe Collection with Heartfelt Creations...

Good morning and welcome to my blog!  I'm here this morning introducing a brand new release for Heartfelt Creations.  The Floral Shoppe Collection is a lovely combination of an Urn and lots of filler flowers and it definitely makes me a happy girl!  


Next is a photo of the inside of my card.  The urn sits on the front of the card and opens up to reveal a sentiment, so you have a shaped card sitting on a  6" X 6" card with this one!


Products Used:
Floral Shoppe Paper CollectionHCDP1-2122
Floral Shoppe Accents Cling Stamp SetHCPC-3932
Floral Shoppe Accents DieHCD1-7330
Large Floral Urn Cling Stamp SetHCPC-3931
Large Floral Urn DieHCD1-7329
Floral Shoppe Fillers Cling Stamp SetHCPC-3933
Floral Shoppe Fillers DieHCD1-7331
Large Garden Zinnia Cling Stamp SetHCPC-3923
Large Garden Zinnia DieHCD1-7314
Large 3D Zinnia Shaping MoldHCFB1-491
Dazzling Dahlia Cling Stamp SetHCPC-3928
Dazzling Dahlia DieHCD1-7323
3D Dahlia Shaping MoldHCFB1-494
For My Friend Sentiments Cling Stamp SetHCPC-3844
Deluxe Flower Shaping Paper Pack of 50 - WhiteHCPP1-475
Stack and Store Daubers-Pack of 30HCDA2-450
Rajni Chawla's Crystal ClearPGM15015
Designer Dries Clear Adhesive159723

Other Products: Ranger Archival Ink Pad Sun Dazed, Ranger Distress Ink (Peeled Paint), White Cardstock, Die Cut Machine, Hot Glue Gun, Magnets

For more tips on creating with the Floral Shoppe Collection watch the tutorial at https://youtu.be/unrqvzpfu1U.

For more tips on creating with the Dazzling Dahlia Collection watch the tutorial at https://youtu.be/KIIpo2C9oDs.

For more tips on creating with the Summer's Garden Collection watch the tutorial at https://youtu.be/kYiP8qJZ4rE.

Instructions: My finished card size is 6" x 6". Make card base out of the Flower Shaping Paper for strength and stability. Pick one of the 6" x 6" card fronts and cover card base. Using the Large Floral Urn Die make a shaped card using heavy white cardstock. Stamp the Large Floral Urn onto another piece of white cardstock and cut out. Cover the shaped card front with this piece. Stamp the sentiment onto the inside of the shaped urn card. Decide on the placement of the magnets and glue them down onto the shaped urn card. Allow this to dry. Glue the shaped urn card to the 6" X 6" card front leaving the top free so you can slip elements down behind to look like they are flowing out of the shaped urn.

Stamp the Floral Shoppe elements onto the flower shaping paper using various ink colors and cut out with coordinating dies. You can choose which colors you like here and make this your own. Add glitter to the elements and allow to dry.

Stamp the small Zinnia flowers onto the Flower Shaping Paper using Buttercup, Fern Green, and Sky Blue and color using the same ink colors. Cut out using coordinating dies and lay onto the shaping mold, spritz with water and run through the die cut machine. Turn out onto desk to dry. Once dry, add glitter and allow to dry.

Stamp the Dazzling Dahlia petals using Cactus Flower Archival Ink and then color using Buttercup and Cactus Flower. Stamp another Dahlia using Fern Green ink and color with Leaf Green ink. Cut out the petals with the coordinating die, lay in the shaping mold and spritz with water. Run through the die cut machine and turn out onto the desk to dry. At this point I did some additional shaping, and I used the hot glue gun to help hold the petals where I wanted them. Layer the petals together to form the flower and hot glue. Use Dries Clear Glue to add Crystal Clear Glitter and allow to dry.

Once everything is dry decide on placement and using hot glue, glue down being sure to allow the shaped urn card to open so you can see the sentiment. Now you have a shaped urn card on a 6" x 6" card. The inside of the 6" card is left blank for you to be able to write a personal message.

If you would like more inspiration just head over to the Heartfelt Creations blog and see what the other designers are showing for your viewing pleasure!  

Wednesday, December 2, 2020

Inspiration Wednesday with Heartfelt Creations....

Good morning friends and welcome to another Inspiration Wednesday with Heartfelt Creations!  I'm here this morning to share another card using the Elegant Gateway dies just released on Black Friday.  I am in love with these dies and they are becoming my "go to" die for many things!  


The next photo is my card all opened and on display.  These Gateway Fold Card bases make it so easy to create a work of art and they pair perfectly with the new Elegant Gateway Dies!


Next up I have a close-up of my Dahlia Flower.  These are so 3 dimensional that just one flower can carry a card!

Products Used:
5" x 7" Gateway Fold Card - WhiteHCCB1-495
Scalloped Flourish Gateway DieHCD2-7325
Ornate Flourish Gateway DieHCD2-7326
Lattice Swirl Gateway DieHCD2-7328
Dazzling Dahlia Paper CollectionHCDP1-2121
Elegant Gateway Sentiments Cling Stamp SetHCPC-3930
Dazzling Dahlia DieHCD1-7323
3D Dahlia Shaping MoldHCFB1-494
Dahlia and Leaves Cling Stamp SetHCPC-3929
Dahlia and Leaves DieHCD1-7324
Deluxe Flower Shaping Paper Pack of 50 - WhiteHCPP1-475
Deluxe Flower Shaping KitHCST1-401
Designer Dries Clear Adhesive159723
Metal Tip for Adhesive Bottles352854
Rajni Chawla's Crystal ClearPGM15015
Ranger Archival Ink Pad - Leaf GreenRACP436
Ranger Archival Ink Pad - Fern GreenRACP962
Ranger Archival Ink Pad - Rose MadderRACP638


Other Products: White Cardstock, Hot Glue Gun, Die Cut Machine

For more ideas on creating with the Elegant Gateway Dies and Accents, watch the tutorial at https://youtu.be/H6fZTiYUH_w.

For more tips on creating with the Dazzling Dahlia Collection watch the tutorial at https://youtu.be/KIIpo2C9oDs.

Instructions: For the first panel I cut a piece of Page 10B with the largest shape die from HCD2-7326 Ornate Flourish Gateway Die. Glue this piece down as a shadow panel. Using the Shadow panel die, then the outer ornate die and the third largest die together cut using white cardstock. ut inner panels picking out a pretty part of Page 3B, 11B, and 1-B. Layer the two center panels (the orange piece first and then the yellow ornate piece and glue down. Cut out the upper panel and glue it down then cut out the bottom panel and stamp the sentiment then glue it down.

Using Fern green ink, stamp the leaves. Stamp the flower petals with Rose Madder ink then color using Buttercup in the center then Rose Madder on the edges. Color the leaves with Leaf Green then cut everything out using the coordinating dies. Run the petals and leaves through the die cut machine inside the mold. I spritzed everything with some water. Turn everything out onto the desk to dry. As the flower petals are drying add a bit more shape with the Deluxe Flower Shaping Kit. Using the hot glue gun, glue the flower and leaves together and then glue to the front of the card. Add glitter and allow to dry.

For the second panel of the card I took the scalloped die from HCD2-7325 Scalloped Flourish Gateway Die and cut a pretty scene from the paper collection. This was page 3-B. I added some Rose Madder ink to the edges and glued the panel down.

For the third panel I cut the shadow piece from HCD2-7328 Lattice Swirl Gateway Die from page 11-B and glued it down. Cut the lattice die using white cardstock and glue it down. Cut a piece of the paper to fit inside the oval and glue it down. I chose a section of Page 1-B for this.

If you would like to see what the other talented designers have created this week just head over to the Heartfelt Creations Blog and have a look!