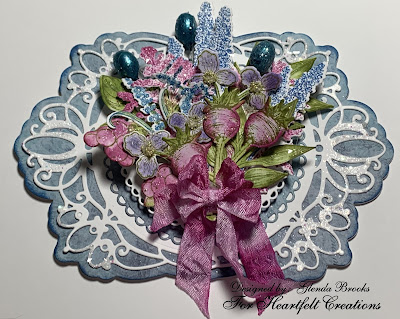
Good morning friends! As we continue along with the Floral Shoppe Collection, I have another card to share with you this morning. This one is a shaped card and I hope you like it! Heartfelt Creations knocked this one out of the park. I know, I know I always say that!
Products Used:
Floral Shoppe Paper Collection, HCDP1-2122
Large Floral Urn Cling Stamp Set, HCPC-3931
Large Floral Urn Die, HCD1-7329
Floral Shoppe Accents Cling Stamp Set, HCPC-3932
Floral Shoppe Accents Die, HCD1-7330
Floral Shoppe Fillers Cling Stamp Set, HCPC-3933
Floral Shoppe Fillers Die, HCD1-7331
Decorative Circle Frames Die, HCD2-7306
Eyelet Circle & Basics Small Die, HCD1-7154
Stack and Store Daubers-Pack of 30, HCDA2-450
Rose Hip Stamens - Large, HCS1-490
Designer Dries Clear Adhesive, 159723
Metal Tip for Adhesive Bottles, 352854
Double Dots 100pc. -3D Foam Circles, DDOTS
Rajni Chawla's Crystal Clear, PGM15015
Lemon Chiffon Prills, ANC809
Dove Blender Kit, 241159
Ranger Archival Ink Pad - Leaf Green, RACP436
Memento Dye Ink Pad - Danube Blue, TSMP600
Memento Dye Ink Pad - Bamboo Leaves, TSMP707
Memento Dye Ink Pad - Lilac Posies, TSMP501
Other Products: Grape Jelly Memento Dye Ink, Seam Binding, Hot Glue Gun, White Cardstock, Die Cut Machine
For more tips on creating with the Floral Shoppe Collection watch the tutorial at https://youtu.be/unrqvzpfu1U.
For more ideas on creating with the 5 x 7 Decorative Frame Dies, watch the tutorial at https://youtu.be/qdBFA5VpmSo.
Instructions: Make a shaped card using Decorative Circle Frames Die and cover with a piece of the paper collection. I used 10-B as it is a beautiful blue color. I used the die and this piece of paper and white cardstock to cut out different pieces of the die. I layered these die cuts onto the base card and the last scalloped circle piece was cut out of white cardstock and popped up with the DDots to give a bit of dimension.
I used various ink colors to stamp the different elements and then colored the pieces with the ink as well. Then I used the coordinating dies to cut out the elements. I added glitter to the elements and onto the base die cut piece and set aside to dry.
I took some of the Stamens and rolled them in the dries clear glue and then over into the glitter then set them aside to dry.
Cut a piece of the seam binding and spritz with water. Wet seam binding seems to take the color better if it is damp. I laid down color onto my desk mat by swiping the ink pad across the desk mat then I pulled the seam binding through the color. Scrunch the seam binding and then lay it out to dry. Once it is dry assemble the elements onto the top layer of the card and hot glue down. Tie a length of the seam binding around the base of the elements and then tie a bow and glue down to the base as well. Now it looks like a beautiful bouquet of flowers ready to send to someone very special.


2 comments:
Oh, gosh, Glenda, you had me over there looking at this collection. I just think those curly blue flower spikes are so cute! Of course, your whole arrangement is gorgeous and set so nicely on the die cut shaped card. Beautiful ribbon. This is WOW all over!
Oh Glenda this is just GORGEOUS!!! I LOVE the colors (very vintage to me) and your 'arrangement' is perfect! You should be a floral designer ... you've got the correct placement & count! (Yes I'm also a certified Florist lol) ... you know, Jack of All Trades, Master of None! LOL Just stunning ... as your creations always are! Thanks for inspiration! HUGS and HAPPY HOLIDAYS!
Post a Comment