Wednesday, July 29, 2020

Inspiration Wednesday with Heartfelt Creations....

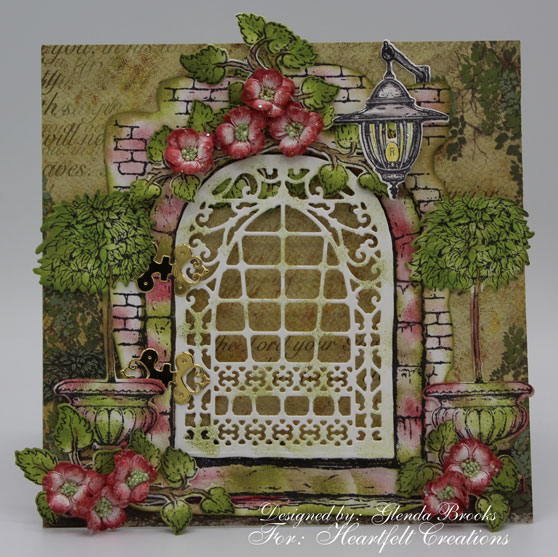
Good morning friends.  I'm here this morning to share with you another Heartfelt Creations card I have made.  I have used the French Cottage Collection and hope you enjoy seeing it.


Products Used:
French Cottage Paper CollectionHCDP1-2114
French Doorway Cling Stamp SetHCPC-3908
French Doorway DieHCD1-7292
French Cottage 'scapes Cling Stamp SetHCPC-3909
Window Hinges DieHCD1-7285
Deluxe Flower Shaping Paper Pack of 50 - WhiteHCPP1-475
Luxe Gold CardstockHCGP1-488
Deluxe Flower Shaping KitHCST1-401
Lettuce Entertain You PrillsANC814
Crystal Ultrafine Transparent Glitter 1/2 oz.85-glitter
Rajni Chawla's Crystal ClearPGM15015
Designer Dries Clear Adhesive159723
Metal Tip for Adhesive Bottles352854
Stack and Store Daubers-Pack of 30HCDA2-450
Dove Blender Kit241159
Ranger Archival Ink Pad - Fern GreenRACP962
Ranger Archival Ink Pad - Leaf GreenRACP436
Ranger Archival Ink Pad - Red GeraniumRACP993

Other Products: White Cardstock, Dandelion Memento Ink Pad, Die Cut Machine

For more tips on creating with the French Cottage Collection watch the tutorial at https://youtu.be/cATv3wk2_sM.

Instructions: My finished card size is 6” x 6”. Cut a piece of the flower shaping paper 6” x 12” and score at 6”. Cover this base with a piece of the paper collection. The problem will be choosing which paper to use as it is such a beautiful collection.

Using Tuxedo Black Memento Ink stamp all the elements of the card. I fussy cut around the brick wall and colored with Red Geranium and Fern Green. I think the green gives it a mossy look. Cut the filigree door out of white cardstock and add a bit of green to that as well. Cut the hinges out of the gold cardstock and glue to the door and door frame set aside to dry.

Color the lamp with the Dove Blender Pen and Tuxedo Black Ink. I rubbed off a lot of the color and came up with a pretty shade of gray. I used Dandelion to color the bulb. Add Glitter and set aside to dry.

Color the Topiary Pots and trees with Fern Green and Red Geranium. The trunk of the little trees are colored with Rich Cocoa. Layer all the pieces to the card front and allow to dry.

While the card dries let’s work on the flowers and leaves. Color with Red Geranium ink and shape. I layered two petals together and added Prills to the center and allowed to dry. As they are drying add the Crystal Clear and set these aside while we color the leaves with Leaf Green and Fern Green and the stalks are Rich Cocoa. I cut the leaves apart and added them and the flowers here and there on my card front. Just place them where you like and glue down. Allow the glue to dry and your card is finished!


Monday, July 27, 2020

Christmas Blessings.....

Good Monday morning my friends.  We are sweltering here in East Tennessee.  Extremely hot and no rain.  All my outside plants are slowly dying a painful death and seems no matter what I do, it is just not enough.  I am so looking forward to some cooler temps!  So I decided if it is so terribly hot outside I will just work on Christmas cards!  Of course I'm using all Heartfelt Creations products and I was inspired by a video Enma Lou did  Facebook.  I tried to go there and copy the link to her video but the Gremlins are at work this morning so I was unable to copy.  

This is a shaped card using one of the Majestic Frames Dies and the Luxe Gold Paper.  I actually made two cards on Saturday and now I'm off to something else.  I will revisit Christmas next time I have a minute! 

Now it's time for another cup of coffee and starting my day!


Wednesday, July 22, 2020

Inspiration Wednesday with Heartfelt Creations...

Good morning friends.  I'm here this morning to share another card I have made for Heartfelt Creations using the new Snowy Pines Collection.  We have been so hot here in East Tennessee that it's a pleasure to work with this collection as I dream of cooler temps.  


Other Products:  Lipstick Red Colorbox Chalk Ink, Art Extras Snowflake Paste, White Cardstock, Die Cut Machine

For more on creating with the Snowy Pines Collection watch this video:  https://youtu.be/nVtKVcgg530.

The finished dimensions of my card are 4 1/4  X 5 1/2.  Make card base by starting with a piece of cardstock measuring 4 1/4 X 11.  Score at 4 1/4 and fold.  Cover the card with a card front from the paper collection.  Set aside.  

Using the Eyelet Oval and Basics Large Die cut a piece of the paper and glue to the center of the card front.  Using the Ornate Ovals Dies cut the oval out of white cardstock and glue down to the front.  

Stamp the Pinecone image using Tuxedo Black Memento Ink and using various Memento Inks to color.  I used the Dove Blender kit for this.  Next cut out the image with the coordinating die and add glitter to the ribbon and berries.  Allow to dry.  Next I added the snowflake paste and then set it aside to dry.  Be sure that the pieces of the pine cone remain able to move.  Once the image is dry I used Double Dots to adhere to the card front giving it a bit of dimension

Wednesday, July 15, 2020

Another Heartfelt Creations Wednesday.....

Good morning friends.  As we continue along with the Heartfelt Creations Snowy Pines Collection I have another card to share with you!


Products Used:
Snowy Pines Paper CollectionHCDP1-2117
Snowy Pines Cabin Cling Stamp SetHCPC-3919
Snowy Pines Cabin DieHCD1-7304
Treasured Heart Gift Box DieHCD2-7291
Rounded Window Frame DieHCD1-7271
Luxe Gold CardstockHCGP1-488
Stack and Store Daubers-Pack of 30HCDA2-450
Double Dots 100pc. -3D Foam CirclesDDOTS
Designer Dries Clear Adhesive159723
Metal Tip for Adhesive Bottles352854
Color In Watercolor Brush - Fine409311
Dove Blender Kit241159
Memento Dye Ink Pad - CantaloupeTSMP103
Memento Dye Ink Pad - TangeloTSMP200
Memento Dye Ink Pad - Olive GroveTSMP708
Memento Dye Ink Pad - Tuxedo BlackTSMP900
Memento Dye Ink Pad - Cottage IvyTSMP701
Gilt Trip PrillsANC805


Other Products: Canson Watercolor Paper, White Cardstock, Distress Ink (Fired Brick, Pumice Stone, Vintage Photo, Tea Dye, Stormy Sky, Barn Door) Art Extra Snowflake Paste, Die Cut Machine

For more tips on creating with the Snowy Pines Collection watch the tutorial at https://youtu.be/nVtKVcgg530.

Instructions: The dimensions of the finished card are 6” x 6”. Cut a piece of cardstock 6” x 12” and score and fold in half. Cover with a piece of the paper collection and set aside.

Stamp the Snowy Cabin in Tuxedo Black Memento Ink onto white cardstock and use the coordinating die to cut the outer ring of pine branches and birds. Color this with various Memento Inks and the Dove Blender Pen. Stamp the image again onto Canson Watercolor paper and using the Distress inks and water brush color the image. Let this dry. Once dry I added the snow and set it aside to dry. Glue the outer ring of pine branches over the water colored piece and allow to dry.

Using the Rounded Window Frame Die cut out a circle decorative piece using the Luxe Gold Cardstock. Glue to the center of the card front. Using the Double Dots adhere the oval Snowy Cabin Piece to the gold center piece. This pops the oval piece up giving it extra dimension.

Using the little heart dies from the Treasured Heart Box Die cut 4 hearts and glue to the corners of the card front.

Wednesday, July 8, 2020

Debuting the Heartfelt Creations Snowy Pines Collection...


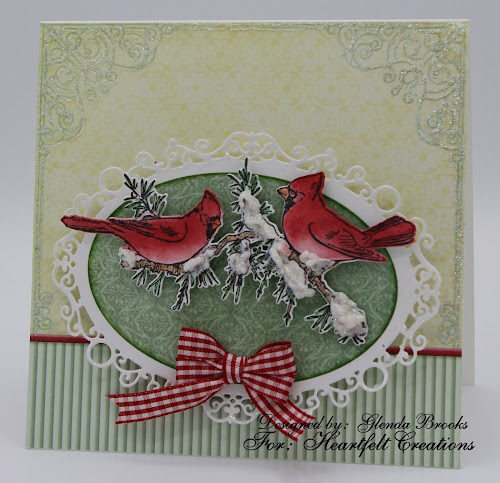
Good morning friends and welcome to the brand new Heartfelt Creations Snowy Pines Collection! 


Other Products: Art Extra Snowflake Paste, Pallet Knife, 3/8” Red Gingham Ribbon, White Cardstock, Scor-Tape, Die Cut Machine

For more tips on creating with the Snowy Pines Collection watch the tutorial at https://youtu.be/nVtKVcgg530.

Instructions: The finished dimensions of the card are 6” x 6”. To make card base cut a piece of cardstock 6” x 12” then score and fold at 6”. Cover the card base with a piece of the paper collection then add glitter accents and set aside to dry.

Using white cardstock, cut the largest oval in the Ornate Oval Dies set. Glitter the edges using Rajni Chawla’s Crystal Clear. Set aside to dry. Cut a piece of green paper from the paper collection using one of the Eyelet Oval & Basics dies. Ink the edges of the paper with Cottage Ivy ink then glue down onto the white Ornate Oval Die.

Stamp the Snowy Pine Cardinals onto white cardstock and cut out using the coordinating die. Color the birds with ink; I used the Stack and Store Daubers and the Dove Blender Pen. Once the birds, pine and the branches are colored add the snowflake paste then sprinkle with glitter and allow to dry. Once dry add Double Dots and attach to the oval piece. Using more Double Dots attach the oval to the card front.

Tie a bow and attach it to the oval. I used Scor-Tape and glue to adhere.

 For more beautiful projects featuring this wonderful brand new collection from Heartfelt Creations head over to the blog!

Wednesday, July 1, 2020

Inspiration Wednesday with Heartfelt Creations...

Good Morning Friends!  I hope you are all well and happy.  I'm here this morning to share a Folio I made using the wonderful Heartfelt Creations Wild Rose Collection.  I find this has become my go to flower as they are so easy and definitely pack a punch!


Inside of my folio:


Products Used:
Large 3D Wild Rose Shaping MoldHCFB1-487
Large Wild Rose Cling Stamp SetHCPC-3907
Large Wild Rose DieHCD1-7290
Small 3D Wild Rose Shaping MoldHCFB1-486
Small Wild Rose Cling Stamp SetHCPC-3906
Small Wild Rose DieHCD1-7289
Wild Rose Paper CollectionHCDP1-2113
Eyelet Oval & Basics Small DieHCD1-7156
Eyelet Oval & Basics Large DieHCD1-7157
Album Tags and Accents DieHCD1-7202
Ornamental Tags DieHCD1-7203
Swirly Accent Spray DieHCD1-7263
Rounded Lattice Window DieHCD1-7274
Deluxe Flower Shaping Paper Pack of 50 - WhiteHCPP1-475
Deluxe Flower Shaping KitHCST1-401
Rock Candy Stamens-SmallHCS1-459-4
Rose Hip Stamens - LargeHCS1-490
Stack and Store Daubers-Pack of 30HCDA2-450

Other Products: White Cardstock, Sap Green Archival Ink, White String, White Seam Binding, Scor-Tape, Die Cut Machine, Magnets, Hot Glue Gun

For more tips on creating with the Wild Rose Collection watch the tutorial at https://youtu.be/2ALPhFnT-qI.

Instructions: Click here to view more photos of this proect. My finished folio measures 6 1/2" x 8 1/2". To make the folio cut (2) 11” x 6 1/2" pieces of cardstock. I used 1/2" Scor-tape and adhered the two pieces together to make a 22” piece of cardstock. I scored on either side of the tape and folded. This makes the folio shape. Next I measured each side to 8 1/2" and trimmed.

I always finish the inside of the folio first so let’s begin. Cover the bottom portion of the inside with a pretty piece of the paper collection. I also cut a piece to cover the 1/2” fold and glued it down. Cut a piece of white cardstock with the Rounded Lattice Window die and also cut a piece of the paper collection to go behind. Glue the two pieces together then using glue on the curved portion of the die cut glue the piece to the bottom portion. This makes a pocket. I cut out a tag using white cardstock and more of the pretty paper. I took a piece of white seam binding and wet it and scrunched it and allowed to dry. When dry I used this for the tie on the tag. I glued a piece of paper to a tea bag which made it match the folio and inserted it into the pocket. I also hot glued a piece of the paper to a honey stick and cut the end into a flag shape.

Next we need to make a few flowers. Stamp the flowers with Magenta Hue Archival ink; do a few of the small flowers with buttercup. I used Archival Fern Green to stamp the leaves. These are all stamped onto the Flower Shaping Paper. Use coordinating dies to cut out the flowers and leaves. I used Stack and Store daubers with Magenta Hue and Buttercup Ink to color the flowers. On the pink flowers I colored the centers with Sap Green ink. On the leaves I used Magenta Hue in the center and Leaf Green around the edges. Lay the petals onto the shaping molds. Spritz with water and run through the die cutting machine. Lay out to dry. Once dry punch a hole in the centers and put the stamens into the holes. I use hot glue on the back of the petals to hold the stamens in place. I put glitter on the center stamen and on the flower petals. Allow to dry. On the yellow flowers I used prills as the centers. Allow them to dry. Hot glue a few flowers and leaves to the pocket with the tea bag and the honey stick.

Now we are moving onto the top inside of the folio. Here we want a fold out so cut a piece of white cardstock to measure 6 3/4" x 8. Score at 1/2” down the 6 3/4" side. Cut a piece of the pretty paper to fit the top piece of the folio and use Scor-Tape to adhere the white cardstock piece. Before you begin to cover the fold out portion, or the top part of the folio, apply a couple of magnets. Now glue down the paper over the 1/2" piece and you now have a fold out. I just chose more pretty paper to cover the fold out so you can add a photo or you could do some journaling on that. I also did a 2 1/2" pocket here and filled it with more tags cut from the paper. I cut a tag from the paper to decorate the pocket as well as two corner pieces cut from the paper collection. Always remember to make your project your own. Always decorate to suit your own taste…you can do as much or as little as you want.

Moving to the front cover of the folio, pick a bold piece of the paper and cover. Die Cut the white cardstock pieces: (2) of the Swirly Accent Spray die and the Eyelet Oval & Basics Small Die. Glue down the Swirly Accent pieces to the front of the folio. Then use the Eyelet Oval & Basics Large Die to cut an oval out of the paper collection. Glue the paper piece to the white eyelet oval piece. I used Double Dots to pop this oval piece up from the rest of the front to give more dimension.

Now it is time to add your flowers and leaves onto the front. Once I decided on the placement, I used hot glue to attach everything. The folio is finished.

Folios are really easy and make great gift items for friends and family.