Good morning friends and welcome to another Wednesday filled with Heartfelt Creations! We are going forward with the Pampered Pooch Collection and I'm sharing two more projects this morning. This first little doggie reminds me of Bella up to and including her pony tail!

My Best Friend
Heartfelt Creations Products and Products Carried in Their Shop:
HCPC-3760 Paw-fect Pooches Cling Stamps
HCDP1-272 Pampered Pooch Paper Collection
HCPC-3626 Classic Sunflower Cling Stamps
HCD1-753 Classic sunflower Die
HCPC-3696 Italiana Grape Vines Cling Stamps
HCD1-772 Italiana Grapevine Die
HCD1-7111 Classic Rose Vine Die
HCPC-3753 Classic Rose Cling Stamps
HCD1-7116 Paw-fect Pooches Die
Designer Dries Clear Glue
Express-O Self Prills
Minnie Pearl Prills
Memento Ink: Lady Bug, New Sprout, Bamboo Leaves, Dandelion, Cantaloupe and Rich Cocoa
HCST1-Deluxe Flower Shaping Kit
Other Supplies: Zig Clean Color Markers: 062 Dark Brown, 060 Brown, 065 Mid Brown, Standard Circles Large Dies, Canson Watercolor Paper, Green Cardstock, White Half Pearls, Grossy Accents, Dimensional Tape, Distress Ink in Tumbled Glass
Instructions:
My card size is 5 3/4 X 5 3/4. Make card base out of watercolor paper for strength and stability and set aside. I chose two pieces of the paper collection and on my top layer I used the largest circle die and on the blue piece of paper I cut the next smallest size. Now glue the two pieces of paper together making a matted circle. Next I stamped the image on a piece of the watercolor paper and colored the image using various distress inks and a brush. I then glued this piece under the two pieces of the paper making my image a matted piece. Next I stamped, cut out, colored and shaped the flowers and leaves and those sweet little lady bugs. Cover the lady bugs in Glossy Accents and set aside to dry. After having formed the flowers and glued the layers together I added the prills to the centers and left to dry. When they were dry I glued the leaves and flowers onto the front of my card. Next glue the two lady bugs where you like them. I cut out a sentiment from the paper collection and matted it with a piece of green cardstock. I stamped, cut out and covered the little bone with prills that had been colored with Lady Bug Ink to match my piece. I am finicky about things matching so sometimes I color the prills with Memento Inks. Once the little bone is dry, glue it to the top of the sentiment piece and use dimensional tape to adhere to the card front. Glue down the half pearls and your card is all finished.
Next up is my little puppy box:

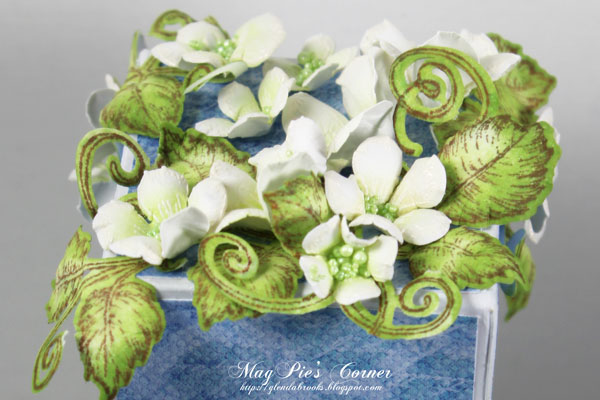
This next photo shows the top of the box and the sweet flowers I made.
Heartfelt Creations Products Used and Products Carried in their Store:
HCPC-3761 Your Paw Paw-fect Cling Stamp
HCDP1-272 Pampered Pooch Paper Collection
HCPC-3731 Berry Blossoms Cling Stamps
HCD1-793 Berry Blossoms Dies
HCPC-3755 Blushing Rose Stems Cling Stamps
HCD1-7113 Blushing Rose Die
HCST1-401 Deluxe Flower Shaping Kit
Express-O Yourself Prills
Lettuce Entertain You Prills
Designer Dries Clear Glue
Memento Ink in New Sprout, Bamboo Leaves and Rich Cocoa
Other Supplies: White Cardstock, Canson Watercolor Paper, White Embossing Powder
Directions: Box is 2 X 4. There are many directions for boxes on line and I just found one and made my box. Next I cut pieces of the paper collection and covered the 4 sides of the box and the top as well. Next I cut some panels to glue over the top of that with pictures of the little dogs on them. Next I cut the decorative piece from the paper collection and glued it along the bottom of the box and also one to glue to the top of the box so it just peeps out from under the lid. Now stamp, emboss, cut out and shape the flowers. Add the green Prills and set aside to dry. Stamp, cut out, color and shape the leaves and set aside. Next I stamped the little paw prints along one side of the box and added glue and prills to give the little paws dimension. The next step is to glue the flowers and leaves onto the top of the box. Once you have done this your box is finished. It can be used to hold a small gift or even some dog treats if you like.
I hope you have enjoyed these two projects and if need further inspiration visit the Heartfelt Creations blog and see what the other designers have made.


