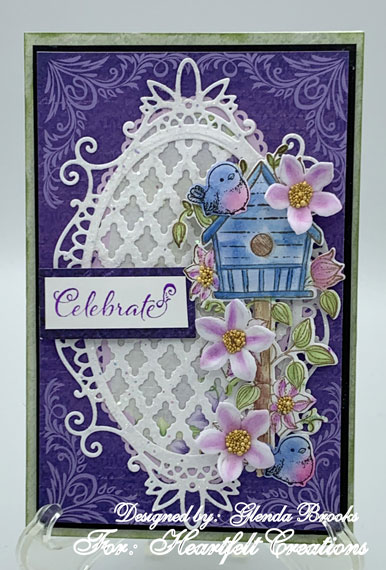
Good morning friends. I'm here this morning to share with you a card I made using the brand new Climbing Clematis Collection from Heartfelt Creations!
Climbing Clematis Paper Collection, HCDP1-2128
Clematis Cling Stamp Set, HCPC-3954
Clematis Die, HCD1-7355
Clematis Birdhouse & Trellis Cling Stamp Set, HCPC-3956
Clematis Birdhouse & Trellis Die, HCD1-7357
Regal Lattice Gateway Die, HCD2-7339
Eyelet Oval & Basics Small Die, HCD1-7156
Royal Elegance Frames Die, HCD2-7307
Celebrate Love Sentiments Cling Stamp Set, HCPC-3847
Art Foam Paper-10 Pack, HCFS1-465
Deluxe Flower Shaping Kit, HCST1-401
Stack and Store Daubers-Pack of 30, HCDA2-450
Hydra Sponges, RLHS100
Scor-Pal Measuring & Scoring Board, 173842
Dove Blender Kit, 241159
Designer Dries Clear Adhesive, 159723
Metal Tip for Adhesive Bottles, 352854
Rajni Chawla's Crystal Clear, PGM15015
Ranger Archival Ink Pad - Leaf Green, RACP436
Ranger Archival Ink Pad - Fern Green, RACP962
Ranger Archival Ink Pad - Majestic Violet, RACP494
Memento Dye Ink Pad - Lulu Lavender, TSMP504
Ranger Archival Ink Pad - Magenta Hue, RACP614
Memento Dye Ink Pad - Toffee Crunch, TSMP805
Memento Dye Ink Pad - Bamboo Leaves, TSMP707
Memento Dye Ink Pad - Danube Blue, TSMP600
Memento Dye Ink Pad - Tuxedo Black, TSMP900
Memento Dye Ink Pad - Rich Cocoa, TSMP800
Other Products: Die Cut Machine, Heat Gun, Misti Stamping Tool, Dimensional Tape, White and Black Cardstock
Instructions: My finished card size is 4" x 6". Make card base and cover with a piece of Sheet 3B of the paper collection. Next, I found one of the card fronts on the paper collection Sheet 3A. Mat that onto a piece of black cardstock to give it a more dimensional look and then using dimensional tape, adhere to the card front.
Using white cardstock die cut the center part of the Regal Lattice Gateway Die and the Royal Elegance Frames. Use the Eyelet & Ovals Basic die that fits best into the center of the Royal Elegance Frames and die cut an oval out of the lattice piece. Glue this lattice oval to the back of the Royal Elegance Frame and allow to dry. Using a sponge and Dries Clear Adhesive, add glitter to this piece and then glue it down onto the card front.
Stamp the flowers with Lulu Lavender ink on Art Foam and I allowed them to dry overnight. Using the stack and store daubers, color the centers of the flowers with Majestic Violet ink and then use coordinating dies to cut them out. Use the heat gun to shape the flowers. Add prills to the centers of the flowers and allow to dry.
Stamp the birdhouse with Rich Cocoa and the little birds with Tuxedo Black onto white cardstock and cut out with coordinating dies. Color with the Dove Blender Pen and various colors of ink to suit your taste. I used the flower shaping tools to add a bit of dimension to the birdhouse. Glue the birdhouse to the right side of the card front and add the flowers and the little birds and allow to dry.
Stamp the sentiment onto white cardstock. I covered part of the stamp with tape then inked it and pulled off the tape and stamped the one word. This allowed me to use one word of the sentiment. Mat this piece onto a piece of the Sheet 12B of the paper collection and then use a bit of dimensional tape to adhere to the card front. The card is finished!

5 comments:
What a lovely card - I love your gorgeous foam clematis!! And your colouring is gorgeous!
Oh my friend this is just ADORABLE! Love the little birdies and your flowers on the birdhouse are perfect! Awesome card!
Oh, my, this is just the prettiest thing! How sweet it would be to have this in my garden. The die and the way the paper frames it are perfection!
Wow! I love everything about this gorgeous card my friend. The colors are beautiful, the foam flowers are so pretty, the design is stunning and of course, the sparkle is amazing!
So delicate and intricate. It’s so dainty. Love it so much.
www.rsrue.blogspot.com
Post a Comment