Monday, May 30, 2016

Happy Memorial Day...A Day of Remberance....


Good morning everyone!  I hope you have a wonderful day planned with your family and friends.  I just wanted to run through and share another Heartfelt Creations card with you.  This was featured on the Heartfelt Creations blog last Wednesday and I'm just now getting around to posting it here.  I used the Under the Sea Collection and made this quick and easy card that will be a snap to mail. I have just fallen in love with this collection and you will be seeing it pop up here often.   


Heartfelt Creations Products Used and Products Found in the HC Shop:
HCDP1-266 Under the Sea Paper Collection
HCPC-3738 Coral Reef Collage Cling Stamps
HCD1-798 Coral Reef Collage Die
HCPC-3737 Under the Sea Coral Cling Stamps
HCD1-797 Under the Sea Coral Dies
HCPC-3736 Tropical Hibiscus Cling Stamps
HCD1-796 Tropical Hibiscus Dies
HCST1-401 Deluxe Flower Shaping Kit
Crystal Art Glitter
Dove Blender Pen
Designer Dries Clear Glue
Art Institute Metal Glue Tip
Tuxedo Black Memento Ink
Minnie Pearls Prills

Other Products Used:  Rangers Distress Ink in Peacock Feathers, Mowed Lawn and Pumice Stone, Chalk, Spellbinders Standard Circles Large, Dimensional Tape, Seam Binding, Hot Glue

Instructions:
My card size is 4 1/4" x 5 1/2".  Make card base and cover with a piece of the design paper and then cut circle in the front of the card.  Stamp, color and shape flower petals, port hole, turtle and fish.  I then shaped the fish, turtle and flower petals and added glitter where I thought it would look nice.  Set everything aside to dry.  Add the prills to flower center.  Next I chose another piece of the paper and covered the inside of the card and I cut out the center of one of the portholes on the paper and attached it to the inside of the card so it shows through the porthole.  I attached the fish I colored and glittered with a bit of dimensional tape to give it a pop.  I placed the turtle and a tag and glued them down with dimensional tape.  I then fussy cut a piece of coral and shell from the pretty paper and applied it with dimensional tape along the side of the porthole.  I found a little sentiment on the paper, cut it out and applied it with dimensional tape.  I tied a bow with seam binding and used hot glue to glue it down and then I applied the flower onto the bow.  

That's it for me this morning.  Enjoy this first holiday of the summer!

Wednesday, May 25, 2016

Heartfelt Creations Wednesday.....

Good morning everyone and welcome to another Heartfelt Creations Wednesday!  My card this morning is a birthday card and I'm so happy to share it with you.

I really fell in love with these Hibiscus flowers and I love them done in bold colors.

Heartfelt Creations Products and Products Carried in Their Store:
HCDP1-266 Under The Sea Paper Collection
HCPC-3736 Tropical Hibiscus Cling Stamps
HCD1-796 Tropical Hibiscus Dies
Designer Dries Clear Glue
Minnie Pearl Prills
Memento Ink in Bamboo Leaves, New Sprout and Rich Cocoa

Other Products:  Spellbinders Oval Regalia Die, Ranger Distress Inks in Peacock Feathers and Mowed Lawn, White Seam Binding, Hot Glue,Dimensional Tape.

Visit this link to see how to shape beautiful flowers:  https://www.heartfeltcreations.us/howto?view=videos&videoID=70

Instructions:
This Card is 5"x7".  Make the card base and cover the front with a piece of the paper from the collection.  Cut out the oval and adhere to card front.  Stamp,cut out, color and shape flowers and leaves.  I colored the Prills and adhered to the center of the flowers and set them aside to dry.  Next cut a length of seam binding and color with ink; scrunch and set aside to dry.  When dry tie into a bow and attach to the corner of the card using hot glue to adhere.  Next place the flowers and leaves where you like and hot glue them down as well. Cut out a tag from the paper collection and use dimensional tape to adhere to the front of the card.

Monday, May 23, 2016

You are Fintastic.......

Good Monday morning everyone! I want to share another card I made using the wonderful Under the Sea Collection from Heartfelt Creations!  I just love the beautiful fish and the Hibiscus flowers.  The white die cut is the Eyelet oval, also from Heartfelt Creations.  The fish and the sentiment tag are just cut out of the paper collection and popped up with dimensional tape to add a bit of extra interest to my card.  

A close up of the flowers and leaves.


Well that does it for me this morning.  Hope you all are well and ready to begin your week.  I have a busy one on tap with lots of yard work and then I need to chop weeds out of my garden.  It is almost to the stage where I can take photos to share.  I love digging in the dirt!

Friday, May 20, 2016

Sea Coral....

Good Friday morning everyone and welcome in as I share another card I have made for Heartfelt Creations.  Every now and then we all need a card that can mail with no extra postage; I call them CAS or 1-2 layer cards.  My card this morning is in that category.  Not a 3D flower in sight but I did use dimensional tape to add interest to my card.


Heartfelt Creations Products and Products Carried in Their Store:
Under the Sea Paper collection
HCPC 3737 Under the Sea Coral Cling Stamps
HCD1-797 Under the Sea Coral Dies
Art Institute Dries Clear Glue
Art Glitter - 85 Crystal
Memento Ink Tuexed Black
Dove Blender Pen

Other Suplies:  White Seam Binding, Scorp-Tape, Chalk, Ranger Distress Ink in Peacock Feathers, Dimensional Tape

Card Instructions:
My card size is 4 1/4" x 5 1/2".  Make card base and cut a piece of the design paper to cover the front.  Tie a piece of the seam binding around the paper and tie a knot.  Stamp, color with chalk and the Dove Blender Pen and then cut out the coral.Find a little turtle on the paper and use the die to cut it out.  Add glitter here and there on the coral and the turtle; set aside to dry.  Once dry use the dimensional tape to put them up and give dimension to the card.

Wednesday, May 18, 2016

Heartfelt Creations Wednesday.....

Good morning everyone!  I'm here this morning sharing another card I made using the Heartfelt Creations  Under the Sea Collection.  I have fallen love with this set and it makes me long to walk along the water's edge and stick my toes in the surf!


Heartfelt Creations Products and Products Carried in the HC Shop:
HCDP1-266 Under the Sea Paper Collection
HCD1-796 Tropical Hibiscus Dies
HCD1-797 Ybder The Sea Coral Dies
HCPC-3736 Tropical Hibiscus Cling Stamp Set
HCPC-3737 Under the Sea Coral Cling Stamp Set
Dove Blender Pen
Designer Dries Clear Glue
Art Glitter - Crystal
Memento Ink in Tuxedo Black,Rich Cocoa, New Sprout and Bamboo Leaves
Minnie Pearls Prills

Other Products Used:  White Cardstock, Spellbinders Standard Circles Large, Scor-Tape, Dimensional Tape, Distress Ink in Frayed Burlap, Seedless Preserves, Scattered Straw, Victorian Velvet and Broken China

Instructions:
My card size is 6" x 6".  Make card base and cover with a piece of the paper collection.  Cut a circle in the middle of the card front and set aside.  Stamp, cut out, color and shape flowers and leaves and set aside to dry.  Fill the centers will colored Prills.  Stamp, color, cut out and shape the jelly fish and shells.  Add glitter and leave to dry.  Next I cut out the turtle and a fish from the paper and added glitter to them.  Once everything is dry I used dimensional tape to adhere the shells, fish and the turtle to my card. Next adhere the jelly fish to the inside of the card so he shows through the circle on the card front.  Now it is time to decide on the placement of the flowers and leaves and glue them to the front of the card.

Monday, May 16, 2016

Make a Splash....

I'm here sharing the second Heartfelt Creations project from last week.  I love making tags and consider them to be little works of art!  I'm really loving this Under the Sea Collection and the beautiful hibiscus flower.


Heartfelt Creations Products and Products Carried in Their Store:
HCDP1-266 Under the Sea Paper Collection
HCPC-3736 Tropical Hibiscus Cling Stamps
HCD1-796 Tropical Hibiscus Dies
HCD1-780 Ornate Borders and Pockets
Morocco Memento Ink
Rhubarb Stalk Memento Ink
New Sprout Memento Ink
Bamboo Leaves Memento Ink
Rich Cocoa Memento Ink
Designer Dries Clear Glue

Other Products Used:  Canson Watercolor Paper, Seam Binding, Dimensional Tape, White Flower Soft colored with Adirondack Butterscotch Ink, Hot Glue

Visit this link to see how to shape the beautiful hibiscus flowers:
https://youtu.be/84Re1-gaq1o

Instructions:
Cut a piece of watercolor paper 4" x 8" and use the Ornate Borders and Pockets die to cut out the top of the tag.  Use the bottom portion of the die to cut a piece of the paper collection so that it fits snug up under the die cut portion of the tag. Glue paper down and set aside.  Stamp, cut out and color the flowers and leaves. Dampen them and shape then set aside to dry.  Next color the Flower Soft and glue to the stamen of the flowers. Cut a piece of the seam binding, spray with water and scrunch.  Dry with heat gun and tie a bow.  Glue down the bow, flowers and leaves with hot glue.  Next I found a sentiment on the paper and fussy cut to go on my tag.  Adhere the sentiment using dimensional tape.

Wednesday, May 11, 2016

Heartfelt Creaions Wednesday...Introducing the Under The Sea Collection

I always dreamed of retiring to the beach where I could spend my days strolling along the waters edge and dipping my toes in the surf.  Obviously that didn’t happen.  I’m in the hills of East Tennessee and a good distance from the ocean.  I love where I live, but some days I long for that stroll I spoke of.  This new collection can take me away for a visit when my soul longs for the tides.


You can take a walk along the edge of the deep blue sea, feel the warm sand between You toes and breathe in the salty air.  Balmy breezes tousle your hair and toy with the exotic hibiscus flower behind your ear as you stoop to snatch a lustrous seashell that has been swept onto the beach with the incoming tide. Cares and worries melt away because life really is better at the seaside.  The cool, crystal clear water lapping at the shoreline beckons you and you cannot resist the sudden urge to dive right in.  Before you know it you have been submerged into a magical underwater world where you find yourself settling on a jagged reef surrounded with burnished coral, glassy seashells and mystical sea creatures more beautiful than your imagination could ever conjure.  A peek behind the coral and waltzing seaweed finds you nose to nose with a school of fish gliding every so gently with their long, graceful flowing tails and glistening scales decorated with an abundance of shimmering and alluring colors.  Delicate sea horses and magnificent jelly fish dart and flit among the dancing aquatic plant life as to entertain you with a glorious underwater show being performed just for you.  Welcome to “Under the Sea”, the newest collection by Heartfelt Creations.  This water themed assembling of magnificent papers, stamps and dies will have you creating ravishing underwater scenes perfect for documenting your seaside vacations, ocean themed altered art pieces or salt water card creations.   The tranquil color palette of calming blues, greens and teals, paired with golden yellows, subtle shades of pinks, purples, corals and reds are sure to soothe your soul.  Creating projects with a tropical flair that will “make a splash” has been made simple with decorative papers boasting mesmerizing patterns of sea shells, florals, delicate swirls and alluring hibiscus blossoms.  The intricate, detailed stamp illustrations of underwater sea creatures, glistening seashells, and exotic hibiscus flowers are sublime for shaping and creating dimensional elements adding a realistic touch to any underwater themed paper craft design.  We invite you to take the plunge and come along with us on an underwater adventure as we explore Under the Sea!

Heartfelt Creations Products and Other Products Carried by HC
HCDP1-266 Under The Sea Paper Collection
HCPC-3736 Tropical Hibiscus Cling Stamp Set
HCD1-797 Under The Sea Coral Dies
HCPC 3737-Under The Sea Coral Cling Stamp Set
Rhubarb Stalk Memento Ink
Morocco Memento Ink
New Sprout Memento Ink
Bamboo Leaves Memento Ink
Dove Blender Pen
Guacamole Color Box Ink
Designer Dries Clear Glue

Other Products:  Canson Watercolor Paper, Zig Wink of Stella, Ivory Flower Soft, Butterscotch Adirondack Ink, Dimensional Tape, Hot Glue, Lace, Scor-Tape

Visit this link to see how to shape beautiful  hibiscus flowers:
https://youtu.be/84Re1-gaq1o

Instructions:
My card size is 6" x 6".  Make card base and cut a piece of the paper collection to cover the front of the card.  Stamp, cut and color flowers then moisten with a bit of water and use a stylus to shape.  Set aside to dry.  Once dry I colored a bit of Flower Soft and glued that to the stamen.  I added a strip of lace on the bottom of the card then found a piece of coral on the paper and cut it out with the die and glued it over the lace piece.  I found the tag that said "You Inspire Me" and fussy cut it and then matted a coordinating piece of the paper under it. I used dimensional tape to the back of the tag and then adhered it to the card. Next I placed the flowers, buds and leaves where I wanted them and glued them down.  

I stamped, colored and cut out the little turtle and then added glitter.  I used a stylus to sort of curve him to give him some dimension then I used dimensional tape to pop him up a bit.

Monday, May 9, 2016

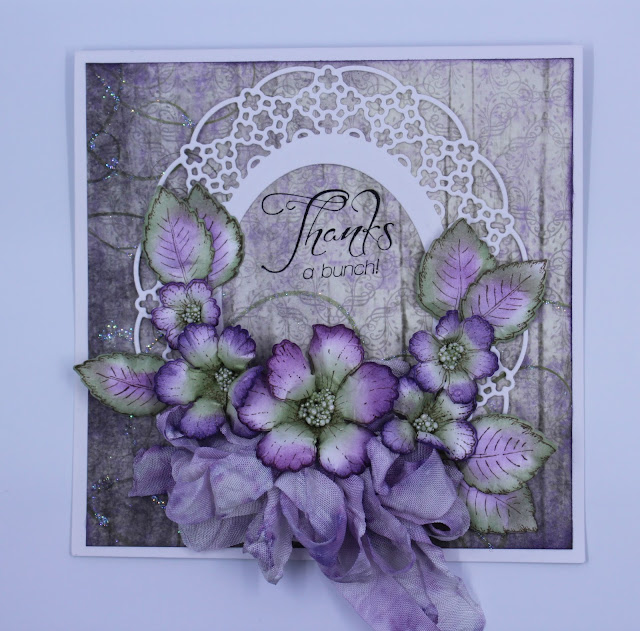
Thanks a Bunch.....

Good morning friends. I'm here to share another card I made using bits and pieces lying on my desk.  Every now and then I just have to take a smidgen of time and clean up so I can start fresh.  The flower petals (Heartfelt Creations Botanical Rose cling stamps) were already cut out as well as the pretty oval piece. This made my card came together really quickly.


I just colored the flowers with Distress inks and then dyed the seam binding to match.  All you have to do is wet the seam binding then dab it in the color, scrunch and let it dry.  I had white Prills and wanted a pale green so I poured some out over the ink pad and rolled them around with my finger.  They took the color pretty well and I am able to utilize my supplies better.

Well that's it for me this morning.  My plan is to attack the weeds in my garden this morning.  It's a dirty job, but one that must happen if I plan to be able to find my vegetables!  I hope you all have a wonderful day!

Friday, May 6, 2016

Pretty In Pink....

Good morning everyone!  We are experiencing Blackberry Winter here in East Tennessee along with cool temps and snow showers in the higher elevations.  Do you have these little cold snaps where you live and do they have names?  We begin with Red Bud Winter when the Red Bud trees bloom then Dogwood winter; when the Dogwoods are in bloom then Blackberry Winter and yes, you guessed it, the blackberries are blooming.  My grandmother spoke of these "winters", and there are more, but these are the only ones I'm sure about.

I'm here this morning to share another of my Heartfelt Creations projects featured on their blog this week! If you would like to purchase any of the items used in creating this card just visit the Heartfelt Creations shop.  There are lots of beautiful items there.


Heartfelt Creations Products Used and Products Carried in the HC Shop:
HCST1-401 Deluxe Flower Shaping Kit
HCDP1-263 Sunrise Lily Paper Collection
HCD1-736 Classic Leaf Die
HCPC-3545 Open Leaf Cling Stamps
HCPC-3608 Arianna Blooms Cling Stamps
HCD1-748 Arianna Blooms Die
HCD1-728 Timeless Armour Die
HCPC-3474 Heartfelt Expressions Cling Stamps
Memento Ink- Rich Cocoa
Colorbox Chalk Ink-Guacamole
Designer Dries Clear Glue
Minnie Pearls Prills

Other Products Used:  Memento Ink-Angel Pink, Spun Sugar Distress Ink, Green and White Card Stock, Canson Watercolor Paper, Scor-Tape, Hot Glue, Dimensional Tape

Instructions:
My card is 4 1/4" X 5 1/2".  Make card base and cover with a piece of the paper collection.  Stamp, cut out, and color flower petals and leaves.  Dampen the petals with water, shape and set aside to dry.  Add Prills to the center of the flowers and again set aside to dry.  Stamp and cut out the sentiment; add dimensional tape to the back and adhere to the front of the card.  Cut out the heart piece and attach to the card front. I did a bit of shaping to this piece so that when I glued it down it was rounded a bit to give more dimension to my card.   Next I placed my flowers and leaves and glued them down

Thanks for stopping by this morning.  The weekend is just around the corner so have a great one!

Wednesday, May 4, 2016

Wednesday With Heartfelt Creations....

I'm here this morning to share with you my project and to let you know this is my first post after being selected to join the Heartfelt Creations Design Team! I am humbled and honored to have been chosen and I feel like I have come home. I want to thank all of you for supporting me along the way; without you this would not have been possible!  I hope I can inspire you with my project, so let's get to it.


I made a tag using the Berry Cafe Collection and find I've fallen in love with these lovely papers, stamps and dies.  They bring back memories from my childhood!

Heartfelt Creations Products and Products Carried in the HC Shop:
HCD-745 Luggage & Tags Die
HCDP1-265 Berry Cafe Paper Collection
HCPC-3732 Blooming Berries Cling Stamps
HCPC-3735 Sweet As Honey Cling Stamps
HCD1-793 Berry Blossoms Dies
HCD1-795 Sweet As Honey Craft Dies
Designer Dries Clear Glue
Dove Blender Pen
Double Dots 3D Foam Squares

Other Products Used:  Ranger Distress Inks in Squeezed Lemonade, Peeled Paint, Forest Moss, Tea Dye, and Wild Honey, Pan Pastels Chalk, Glossy Accents, Dimensional Tape, Tag

Instructions:
My tag size is 3 1/8" x 6 1/4".  Cover tag with a piece of the paper collection and set aside to dry.  Stamp, color and cut out the bee hive,  strawberries and the fence pieces.   I covered all the strawberries with glossy accents and set aside to dry.  Next I found a tag on the paper and used the tag die to cut out.  Now that you have all the pieces assembled it is time to decide their placement on the tag. I used 3D foam squares and dimensional tape to adhere down the pieces.  I curved the fence a bit before sticking it down to give it a more life like appearance.

Now for more inspiration please visit the Heartfelt Creations Blog!  All the designers strive to create projects that will delight you!